
[Note: This article was originally published in Autumn, 2017, and has been updated to reflect changes over the past 12 months. This is the 2nd of what will be 8ish articles on how to Zwift, the whole series binge-published over the next 2 weeks.]
Zwift is not hard to join; not hard to commence; but it’ll take you a good while to plumb its depths. Last week I wrote you a primer on the easiest, least expensive Zwift entry point: using Virtual Power to gauge your effort. That primer gave you just enough to get you set up with the hardware and software you need to simply ride.
Now that you’re turning the pedals and exploring the virtual world, let’s take a look at how you can interact with that world and the other people who occupy it.

Whoa… Where am I?
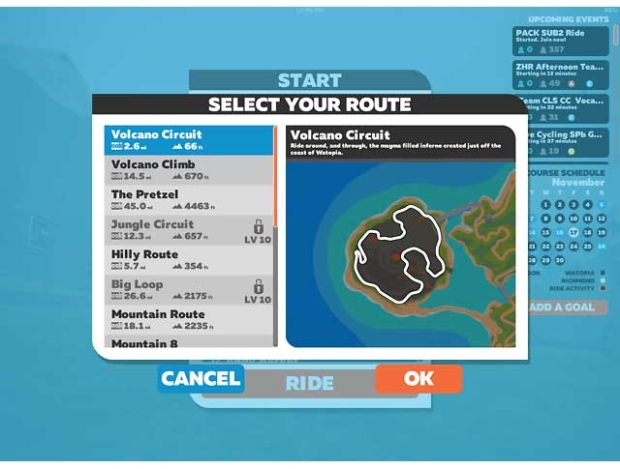
One of the fun aspects of Zwift is exploring the different courses and locales available in the game. Zwift currently offers several different routes in 5 different locales: Watopia (Zwift’s original virtual world), London, England, Richmond, Virginia, New York City and Innsbruck, Austria (the last 2 added since we first wrote this a year ago). Thus far, we’ve just picked the default route for our discussion so far, but what if you want to change it up?
The available course is dictated by the date, so on a given calendar date, everybody is riding the same locale. The course schedule is displayed on the right side of the Start screen, so you can plan ahead a bit if you want to ride a certain course.

Within each course, you can choose a specific route from the list of available routes. Within each locale, all of the routes are interconnected. As you ride, if you don’t change direction at turns, you will stay on the route you selected at startup. Some routes have to be earned - for example, you must achieve level 10 to unlock the Jungle Circuit.
What is all this Stuff on the Screen? It’s the Zwift HUD (Head’s Up Display)
Once you’ve chosen your route and started your ride, you may find the amount of information on screen overwhelming at first. The Zwift HUD (Head’s Up Display) provides a lot of information about your current ride. Let’s break the screen down:

Sensor Information (1)
In the upper left corner, you’ll see your sensor information. This includes your wattage, and if you have other sensors paired, you can see your RPM and heart rate.
Ride Statistics (2)
In the top middle of the screen, you will see the values that are derived from your sensors in conjunction with the virtual world itself. There are quite a few bits of information here:
Speed - Your speed is calculated based on your power, your weight, and the course. If you are putting out a hard effort to climb a hill with a 10% grade in Zwift, your bike computer may register 20 mph but Zwift may only read 5 mph. This is Zwift simulating the terrain and conditions. With zPower, you don’t feel the increased resistance going up a hill or decreased resistance going downhill - you just keep putting out the work and your progress will be calculated accordingly. If you want to get a more realistic feel, you’ll need a smart trainer.
Mileage - The distance you’ve ridden in Zwift during this ride.
Elevation - How many feet or meters of elevation you’ve gained during this ride.
Elapsed Time - How long you’ve been riding.
Progress Bar - The Orange and gray bar indicates how much progress you are making towards your next rider level. In the image above, the rider is at level 1 and is roughly half way to level 2. Your rider level is one of several motivational features in Zwift we’ll discuss in a future installment.
Map (3)
A map is displayed in the upper right corner. You can click/touch on the map to toggle 3 different map views. This is also where you will see the grade of the incline or decline you are currently riding.
Riders Nearby (4)
On the right side of the screen, you will see a list of riders that are near you. You can see how far ahead or behind the riders nearby are. If you click on a rider’s name, you will switch views so you can watch them. A “Back to Me” button will be displayed in the lower left corner of the screen so you can get back to your own ride. You may also see some other ways to interact with others here - you may see messages sent from other riders, and you may also have the opportunity to give somebody a thumb’s up (aka, a “ride on!”) when they reach an achievement.
Power Ups (5)
The white circle is where you can see your available Power ups. Power ups are another fun feature you earn randomly when you pass through different checkpoints. You can use the selected power up by hitting the spacebar on your keyboard, or touching the power up circle on an iPad.
Messages (6)
This is another motivational tool we’ll discuss shortly.
In addition to the aforementioned display areas, There are a few other things that will pop up on screen at times. One of the more useful ones that you can interact with is the intersection indicators that will show up at the bottom of the screen:

These will be displayed as you are approaching an intersection. By default, one of the directions will be pre-selected (outlined in orange) based on the route you chose during the ride startup, and you don’t need to do anything - just keep riding and you’ll go that way. But if you want, you can change direction by clicking on the non-selected icon or using the Left/Right arrows on the keyboard, or touching the icon on your iPad.
Another way to change direction is to do a U-Turn: You can do that with the Down arrow on the keyboard. Doing a U-turn at 30mph on gravel is pretty impressive!

OK, I’m riding and I like what I see, but how do I drive this thing?
Now that you’re more familiar with what you’re seeing, let’s talk about how you take control. Zwift provides a lot of in-game options which are accessed via keyboard shortcuts on the PC or Mac, or via a touch menu on the iPad. Zwift provides different camera views, rider actions, workout controls, direction controls, messaging, and other ride options using keyboard shortcuts or a touch menu on iOS devices, as shown in the iPad Mini screenshot above.
PC and Mac Keyboard Shortcuts
Camera Angles
1: Default view
2: Third-person view
3: Rider perspective
4: Side view
5: Rear view
6: Head on view
7: Spectator view
8: Helicopter view
9: Bird’s eye view
0: Panorama version of current view
Rider Actions
F1: Stick out elbow
F2: Wave hand
F3: “Ride On!”
F4: “Hammer Time!”
F5: “Nice!”
F6: “Bring It!”
F7: “I’m toast”
F8: Bike bell
Direction Controls
Down Arrow: U-turn
Left Arrow: Left Turn
Right Arrow: Right Turn
Other Controls
Spacebar: Use power up
ESC: Display “End Ride” screen
F10: Screenshot
A: Device pairing screen
G: Toggle Watt/HR graph
M: Group message
P: Enter a promo code
T: User Customization screen
Up Arrow: Show actions/options menu (use left/right arrows to select)
Workout Controls
E: Display workout selection screen
Tab: Skip workout block
Page Up: Decrease workout intensity
Page Down: Increase workout intensity
For your convenience, we’ve made a handy printable cheat sheet that you can download.

iOS Controls
The iOS app is full-featured, and utilizes a touch screen interface. If you click on the screen while you ride, a control menu will be displayed (above).
You can scroll left and right for more options. Touching the camera icon will toggle through the different views, and you can touch anywhere outside the on-screen menu to hide it. I found that I prefer the iOS version on the iPad mini because it’s easier to touch a screen instead of pressing a key when moving and sweating.
Hey, I want a kit like that guy had!
By now, you have probably noticed a wide variety of different jerseys, bikes, and rider appearances as you encounter other riders within Zwift. Let’s make sure we’re looking good while we’re at it! Zwift allows you to customize how your avatar looks - you can change kits, bikes, and other rider attributes. You can get to the user customization menu from two places:
- Press T during your ride
- Pause the ride, and select “Customize” on the right side of the Pause screen.
Either of these methods will bring up the User Customization screen. On the left side you can select different aspects of your avatar that you want to customize - your kit, your bike, and the appearance of your avatar. In the beginning, you have a fairly limited selection of gear options, but as you continue to ride, you will earn new gear - kits, bikes, wheels, socks, and more.

If you really want to look good, you need the Slowtwitch kit. To get the kit, type P during your ride to enter a promo code. Enter SLOWTWITCH and press Enter. The Slowtwitch kit is now all yours - wear it with pride.

I just hit the “I’m Toast!” key. I wanna go home. How do I get out of here?
Once you are ready to wrap up your ride, you can simply coast to a stop. Your avatar will put a foot down and stand still. The Menu button is then displayed in the lower left corner of the screen. Alternatively, you can hit the ESC key on your keyboard to end your ride.
After your ride, you’ll see your statistics:

Hitting the End Ride button will allow you the opportunity to save the ride to your history and share it on Strava, MapMyRide, Garmin Connect and others.
It probably occurred to you that I wasn't entirely transparent. I called this a "deeper dive" which it was. But in reality we’ve just scratched the surface with Zwift. This app is cycling's Dungeons and Dragons, but executed at some percentage of your FTP with your feet turning circles. Our goal above was to add some fun to your first ride in Zwift. Very soon we’ll look at some more advanced functions within Zwift to enhance the ride and familiarize ourselves with the Zwift virtual world. We will look at the different ways Zwift provides motivation and allows us to interact with other people. We will take our Zwift experience beyond just a ride and learn how to perform workouts and share information with a coach or friends.
Ride on!
Here's the whole series:
1. Welcome to Watopia: Install Zwift using virtual power, the most cost-effective option.
2. Zwift, The Deeper Dive: One more layer below the surface.
3. It's Game On With Zwift: Zwift is a game, but also a virtual community.
4. Zwift: Let's Dance! The social aspect; Zwift is a Massive Multiplayer Game.
5. Zwift: A Potent Tool for Training: Zwift’s workout mode.
6. On Zwift Every Day is Race Day: Zwift's racing culture and community.


