1 of 20 photos
Alas, your bike does have something called a headset. The key feature of this device is a great one – it allows you to navigate the streets in a turny-steery sort of way. Or - it’s just what allows your handlebars to turn left and right.
Headsets seem to be one of those black-magic bike parts, in a league with bottom brackets and rear hubs. People know that they do something mechanical, and need service from time to time, but may have no clue what that service is – or even how the part generally works.
But there is good news, at least when it comes to headsets. Similar to bottom brackets and rear hubs, there are a LOT of different designs. However, no matter what specific type of headset you have, they all function in a similar way (which is not always the case with BBs and hubs). As well, the required tools – while not inexpensive – generally apply to most types of headsets, so it should be a one-time purchase.
Let’s Get Started
Part one of this two-part series covers the removal and installation of a modern threadless, external-style headset. Part two will cover headset adjustment, troubleshooting, and general headset theory. Does it get more exciting than that?
You may ask - why cover external-style headsets? Aren’t those old school? Yes and no. While many new frames feature an “integrated” or “internal” style headset, the basic function is the same as an external. The reasons I want to cover external are:
1. They require big/bad tools, which many people don’t know how to use or don’t understand (so we’ll show you).
2. While they’re not standard equipment on many triathlon bikes these days, they are still very common on road bikes, mountain bikes, cyclocross bikes, etc.
3. I still think they are superior to 90% of internal headset designs – in terms of frame longevity, cost, availability of parts, and ease of service.
4. I think (or hope) that you’ll find this interesting, if nothing else.
The Tools
I’m covering what I consider to be a “full” headset service, minus the prepping phase (similar to my piece on bottom brackets, linked at the bottom of this article). 99% of frames that are painted will have overspray on places you don’t want it. Places like the ends (or “faces”) of the bottom bracket shell and head tube. To ensure proper installation and long bearing life, it is always a good idea to “face” the frame – i.e. have your bike shop use specialty tools to cut off the excess paint and leave you with perfectly parallel faces of your head tube and BB shell. I’m lucky enough to be working with an unpainted titanium frame, so this step was not necessary.
Here are the tools that I did need:

2 of 20 photos
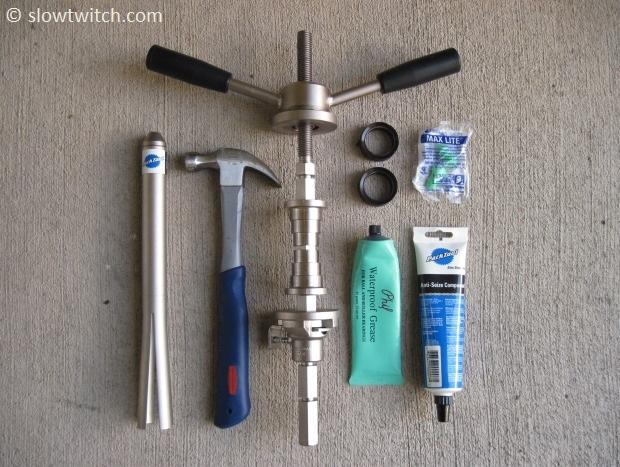
1. Headset press
2. Headset cup remover
3. Hammer
4. Earplugs
5. Manufacturer-specific cup adapters (sometimes optional)
6. Degreasing solvent (not pictured)
7. Grease or anti-seize compound
8. Surgical gloves (not pictured)
I’m using the headset press and remover from Park Tool. They only have one press, and it works on every headset that I know of. There are several different versions of the removal tool, however. Mine is the “standard” size, for either 1” or 1 1/8” diameter steer tubes. Larger diameters require a larger tool (i.e. any tapered steerer tubes, 1 ¼”, 1.5”, etc).
I’m starting with the stem and fork already removed. I’m confident that all of you can figure that step out on your own – all you need are a 5mm allen wrench for the top cap, and the appropriate size Allen or Torx wrench for your stem bolts (typically 4mm Allen).
The reason I’m removing my headset is simple: I have a titanium frame. The headset cups pressed in to this frame are aluminum. Titanium is a great frame material, but it doesn’t always play nice with other metals.
Specifically, it causes dissimilar metal corrosion over time. Left untouched, this can cause those aluminum headset cups or that aluminum seatpost to literally seize in your frame – sometimes permanently. To combat this, you should use an anti-seize compound on anything that inserts, threads, or presses in to a titanium frame.
I did apply anti-seize to the headset cups when I first installed them, but that was well over a year ago. My rule of thumb is to remove each of these parts, wipe them down, apply new anti-seize, and re-install them at least every two years on a ti frame. On aluminum or carbon frames (which use standard grease or carbon paste), you can probably stretch it another year if you really want, but it is still good practice to periodically remove, clean, grease, and reinstall your headsets, seatposts, and bottom brackets. If you sweat a lot or live in a humid/coastal region, you will likely have to perform this service at more frequent intervals.
To begin, you need your headset removing tool:

3 of 20 photos
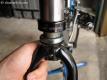
You can remove either the bottom or top headset cup first; it doesn’t matter. The tool works just like it looks – you force it in one end of the head tube, it expands, and you hammer the cups out.
***Note – my Cane Creek headset has removable bearings that drop in and out very easily (which is great – they’re replaceable). I already removed the bearings before hammering out the headset. But – not every headset has this feature. If the bearings are *not* removable from the cups, simply hammer out the complete assembly with bearings inside.
***Note – my Cane Creek headset has removable bearings that drop in and out very easily (which is great – they’re replaceable). I already removed the bearings before hammering out the headset. But – not every headset has this feature. If the bearings are *not* removable from the cups, simply hammer out the complete assembly with bearings inside.

4 of 20 photos
The top of the tool will stick out the other end of the head tube. I pull up on the closed end, and push from the bottom on the open end.
Insert the tool until you head that distinctive CLICK. That’s right when the tool passes over the edge of the headset cup and contacts the frame:
Insert the tool until you head that distinctive CLICK. That’s right when the tool passes over the edge of the headset cup and contacts the frame:

5 of 20 photos
Now it’s time to put in those ear plugs, and get to hammering. I’d take a photo of this process, but it’s pretty self-explanatory, and I don’t have six hands to hold cameras and hammer at the same time.
The key thing you want to remember is to support the cup you’re hammering out. Just use an old shop rag in your hand. This step isn’t absolutely necessary, but it helps avoid losing a headset cup that comes flying out of your frame.
The key thing you want to remember is to support the cup you’re hammering out. Just use an old shop rag in your hand. This step isn’t absolutely necessary, but it helps avoid losing a headset cup that comes flying out of your frame.

6 of 20 photos
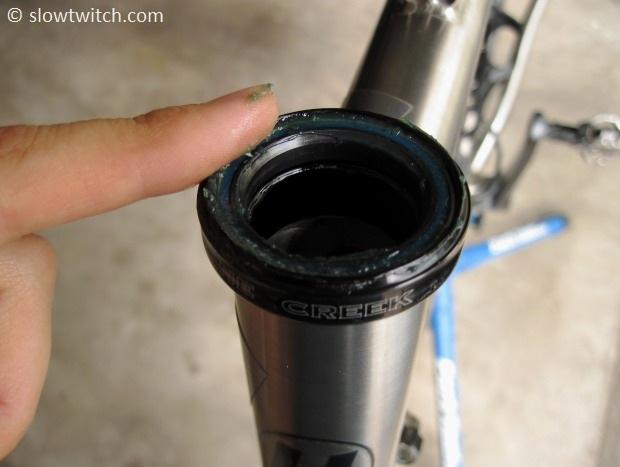
Once the first cup is removed, simply repeat the process for the other one.
Now, do what every good mechanic does and completely wipe out the head tube. It will likely have some nasty old grease and dirt… so take 30 seconds and clean it well.
Now, do what every good mechanic does and completely wipe out the head tube. It will likely have some nasty old grease and dirt… so take 30 seconds and clean it well.

7 of 20 photos
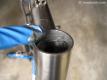
Now it’s time to apply new anti-seize (or grease on a non-titanium frame). Be sure to get the inside of the head tube AND the ends, or faces of the tube.
8 of 20 photos
I also apply a thin layer to each headset cup for good measure. Better to use a little extra than have a permanently-stuck headset.
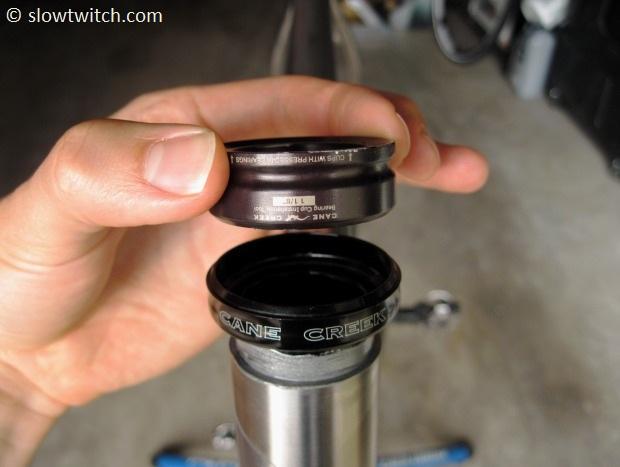
Next, I set the upper headset cup in to the frame and put my Cane Creek adapter inside. It is a two-sided adapter; one for cups without permanent pressed-in bearings (like mine), and one for cups with pressed in bearings.
Not every headset out there has adapters like this available. The main idea behind them is to make a perfect fit with your headset press, to avoid damage to the cups, and help press them in perfectly straight. If you don’t have these adapters, or they’re not available for your particular headset, Park supplies universal adapters with the big press tool, which are stepped down in diameter at various intervals to fit most headsets.

9 of 20 photos
Next, the press goes in the top of the head tube.

10 of 20 photos
On the bottom end of the head tube, stack up the lower cup, adapter, and bottom clamp of the headset press. Push this whole assembly up as far as possible on the shaft of the press, until it clicks in to place.
11 of 20 photos
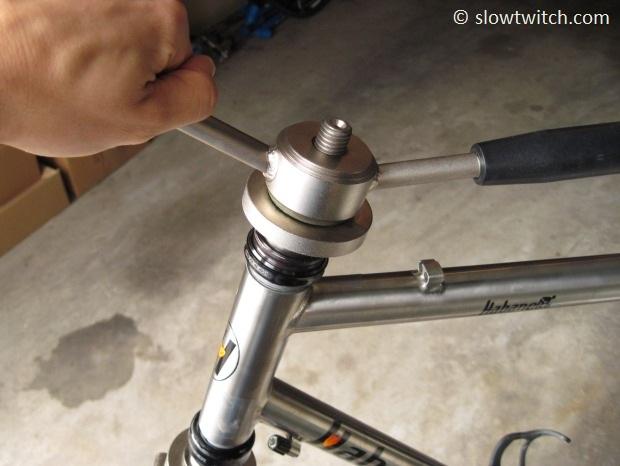
Now you’re ready to start pressing that headset in.
WAIT!
Before you do – check the alignment of the logos on your headset. Some people must have them lined up perfectly straight, or their reality comes crashing down and they can’t ride their bike. Personally, I don’t really care if the logos are lined up or not… but if you want them facing a certain direction, now’s the time to do it.
Start turning the handles slowly. Use two hands; one on each handle (I had to hold the camera with one hand… don’t follow my bad example).

12 of 20 photos
As the headset presses in, check the alignment often. Both the top and bottom cups need to be pressed in straight; front-to-back, and side-to-side. If they are pressing in crooked, STOP. If you’re not too far along, you can usually just remove the press and use your hand to straighten things out. Also be sure that the headset press itself isn’t aligned off-center in the head tube.
We’re getting closer…
We’re getting closer…

13 of 20 photos
Once the headset finally starts to bottom out on the frame, you may be wondering how tight it should be. Super-sumo-crushed-in-to-the-frame?
I say: nice and snug. Or – “one grunt” on the farmer’s torque wrench scale. You want to be sure that the headset is firmly in place and not hanging out with 1mm or more not pressed in. Also, it should go without saying that you want to be sure that BOTH top and bottom cups are all the way in. They won’t necessarily press in at the exact same rate – keep turning those handles until both are fully seated.
Once the cups are pressed in, remove the headset press. Oh, and be a good mechanic and wipe off any excess grease or anti-seize from the frame.
Now we need to assemble the “guts” of the headset. Before putting the bearings in, I always put a layer of grease inside both cups.

14 of 20 photos
Next drop the top bearing in – angled side down, flat side up. Keep in mind that not all headsets have identical top and bottom bearings. Pay attention if and when you remove them, so you know which is which.
It should also go without saying that this is the time to check to see if you need new bearings. Spin them with your fingers. Smooth as Grandma’s beef gravy? You’re good to go. Crunchy, gritty, and/or making noise while riding? Replace them. The beauty of headsets with drop-in bearings is that you can get replacements for much less money than a whole new headset… or a lot less effort than sending a pricey headset back for warranty. I try to not use more than one or two types of headsets on all of my bikes, so I can easily keep replacement bearings on-hand at a low inventory cost.
It should also go without saying that this is the time to check to see if you need new bearings. Spin them with your fingers. Smooth as Grandma’s beef gravy? You’re good to go. Crunchy, gritty, and/or making noise while riding? Replace them. The beauty of headsets with drop-in bearings is that you can get replacements for much less money than a whole new headset… or a lot less effort than sending a pricey headset back for warranty. I try to not use more than one or two types of headsets on all of my bikes, so I can easily keep replacement bearings on-hand at a low inventory cost.
15 of 20 photos
Now that the bearing is installed, I put another layer of grease on top. Don’t be shy with this – especially if you ride cyclocross, mountain bikes, have sweat glands, consume sports drink, ride in the rain, or if your favorite day of the week ends in “-day”. (Just do it!)
Your bearing cartridge has grease inside, but this extra layer on top acts as an additional barrier, and helps prolong its life. The rule of thumb I use for grease application on headset bearings harks back to my days working in a restaurant kitchen in high school. The kitchen manager’s rule for application of Caesar salad dressing was (literally): “Too much is never enough.” Same with grease. Go to town.
Your bearing cartridge has grease inside, but this extra layer on top acts as an additional barrier, and helps prolong its life. The rule of thumb I use for grease application on headset bearings harks back to my days working in a restaurant kitchen in high school. The kitchen manager’s rule for application of Caesar salad dressing was (literally): “Too much is never enough.” Same with grease. Go to town.

16 of 20 photos
Now we need to repeat the procedure for the bottom bearing. Smudge the whole thing in grease, and put it on the fork steerer. It should face the opposite direction of the top bearing – angled side up, flat side down.
***Note: At this point in the service, I also grease the steerer tube of the fork – as mine is made of steel, and I don’t want it to rust. It is also not a bad practice to do the same on aluminum steerer tubes. Most mechanics recommend that you wipe off any grease from the area around which the stem clamps.
***Note: At this point in the service, I also grease the steerer tube of the fork – as mine is made of steel, and I don’t want it to rust. It is also not a bad practice to do the same on aluminum steerer tubes. Most mechanics recommend that you wipe off any grease from the area around which the stem clamps.
17 of 20 photos
Next, insert the fork in to the frame.

18 of 20 photos
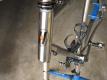
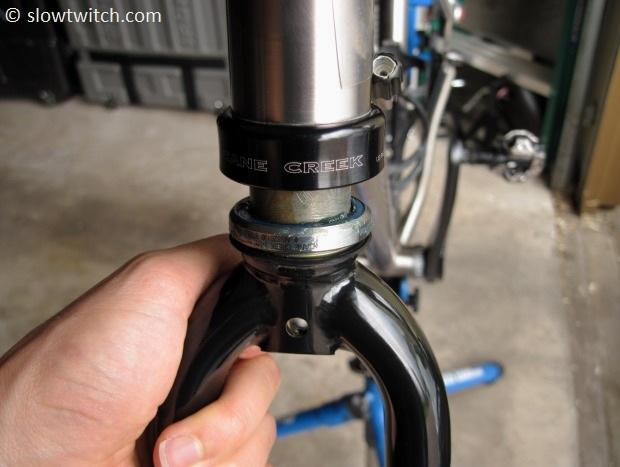
Up top, there is usually a series of parts that go in a specific order. Most modern headsets look similar to mine. First is a centering cone, which keeps the steerer tube snug and centered in the bearing (the bottom silver piece in the photo). Next is typically some sort of thin spacer or shim (the middle piece with rubber gasket). Finally, you’ve got the headset top cover.

19 of 20 photos
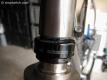
Be sure that the centering cone is pressed all the way down, and then press the other parts down in to place.
20 of 20 photos
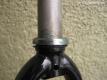
That’s it! It’s a headset!
For those who don’t desire to do the full service I described, there is a basic procedure you can do. Call it a simple bearing check. To do this, simply take the stem off, drop the fork out, and check the bearings. If they’re in good shape, re-grease them and put everything back together. If they’re cooked, replace them and then put everything back together. The big step you’re skipping is the removal and re-installation of the headset cups (which requires the large press tool and cup remover). This is a good way to get your feet wet, without requiring expensive tools or much of your time. And – for most frames with integrated headsets, this simple service is the only service. There are no headset cups that press in to the frame… it’s just the bearing that drops straight in to the frame. While this makes service simple, the obvious concern is that any major headset problem can only be cured with a complete new frame. You can’t just knock out the headset and put a new one in.
But – that’s a discussion for another day.
Part two of this How-To will cover stem installation, headset adjustment, as well as a general discussion on why headsets are designed the way they are, and how they do what they do. Stay tuned.
All images © Greg Kopecky / slowtwitch.com