1 of 20 photos
This new Madone is a completely different beast, however. It has an integrated seat mast, Kamm tail tubing, and of course – these high-tech brakes.

2 of 20 photos
The photo above shows the two main parts of the front brake. The rear brake is similar in design, but not identical (which we’ll detail later in the article). With the two pieces put together, it actually looks and feels similar to a standard dual-pivot road caliper. The key difference is that the pivots mount directly to the frame. I don’t know if Trek uses this term (or if I’m coining it right now), but it seems to me like a ‘direct mount brake’.
As you could guess, the mounting points for this brake are different than a normal caliper. As a result, the fork is proprietary:
As you could guess, the mounting points for this brake are different than a normal caliper. As a result, the fork is proprietary:

3 of 20 photos
When I first got my hands on the brakes, I wondered if Trek made several versions of them. After all, the rate of cable pull between other manufacturers’ brake calipers and levers can vary. What if I want to use Campagnolo brake levers with these calipers? Or Shimano? Or SRAM? Are there three (or more) different Trek calipers to work with these?
The clever folks at Trek thought of that:
The clever folks at Trek thought of that:

4 of 20 photos
Yes, those are limit screws. On a brake.
While limit screws are normally found on front and rear derailleurs, this brake caliper uses them to adjust for different levers. Trek supplies this handy chart:
While limit screws are normally found on front and rear derailleurs, this brake caliper uses them to adjust for different levers. Trek supplies this handy chart:

5 of 20 photos
I’m using Shimano Ultegra Di2 levers, so that means I unthread the L screw, and thread in the H screw before mounting the caliper. If I was using SRAM or Campy levers, I’d thread in L, and unthread H.
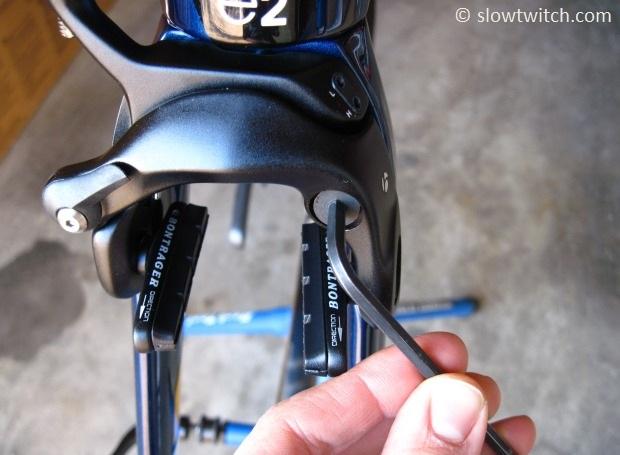
Now that we have the limit screws taken care of, let’s mount the front brake. There are two 4mm flat-head hex bolts; one for each of the two main arms. Note the small ‘nub’ that mates with a matching small hole on the fork – the brake uses this as a point of leverage.
Now that we have the limit screws taken care of, let’s mount the front brake. There are two 4mm flat-head hex bolts; one for each of the two main arms. Note the small ‘nub’ that mates with a matching small hole on the fork – the brake uses this as a point of leverage.

6 of 20 photos
Thread the bolt down, and tighten it to 6-8 newton meters.
7 of 20 photos
Next, bolt the second arm on:

8 of 20 photos
The cable and housing install similar to a normal road caliper. I followed my usual rule of “If a ferrule fits – use it”.
9 of 20 photos
Next, I tightened down the anchor bolt, which aids in setting up the pad placement.
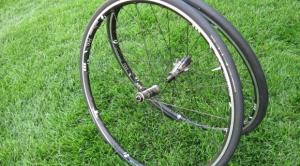
Just where do I set up those pads? What about wide rims? The stock wheels with this bike are Bontrager’s updated Race X Lite model (which we reviewed in 2012 – linked at the bottom of this page). These wheels follow the trend of wider-is-better, and have 23mm rims (measured outside-to-outside at the braking surfaces).
Bontrager did the math for us to accommodate various rim widths. Each brake arm has two washers that may be moved to either side, to space the pads appropriately:

10 of 20 photos
These 23mm rims get one spacer on each side of the brake arm.
To set up the pad properly within the braking surface, I followed my normal procedure – loosen the pad bolt with one hand, squeeze the brake lever with the other hand, and tighten the bolt.
To set up the pad properly within the braking surface, I followed my normal procedure – loosen the pad bolt with one hand, squeeze the brake lever with the other hand, and tighten the bolt.

11 of 20 photos
The pad adjustment was my only gripe with the front brake. The pad holder fell victim to what I call “tighten-and-swivel syndrome”. What’s that? As I tightened the bolt on the pad holder, it caused the whole pad to rotate – no matter how hard I squeeze the brake lever.
This isn’t a deal breaker – just makes it more difficult to properly set up the pads. In my book, Shimano sets the gold standard in this regard. On a Dura Ace, Ultegra, or 105 brake, the pads tend to stay very straight (making setup VERY fast and easy).
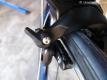
With the front brake installed, I wanted to take a look at how the quick release cam works. When closed, it is in-line with the rest of the brake. To open the quick release (to make the caliper open wider for wheel removal) – you pull the lever outward in to the wind:
This isn’t a deal breaker – just makes it more difficult to properly set up the pads. In my book, Shimano sets the gold standard in this regard. On a Dura Ace, Ultegra, or 105 brake, the pads tend to stay very straight (making setup VERY fast and easy).
With the front brake installed, I wanted to take a look at how the quick release cam works. When closed, it is in-line with the rest of the brake. To open the quick release (to make the caliper open wider for wheel removal) – you pull the lever outward in to the wind:

12 of 20 photos
Let’s move on to the rear brake. Before starting, I want to point something out that may or may not be obvious to you. How do pro mechanics work on all of the hidden brakes these days? First, they use a “race work stand” that holds the bike by the front fork and bottom bracket. To access the brakes, they simply flip the bike over:
13 of 20 photos
You can rest the saddle on something like a stool, bike box, etc.
Lucky for me, the rear brake cable was already routed through the frame. This is how the bike came pre-assembled from Trek.
Lucky for me, the rear brake cable was already routed through the frame. This is how the bike came pre-assembled from Trek.

14 of 20 photos
As you can see, the rear brake is under the bottom bracket shell. There is also a Di2 battery mount just in front of it.
Also take note – the rear caliper does NOT have a quick release cam on it, nor a barrel adjuster. How do you open up the brake arms to let your wheel out? Trek thought of that ahead of time, and made this very slick two-piece inline cable adjuster:
Also take note – the rear caliper does NOT have a quick release cam on it, nor a barrel adjuster. How do you open up the brake arms to let your wheel out? Trek thought of that ahead of time, and made this very slick two-piece inline cable adjuster:

15 of 20 photos
This piece bolts in near the head tube. The cable housing terminates here, and a bare cable runs through the down tube.
If you rotate the piece furthest to the right (in the above photo), you adjust cable tension. If you turn the next piece to the left – with the protrusion – this opens up the brake like a normal quick release. Whoever invented this little guy deserves the coveted “Employee of the Month” parking space… AND a casual Friday.
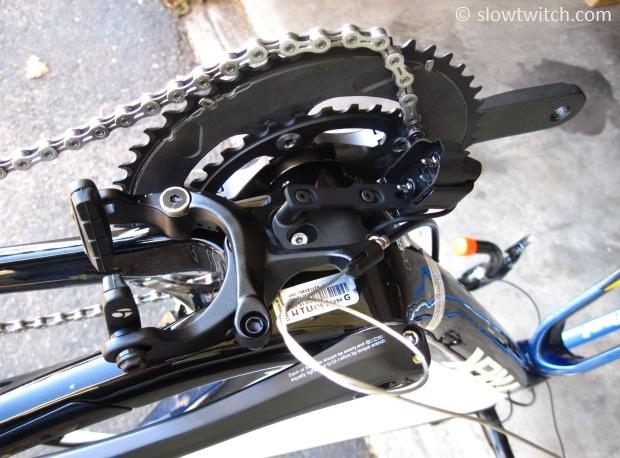
Also note that the rear brake caliper’s limit screws are in a different location than the front brake. They’re right behind the chainrings:
If you rotate the piece furthest to the right (in the above photo), you adjust cable tension. If you turn the next piece to the left – with the protrusion – this opens up the brake like a normal quick release. Whoever invented this little guy deserves the coveted “Employee of the Month” parking space… AND a casual Friday.
Also note that the rear brake caliper’s limit screws are in a different location than the front brake. They’re right behind the chainrings:

16 of 20 photos
I could adjust the first screw (on the left in the above photo), but had trouble reaching the second screw (on the right). Whether or not you can reach these will ultimately depend on chainring size and type – you obviously would have much more trouble with a solid TT ring. I ended up using the short end of an L-style 2mm allen wrench to adjust the screw on the right, but could only do about 1/8th turn at a time. This job is likely best done with the cranks completely off the bike – similar to many other hidden-rear-brake bikes.
The rear cable anchor bolt is also unique. Seen in the photo below, you must slide the cable in to the slot. Then you tighten the 5mm bolt on top, which threads in to a hex nut underneath.
The rear cable anchor bolt is also unique. Seen in the photo below, you must slide the cable in to the slot. Then you tighten the 5mm bolt on top, which threads in to a hex nut underneath.

17 of 20 photos
After tightening this anchor bolt down, adjusting the pads, and dialing in the pad width, I noticed the brake was dragging. It didn’t feel quite right. Upon closer inspection, I found that the piece of rear housing was cut too short from the factory:

18 of 20 photos
The housing was pulled taut against the down tube, and didn’t allow the cable to move freely.
The fix? Loosen the cable anchor bolt, pull the cable from the caliper, remove the housing, and cut a slightly longer one:
The fix? Loosen the cable anchor bolt, pull the cable from the caliper, remove the housing, and cut a slightly longer one:

19 of 20 photos
I bolted everything back together, but it still didn’t feel quite right. The rear housing had a nice gradual arc, the pads were straight, and the caliper was centered.
I fiddled. I sat down for a minute of quiet time. Was the cable routed incorrectly through the down tube? Was it caught on one of the Di2 wires? That was all I could figure. In all of my years of working on internally-routed bikes, mystery shifting and dragging brakes usually mean a tangled mess inside the bike… and manually re-routing cables through.
So – I unbolted the cable anchor, pulled the housing, and removed the cable entirely from the bike. As I removed the cable from the brake lever, I found the culprit. It wasn’t routed poorly through the down tube at all. It was...

20 of 20 photos
...a very kinked cable. Whoops.
I installed a new cable, fished it through the down tube, re-installed both down tube cable stops, installed the rear housing, and buttoned up the cable anchor bolt.
The only issues I had with the brakes had nothing to do with the design itself, but rather the factory assembly of the bike. These issues will generally be solved by the dealer who assembles each bike, but it brings up an important point – what is their labor time worth? This job took me approximately one hour and forty-five minutes. With the same housing and cable problems on a standard caliper and external routing, I’d put it at twenty or thirty minutes tops. Do shops charge based on task or time?
More than one dealer of high-end triathlon bikes I’ve spoken with voiced real concern on this topic. Many of them are simply eating the cost of increased labor time, in hopes of retaining customers. A bike fit adjustment that takes ten minutes on an “easy” bike could take five or ten times as long on a fully integrated one. Need to cut that aerobar extension down by one centimeter? Well, we need to pull the cable and housing out, cut the bar, fish Di2 wires or new cables through the frame (and potentially remove cranksets, brakes, and batteries to do so), reinstall all of the sub-components, re-tape the bars, and so on. Can this shop double their bike fit rate because the customer bought a sleek bike? Probably not. But – can we blame the customer for buying the bike, when so many of the available choices in the market are this way? I don’t know what the right answer is, but I certainly empathize with the dealers that must figure this out.
At the end of the day, I think Trek has a nice brake here. The lever feel is good. I wouldn’t call it “Dura Ace good”, but it’s on-par or better-than other proprietary brakes. The real success story, in my opinion, is how much of an improvement these brakes are over the Speed Concept – in lever feel, strength, and ease-of-use. My hope is that these brakes (or something similar) find their way on to whatever the next generation of Speed Concept is.