This is part 2 of our How-To series on bicycle chains. If you missed part one, it is located HERE.
We’ve already covered the particulars of derailleur capacity, cage length, and general knowledge of how to properly size a chain. We haven’t yet shown you how to trim a chain to that proper length, or how to seal the deal and connect the ends of the chain. That’s what we intend to cover herein.
Trim that Chain
When we left off, we had already determined the length of our chain (as long as possible, while not sagging or hitting the derailleur cage when in the small chainring and small cog). That is, of course, assuming that our drivetrain has the proper length derailleur cage in the first place.
To re-size your chain, you need a chain tool. Mine here is from Pedro’s, but they all tend to look and operate similarly:

“All you do is push one of the chain pins out, right? Let ‘er rip!”
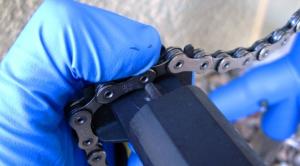
Slow down, Ace; this is where the tricky part comes in. Depending on what brand of chain you have, you must trim the length slightly differently. For example, the image below details how a SRAM chain should look while installing it on a bike (the photo was taken with the chain off-the-bike for ease of illustration).

SRAM chains use a quick link to hold them together. Because of this, you need to have two male ends of the chain exposed. If you push the wrong pin out and leave a female end, it won’t work.
However – let’s look at a Shimano chain. They use a special installation pin. This means that you must have one male end, and one female end on your chain:
![]()
What this all boils down to is simply this: double-triple check that you are pushing out the correct pin with your chain tool when resizing your chain. If your chain uses a quick link, you need two male ends. If it uses a pin, one male and one female. EITHER WAY – you can achieve the right length of chain. Just think: “Long as possible, without touching the cage.”
Once you’ve determined the right length, lay the chain in your chain tool. Thread the handle down with one hand, and use your thumb on the other hand to hold the chain in place:

Thread the handle all the way in, until the pin fully pops out.
For final assembly, we’ll start with the SRAM 1091 chain. The chain itself is symmetrical, so there isn’t a ‘right’ or ‘wrong’ direction for it to face. However, the connecting link is directional (it has a small arrow etched in to each plate). You want the outside arrow to face the direction your chain runs while pedaling forward.
First, put those link halves together loosely:

Next, slowly turn the cranks forward to bring the link to the top of the drivetrain (where it’s above the chainstay):

Now, grab the rear wheel firmly with your left hand to hold it still (not pictured) – and push the right crankarm with your right hand:

Push firmly with your right hand until you hear the quick link snap in to place.

Take note that the SRAM 10-speed link is a one-time-use item. They say that due to the material thickness (i.e. not all that thick), repeated installation and removal compromises strength. Their 8 and 9-speed links are re-usable.
If I do want to remove a SRAM link, I use my Park chain link tool:

It works like a pair of pliers to un-snap that chain link:

SRAM sells new links for a reasonable price, so it’s a good idea to keep some on-hand if you’re a SRAM chain user.
Next, let’s look at the Shimano pin system. Note that some Shimano chains are directional – such as my Ultegra 6700-series chain (also 105 5700 and Dura Ace 7900). Older 6600 and 7800 chains, and the latest 9000 chain are NOT directional. When in doubt, consult the instructions that come with your chain. For the directional chains, there are logos on only one side of the chain; you want these to face outward on the drive side of the bicycle.
After the chain is routed through both derailleurs, I take it off of the small ring. This takes all tension off the chain and makes pin installation easier.
![]()
Next, put the two ends together and insert the pin. The first half of the pin slides in easily.
![]()
Now use the chain tool to slowly push the pin in. This is one part of bike maintenance that cannot be defined as an exact science. As Bruce Lee said, “Do not think - feel.”
![]()
The pin is thicker on the ends than in the middle. As it slides through the holes in the plates, you can feel this difference. Right as the pin approaches its final resting place, you will feel a distinct increase in effort. When you think the pin is probably in far enough – STOP. More than likely, it is. Resist the temptation to push it that little bit further. Always push the pin in very slowly, and check both sides several times (to make sure they look the same).
Once the pin is in, use a pair of needle nose pliers to break off the extra installation portion.
![]()
Afterwards, I always check to make sure that the final joining pin feels like all of the others. If that link feels stiffer than any of the others, the pin was installed incorrectly. If this is the case, you can ‘nudge’ the pin in one direction or the other - very gently. I’m talking a tiny, tiny bit.
The other option with Shimano chains is to use a KMC Missing Link. They make one that is 5.88mm wide, and is compatible with both Shimano and KMC chains. If you use this, install it in the same manner as a SRAM link (with two male chain ends).
Last, let’s look at Wippermann. They have a quick link system that is similar to SRAM and KMC. It is reusable, which is nice. Similar to SRAM, the chain itself is not directional, but the link is. The easy way to think about it is this: ‘Elbow up – on the bottom’. What does that mean? The link has a little elbow-shaped slot for joining the two halves:

When this link is on the bottom of the drivetrain (below the chainstay), you want the elbow to face up. Wippermann links are unlike SRAM and KMC in that they have a looser fit – you do not need to ‘slam’ them shut with the crankarm. Simply put the halves together and the rear derailleur’s spring with pull the link shut.
What? No Campagnolo chains in the demo? Sorry, but no. I don’t currently have a Campy bike, nor do I desire to buy their (expensive) proprietary chain tool, or the rivet peening substitute tool from Park. If you have a Campagnolo 11-speed drivetrain, you have to make the investment – or go to a shop that did.
Final Note on Chain Sizing:
Some of our readers commented in the last article that their chain sizing method differs from mine. As with most things mechanical, I say this: If it runs, run it. There are other ways to do it.
The reason I like my method is that I feel it does the best at taking ALL factors in to account – chainstay length, bottom bracket drop, chainring sizes, cassette size, derailleur cage length, and derailleur manufacturer. It gives you flexibility to change cassettes without changing chains. I’ve yet to see it cause a derailleur to fail. The only ‘downsides’ are this: 1) It requires that you use the correct length derailleur cage for your drivetrain, and 2) If you ONLY run a narrow-spaced cassette (i.e. 11-21), the chain length is probably a little bit longer than absolutely necessary for big-big operation – which is not a mechanical problem – it just weighs a tiny bit more. I personally think the user-friendliness of this method makes it the best choice for the vast majority of triathletes. If you are an expert mechanic and want to optimize your chain length for a specific uphill time trial, I say go for it. Folks like that probably aren’t reading this article anyhow.
The most common “other” chain sizing method I see is this: Big-Big plus two links. Or – Big-Big plus one inch. What does that mean? Wrap the chain around the biggest cog in the rear and the big chainring up front – but NOT through the rear derailleur cage. Now add two links (one pair of outer plates, and one pair of inner plates). The thing I dislike about this method is that it does not take derailleur cage length into account. If you use a short cage, the chain will be effectively much longer than if you use a long cage. So – with the short cage, you could lose the ability to use your small ring and smallest few cogs… and with the long cage, your chain could be too short and risk derailleur damage in big-big.
The good news is that – for the most part – modern derailleurs can deal with a range of chain sizes. If you are a link or two off, the derailleur will likely be fine. Most of the really extreme cases I’ve discussed don’t even have anything to do with triathlon bikes; they’re special situations with long-travel downhill and/or freeride mountain bikes. On those bikes, it often behooves the rider to use the shortest derailleur cage possible, simply because it offers more rock clearance. But, this often requires sizing the chain longer than otherwise necessary. My method may not result in a long enough chain. If you’re good enough to ride those bikes on that terrain, you likely understand this situation.
Most of the best pro mechanics I’ve met use a mixture of my method plus the indispensable human brain to critically think about what they’re doing. If it’s a pro cyclocross mechanic, he or she will likely start with the standard method to get the chain in the ballpark. If the athlete goes to ride a few warmup laps, but feels the chain is too loose – like they are risking dropping the chain on a particularly bad section of washboard terrain – the mechanic would likely shorten the chain. That will increase the spring tension in the rear derailleur’s P-knuckle in ANY gear combination, resulting in better chain retention. Conversely, a pro mountain bike mechanic might add length to a chain if the rider determines there is a section of trail that they simply MUST use the big-big gear combination. There is no possible way to describe each one of these potential situations. That’s where the value of a good mechanic lies.
All images © Greg Kopecky / slowtwitch.com
![]()