1 of 14 photos
Crankset How-To
All images © Greg Kopecky / slowtwitch.com
All images © Greg Kopecky / slowtwitch.com

2 of 14 photos
Once again, it’s time to get down and dirty working on your bike. Or, just watch us do it. Earlier this week, I covered the particulars of installing a modern outboard bearing, threaded-style bottom bracket. I happened to be working with a Shimano Ultegra 6700, but the procedure is nearly identical for most other manufacturers (such as SRAM, Rotor, FSA, and more). Keep in mind that the procedure I covered was specific to bikes with threaded bottom bracket shells (the most common type), not BB30, BB86, BBright, BB386Evo, PF30, or any other new bottom bracket standards that have cropped up this week.
Today, I’ll show you how to install the corresponding Shimano crankset to go with the bottom bracket we just installed. Understand that crank systems are a little bit more manufacturer-specific in terms of installation procedure. Shimano utilizes a user-adjustable bearing preload, which gets set via a pair of pinch bolts on the non-drive-side crankarm. SRAM has no pinch bolts, and relies on a spindle that reduces from 24mm to 22mm, and bottoms out on the non-drive-side bearing’s inner race – and is secured with a single large bolt. FSA is different altogether, and is a quasi-mix of the Shimano and SRAM systems.
Whichever crank manufacturer you choose, none are particularly difficult to install. The keys to your success are: 1) Making sure the bottom bracket is installed tight (and correct) in to a BB shell that has been prepped, 2) Greasing the spindle and inner bearing races, and 3) Tightening the crank bolt(s) to the proper specification. If you can handle all that – you’re well on your way to many miles and smiles.
Shall we?
To begin, let’s take a look at the short list of required tools:
1. Grease of your choice. I like Phil Wood because it tends to keep its consistency over a long period of time (i.e. not separate in to oil and crust).
2. A 5mm allen key. If you don’t have one of these, you’re not officially a triathlete yet.
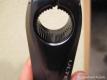
3. A Shimano preload adjusting tool. Mine happens to be on the end of a Park Shimano BB tool (the preload adjuster is the little black disc). They are also available as a standalone unit i.e. just the black disc by itself. This tool is only necessary for Shimano cranks – not FSA, SRAM, etc.
Today, I’ll show you how to install the corresponding Shimano crankset to go with the bottom bracket we just installed. Understand that crank systems are a little bit more manufacturer-specific in terms of installation procedure. Shimano utilizes a user-adjustable bearing preload, which gets set via a pair of pinch bolts on the non-drive-side crankarm. SRAM has no pinch bolts, and relies on a spindle that reduces from 24mm to 22mm, and bottoms out on the non-drive-side bearing’s inner race – and is secured with a single large bolt. FSA is different altogether, and is a quasi-mix of the Shimano and SRAM systems.
Whichever crank manufacturer you choose, none are particularly difficult to install. The keys to your success are: 1) Making sure the bottom bracket is installed tight (and correct) in to a BB shell that has been prepped, 2) Greasing the spindle and inner bearing races, and 3) Tightening the crank bolt(s) to the proper specification. If you can handle all that – you’re well on your way to many miles and smiles.
Shall we?
To begin, let’s take a look at the short list of required tools:
1. Grease of your choice. I like Phil Wood because it tends to keep its consistency over a long period of time (i.e. not separate in to oil and crust).
2. A 5mm allen key. If you don’t have one of these, you’re not officially a triathlete yet.
3. A Shimano preload adjusting tool. Mine happens to be on the end of a Park Shimano BB tool (the preload adjuster is the little black disc). They are also available as a standalone unit i.e. just the black disc by itself. This tool is only necessary for Shimano cranks – not FSA, SRAM, etc.

3 of 14 photos
First step? Grease that spindle. Be sure to grease the whole thing, including the splines on the end.

4 of 14 photos
Next up, grease the bottom bracket itself. Be sure to hit all surfaces - especially the inner surface of the black bearing covers.

5 of 14 photos
Now it’s time to install the drive-side half of the assembly (the part with the chainrings and right crankarm). This is one step that tends to require a little extra “love” – at least for Shimano cranks. The fit between the spindle and bearings tends to be tight, so don’t be shy – use some force.
6 of 14 photos
Next is a step that is ONLY required for Shimano triple chainring cranks (which I happen to be working with today). There is a small spacer that goes on the spindle, over the non-drive-side bearing. Double chainring Shimano cranks do NOT have this spacer.

7 of 14 photos
Now we need to install the left crankarm. Notice that there is a single wide spline within the pattern:

8 of 14 photos
This lines up with a similar wide spline on the spindle (so your cranks are timed 180 degrees from each other):

9 of 14 photos
Install the left crank – just push it on. Next, you need to thread in the bearing preload cap that comes included with the crank:

10 of 14 photos
Now we’re at the only part of the installation that requires any true “skill”. We want to adjust the bearing preload, which is somewhat subjective. Use the preload tool to thread the cap down:

11 of 14 photos
The condition you’re looking for is: “No side-to-side play”. BUT – not too tight either. If you overload the bottom bracket bearings with too much side-load, they will die an early death.
Thread the cap down until the side-to-side motion of the left crank stops. Right when you reach that point – STOP. Resist the urge to torque the cap down any further. The best way to test whether you’ve got it right is to use your hand to try to wiggle the left crankarm side to side. You don’t want any wiggle.
Thread the cap down until the side-to-side motion of the left crank stops. Right when you reach that point – STOP. Resist the urge to torque the cap down any further. The best way to test whether you’ve got it right is to use your hand to try to wiggle the left crankarm side to side. You don’t want any wiggle.

12 of 14 photos
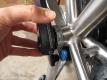
Now that your bearing preload is set, use the 5mm allen key to tighten down the left crank pinch bolts. BE SURE TO alternate tightening down the left and right bolts a little bit at a time. If you tighten one all the way and then the other, it could result in a crankarm that comes loose mid-ride. The official torque specification for these bolts is 12-14 newton meters. Similar to the bottom bracket - after you’ve installed enough of these things and you start to know what that torque feels like. If you’re a beginner, however, use a torque wrench.

13 of 14 photos
You’re done! If you did everything right, it should look, spin, and bark like a crank.
14 of 14 photos
That wasn’t so tough, was it?