

1 of 20 photos
The reason this hub warrants a whole ‘nother article is simple – it is quite a bit different than its predecessor. It has different bearings, a different axle, a different drive mechanism, requires different lubrication, and has a bearing preload adjustment feature. If you’re a clever person (I certainly don’t claim to be) – you might say that the 182 hub is like an apple… and the 188? Positively orange-like.

2 of 20 photos
Analogies aside, there are some significant differences between the two hubs. But what about similarities? Both hubs rely on cartridge bearings (vs traditional cup-and-cone), and those cartridges are radial in design. What does that mean? They’re designed to primarily take loads in the vertical axis. For (lots of) detail on that topic, check out the article called Bearing Breakdown linked at the bottom of this page.
The older 182 weighed 182 grams. How much does the 188 weigh? You guessed it – 188 grams! Where does the extra weight come in? Zipp made an honest effort to improve this hub’s sealing against water, dirt, and any type of contamination that your bike could encounter. The front and rear hubs each have shields that cover the outermost bearings. This being said, I still lump the 188 in with the category of racing hubs. Shields are good, but they do not affect things like bearing design, load capacity, and size – which are more important in determining a hub’s longevity (in my experience).
Getting Started
To begin hub disassembly, all you need is a 2mm allen key.
The left side of the hub has an adjuster nut, called a ‘clinch nut’, or a ‘pinch nut’. There is a 2mm hex bolt – loosen it with your allen wrench. You do not need to remove the bolt all the way.

3 of 20 photos
With the 2mm bolt loose, unthread and remove the pinch nut.

4 of 20 photos
Now, pull the axle and freehub out of the hub’s right side.
5 of 20 photos
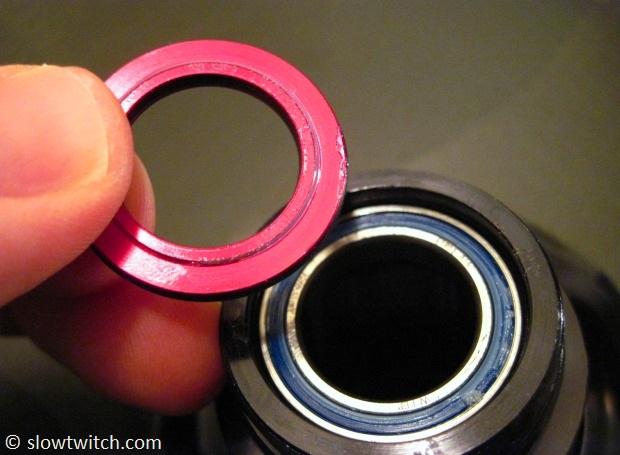
Remember those bearing shields we talked about earlier? Here is the shield from the left side of the hub.

6 of 20 photos
NOTE: There is a right way and a wrong way to install this. One side is flat, and the other side has a raised boss (pictured above). The raised boss faces towards the bearing. This raised section touches ONLY the inner bearing race and facilitates setting the bearing preload. As part of the hub disassembly, simply remove the bearing shield – it should pop right out.
What do we do now? Similar to our Zipp 182 hub article, we have a choice to make. Option 1 is to do the simple service – clean off the drive mechanism (pawls and ratchet ring), re-lubricate it, and reinstall everything. This service does nothing with the bearings.
Option 2 is a full overhaul and bearing replacement. We know you’re itching to get greasy and dirty, so this is the route we’ll take. Since the wheel is relatively new, it does not need new bearings, but we’ll do it anyway.
Before we really get in to it, let’s take a look at all of the parts we’ve taken out of the hub so far.

7 of 20 photos
On the bottom, you have the clinch nut, left side bearing shield, .25mm shim, freehub, and right side bearing shield. The axle is on top. NOTE: This hub does not have a tube spacer between the bearings in either the hub shell or freehub body (unlike the 182 hub). If this is the first time you’ve done this type of service, it is a good idea to lay your parts out in the order and orientation you took them off, to avoid losing anything or mixing up your parts.
To remove the bearings, use a hammer and punch. Be sure to rest the punch on part of a bearing, and NOT any part of the actual hub. Tap opposite sides of the bearing to slowly knock it out of place.
To remove the bearings, use a hammer and punch. Be sure to rest the punch on part of a bearing, and NOT any part of the actual hub. Tap opposite sides of the bearing to slowly knock it out of place.
8 of 20 photos
Manufacturer-specific Note:
Most cartridge hub designs use press-fit bearings. That means just what it sounds like – the bearings press in to place. The 188 hub is rather unique in that is uses a slip-fit bearing. You could also call this a (very) light press-fit. What it boils down to is this: the bearing bores are larger than most other hubs, so the bearings slip in and out more easily. I’ve had instances with this hub where I’ve pulled the bearings out with just my fingers, using very little effort. The hub in my disc seemed to have tighter bores, so I had to use a hammer and punch.
Mechanically, I don’t know if this has any real effect. Zipp engineers say that the lighter press-fit leads to slightly improved rolling efficiency, but I’ve not seen any hard data. The (potential) mechanical compromise is a greater chance of creaking, if the bearings are used over time under heavy loads. As the axle bends (from the rider pedaling and leaning side-to-side), this applies force to the bearings, causing them to rock back and forth slightly in their bores.
This in mind, I’ve made a habit of putting a thin layer of grease in the bearing bores of this hub before pressing new bearings in (to combat potential creaking down the road). Some mechanics do this in all cartridge bearing hubs. I follow this rule: If it’s a tight press fit, I don’t use grease. If it’s a loose press fit, I use grease. The most important thing – grease or not – is that you actually take the hub apart from time to time, to check the drive mechanism and see if the bearings are still in good shape. If you do that, you’re way ahead of the curve.
End Note.
So – now we have the bearings out. The next step is to wipe out the entire inside of the hub to make it sparkling and clean. Feel free to use a light solvent to aid your work.

9 of 20 photos
The 188 hub used in disc wheels has one key difference from the 188 hub used in spoked wheels (i.e. 808) – the hubshell bearings are different sizes. The standard 188 hub uses four 6803 bearings – two in the hub shell, and two in the freehub. The 188 disc wheel hub substitutes a larger 6903 for the drive side hub shell bearing. Here are the bearing dimensions:
6803: 17mm ID, 26mm OD, 5mm thickness
6903: 17mm ID, 30mm OD, 7mm thickness
The larger cartridge uses larger ball bearings, more grease, and has a higher load capacity.
Here are my new bearings, sitting on their size-specific Wheels Manufacturing adapters:
6803: 17mm ID, 26mm OD, 5mm thickness
6903: 17mm ID, 30mm OD, 7mm thickness
The larger cartridge uses larger ball bearings, more grease, and has a higher load capacity.
Here are my new bearings, sitting on their size-specific Wheels Manufacturing adapters:

10 of 20 photos
The large 6903 bearing has different colored bearing seals on either side; one is green, and the other is black. When manufacturers do this, it sometimes means that the bearing is directional (but doesn’t ALWAYS mean that). Just to be safe, I press the new bearing in the same way that the old one came out. In this case, that means the green seal faces inward, and the black seal faces outward.
Before pressing the bearings in, I put a light coating of grease in the bores, as discussed above. Then it’s as simple as lining up the bearings and slowly threading the handles down.
Before pressing the bearings in, I put a light coating of grease in the bores, as discussed above. Then it’s as simple as lining up the bearings and slowly threading the handles down.

11 of 20 photos
I press the bearings just until they stop, and then snug them down a tiny bit. If your bearing bores are on the loose end of the spectrum, this operation will require very little effort.
Now it’s time to address the freehub. Similar to the 182 model hub, Zipp does not recommend replacing the bearings individually; they say you should replace the whole freehub. Personally, I’ve had no trouble replacing individual bearings with the 188. Because there is no tube spacer and the bearing adjustment is done externally, there isn’t much of anything to worry about.
Now it’s time to address the freehub. Similar to the 182 model hub, Zipp does not recommend replacing the bearings individually; they say you should replace the whole freehub. Personally, I’ve had no trouble replacing individual bearings with the 188. Because there is no tube spacer and the bearing adjustment is done externally, there isn’t much of anything to worry about.

12 of 20 photos
If I was going to replace the freehub bearings, I’d treat them exactly as I did the hub shell – knock ‘em out, and press new ones in.
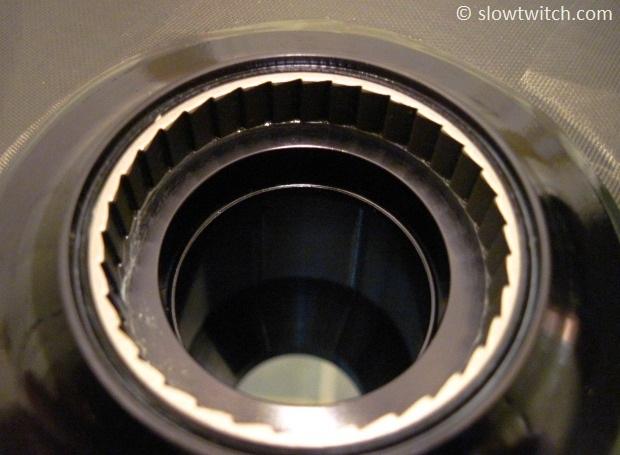
Since the bearings are in good shape, I’m simply going to clean and re-lubricate the existing freehub. As you can see in the photo above, the pawl design is completely different than the 182 hub. The 182 uses three pawls that are driven by a single c-clip spring; the 188 uses three larger pawls that each get their own leaf spring. This is a better design for two reasons:
1. The individual springs are very strong, allowing you to use grease instead of oil for lubrication (which withstands inclement weather much better).
2. If one spring happens to fail, you still get engagement from two pawls (so the hub still drives forward).
The only downside is that the mechanism is slightly more cumbersome to clean. If you’re in a hurry, just wipe everything off as best you can with a shop rag. If you want to get detailed (I do), use a pair of needle nose pliers to remove each pawl and spring individually:

13 of 20 photos
I advise only removing one pawl/spring at a time. They have a specific orientation. In the photo above, note how the pawl has a line on it – this is only on ONE side. If you reverse the direction upon reinstallation, the hub won’t work. Same goes for the spring – there is one direction that it must face. If you do one at a time, you can reference the other two.
When you have each pawl and spring out, wipe them all clean, along with the pockets in which they rest.
Next, you will need some grease. The nice thing about the 188 is that you can use almost any grease you desire. I’ve never had the pawls stick down from grease that was too thick. My go-to for freehubs is ‘Lectric Lube from Morningstar Tools (also known as Morningstar Freehub Soup). It’s a silicone-based lube with teeny-tiny bits of copper in it.

14 of 20 photos
It’s made by forever-bicycle-geek, Paul Morningstar, in the hills of northern California. I’ve had the chance to speak with Paul over the phone, and he’s one of the nicest and most enthusiastic bike guys on the planet.
As odd as it sounds, I’m a big nerd when it comes to grease, and this Morningstar lube stands as my favorite for this job. It’s fairly light weight, and seems to be really slick. The resulting freehub action is very smooth and noticeably quieter than most stock lubricants.
I put a small dab of grease down where each pawl and spring will go:

15 of 20 photos
Repeat the procedure until all of the pawls and springs are cleaned, lubricated, and re-installed.
Next, I put a layer of grease all over the top and sides of each pawl and spring. You don’t need a gallon of lube, but don’t be shy with it either.
Next, I put a layer of grease all over the top and sides of each pawl and spring. You don’t need a gallon of lube, but don’t be shy with it either.
16 of 20 photos
I also put a light layer of grease on the hub’s ratchet ring.
Before I re-assemble everything, I’ll show you the A+ mechanic’s secret. If you saw our demo on the 182 hub, you may remember that I covered the exposed half of the drive side bearing with grease for a little bit of extra weather-proofing. With the 188 hub, I do the same thing on both outer bearings.
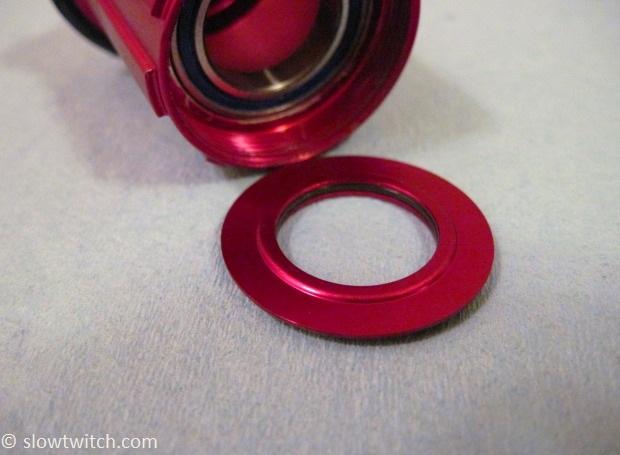
Here’s a shot of the drive side bearing shield. Similar to the non-drive side, there is a raised boss on one side that faces the bearing.
Before I re-assemble everything, I’ll show you the A+ mechanic’s secret. If you saw our demo on the 182 hub, you may remember that I covered the exposed half of the drive side bearing with grease for a little bit of extra weather-proofing. With the 188 hub, I do the same thing on both outer bearings.
Here’s a shot of the drive side bearing shield. Similar to the non-drive side, there is a raised boss on one side that faces the bearing.
17 of 20 photos
Smudge grease over the outside of the bearing. For this application, I just use a standard shop grease (not the freehub soup). Bearing shields in most hubs do a fairly good job of keeping stuff out – but if stuff does manage to get in – the shield can trap it there. If we fill up that space with grease, it’s harder for anything to make it inside (the grease must be washed out first). This is one of those five-second steps that makes too much sense to ignore.
Next, slide the (greased) axle back in the freehub. Don’t forget to re-use your .25mm shim!
Next, slide the (greased) axle back in the freehub. Don’t forget to re-use your .25mm shim!

18 of 20 photos
Slide the assembly back in to the hub. Press all three pawls down simultaneously and spin the freehub counterclockwise.
Next, I cover the left side bearing with grease and install the shield – with the raised boss facing towards the bearing. You know there’s enough grease if some gets pushed out like this:
Next, I cover the left side bearing with grease and install the shield – with the raised boss facing towards the bearing. You know there’s enough grease if some gets pushed out like this:

19 of 20 photos
Wipe away the extra grease with a rag and thread down the clinch nut.
20 of 20 photos
This is where the always-subjective step of bearing preload comes in. For this hub, thread the clinch nut down just until it stops. Then back it off about 1/8th of a turn and tighten the 2mm bolt.
To check the preload, simply spin the axle. How should it feel? That’s like asking a man to describe his wife’s feelings on window curtain design. Can you really define it? For hubs – I’ll do my best. Smooth, but not tight. Free-spinning, but not loose. You will have to use your noggin for this, and trust your own judgment. New bearings will feel somewhat stiff compared to one that has been ridden for 100 miles, but it should not take that much effort to spin. If the hub is too loose, there will be side-to-side play (push the axle side-to-side with your hand). You might have to adjust the hub two or three times, but eventually you’ll find a happy, smooth, and fast place.
If you want to replace the bearings in your 88 front hub, knock them out exactly as we did the rear bearings. The only tricky part is that the front hub has one real clinch nut and one 'dummy' clinch nut (so the hub looks sleek and symmetrical). There is no way of telling which is which - you simply have to take a guess and loosen one. The dummy side does not have any threads and can be tightened in any direction; the intention is that you can match it up with the real clinch nut for a consistent appearance.
This concludes our How-To on Zipp hubs, for model years 2006 – 2013. We have plans in-the-works for several more manufacturers’ hubs, so stay tuned.
All images © Greg Kopecky / slowtwitch.com


