I tend to look at bikes in two ways: First, the bike in theory. The claims. The white papers. The spec and geometry. The color as it looks in an image or graphic.
Then there’s the bike when I have it in front of me, when I assemble it, try to get it to fit me, and then when I ride it. What you see in a brochure, or even on a showroom floor, tells only half the story. Bikes are like dates. Love at first sight wears off when you have to live with him or her. And with bikes it’s really like that. There are almost always disappointments or obstacles to hurdle. (Or, a much more blissful time of it, if you chose wisely in the first place.)
I wrote last week about Cervelo’s new P-Series, and statistically speaking this is the bike you’re more likely to buy than any other (tho not in this build). It’s this frame built in some groupset, or maybe a Canyon, maybe a Quintana Roo, they all make very good bikes at what is now the entry level, which is $2,500 to $3,200.

Let’s stop here for just a moment. I know I’m going to get snarky comments about this, so let me just say what is, at the expense of what you think ought to be. Bike makers don’t determine entry level. You determine it, along with wheel size, brake type, the spec, the geometries. I’m 32 years in the industry, the first 12 as a bike maker, the last 20 writing to you all, and the industry is strewn with the carcasses of my contemporaries who thought they’d give you what you need instead of what you’ll buy. Remember the Fuji Aloha? Entry level for a bike you can ride as an avid competitor is about $1,200. Entry level for a new tri bike is about $2,500 and properly spec’d more like $3,000.
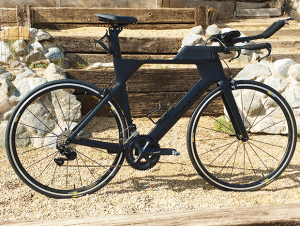
Below is my experience with the P-Series, that is, my experience starting with the bike in theory and ending with a bike optimized for me. I wrote above that what you see is only half of it. That was generous. For every bike I’ve ever owned, only about a third of what made the bike work for me was the obvious stuff (how it looked, the color, the spec and the price, the geometry and whatever it was I could see without hiking my leg over the top tube). The other two-thirds was how and whether I was able to make the bike my own. Bikes are, for me, more like horses than motorcycles. How much can you tell by looking at a horse how it's going to ride when you're in the saddle? That’s about as much as I can divine by simply looking at a bike, even knowing its geometry and spec. Bikes have personalities of their own, and the difference between first look, versus feeling like it’s an extension of me, that’s the process I’ll try to describe here.
This bike featured is the Ultegra Di2 build. This is not the bike most of you will buy. I’ve chosen to write about this bike because it has some features that might help me make the points I consider important to you.
Adjusting the Front End
The bike comes with a steer column several centimeters longer than necessary, so that you can spacer it up. I don’t like this strategy. If you need higher armrests, and you almost certainly will, then just pedestal the armrests. The Vision Metron bars that come on this bike go quite high. All the pedestals and bolts are included. I slammed the stem onto the headset top cap and then added 30mm of pedestals (I knew how much to add because I can do math. If you want to know more about how to math your way to your bike’s set up, let’s talk on our Reader Forum).

At first blush the excess steerer above the stem (when I placed the stem down right on the headset top cap) turned out to be a handy place for my Di2 junction box. I don’t know if I’ll leave it there. But it’s there right now. I’ll probably cut 1cm off the steerer even if I do leave it there. I don’t think that’s a bad place for it, aerodynamically, because there’s stuff in front of and behind it.
The extensions out of the box were too long for me, and they terminate too high in elevation above the armrests. They’re aluminum on this bike. I cut them down with a tubing cutter. But when I did this I didn’t reckon on a ring of extra material on the inside of the extension, right where the extension is slotted to run your mechanical cable internally, through the extension. This interfered with the Di2 shifter’s wedge mechanism. So, when you cut your extensions down on this bike, don’t cut them as far down as I cut mine. Generally, you need about 2cm of straight, unencumbered inside diameter for all these mechanical and electronic bar end shifters.
Second, this bike comes with electronic shifting, so I don’t a slot in the extension for internal routing. But sometimes product managers spec’ing bikes don’t get down into the tall weeds like that. I just stuck another set of extensions on there, cut to size. (I had a set of nice, light carbon TriRigs; that’s what you see on this bike now).

Vision’s armrests are exceptionally adjustable, in every plane. The brackets that accept the armrest cradles arrived pointing forward, and if you switch left and right they pointed backward (the centerline of the armrest is now behind the pursuit bar center) and I favor that. There is no imaginable armrest config that you can’t achieve with these bars and a sense of the possible holes in the pad and the cradle are visible in the image above. The Vision Metron Si013 aerobar hardware is substantially the same as the Vision Metron TFA bar I reviewed earlier this year, but with different extensions and there’s no integrated stem. This is a very nice bar, it sells aftermarket for about $600, mounted on a Trimax carbon pursuit bar that’s another $250. The bike comes built with a standard stem (fairly short, which I like for tri bikes, and changeable though I didn’t see any need to change it).
When you do all this adjusting, know that a 23mm cone wrench is necessary to tighten the bar-end shifters to the bar ends. Note that shortening the extensions is much (!) easier with electronic shifting. If you do this with mechanical shifting you must decable the bike (at least the derailleur cables). And for this reason, let me tell you what you need (whether you realize it or not) and the problem bike makers make (whether they realize it or not). If you want to make a bike your own, rather than simply riding it the way it came, you’re way better off simply buying the bike with electronic shifting. No decabling the bike, no shortening cable housing, no need to run a new rear derailleur cable.

Which leads us to the spec mistake. Canyon does it; Cervelo does it; most bike companies do this. They upgrade everything at once. This bike I’m writing about today can be bought at $3,200 or (in the case I’m writing about here) $6,500. The Canyon Speedmax CF 7.0 and 8.0 can be bought at $2,500 or $5,500, same frame. In each case, upgrading to electronic shifting, from mechanical, should cost about $600, if that’s the only thing you change. But the bike doubles in price because everything must be upgraded according to these bike brands. Bill Duehring, when he owned and ran Felt, had it right: Figure out the lowest price you can shoehorn electronic shifting onto a tri bike, sell it for that, let the customer decide what else he wants to upgrade.
Storage and Hydration
The Metron Front Hydration System comes with a Bento attached to it, just behind the hydration nacelle. If you want the Bento attached, and you want system as far back as possible (not leveraged out front of the steering axis) I can’t find any other way to do it than how it looks in the image above. But that hydration system is riding pretty high. If you want the hydration nacelle back, close to the steerer, and also low to the ground, you’ll take the Bento attachment off (it used to be attached magnetically, now it’ just slides up and off) and then you mount it lower, as pictured below.

If you look at the low-mount hydration system, closely enough, you’ll see that the rearward part of the system is gone. That’s the Bento. Mind, it’s one of the other. High, or low without the Bento. I chose low, because the bike already has pretty good storage and I don't need the Bento attached to the Metron hydration system.
Let me be precise (and maybe picky). I believe that the Metron hydration, in Cervelo's own pics, show the lower mount and the Bento attached, but on the bike I'm showing here I have the hydration system pushed several centimeters back, because I don't want a full tank of fluid that far in front of the steerer. That's why the Bento got sacrificed.
Adjusting the Cables
I don’t want to beat this cable thing up too much, but almost all bikes come with cables too long. Why? Because it’s easier to shorten than to add cables and housing, so the bike comes assembled with housing that assumes you’re going to ride with your front end high, and extended out. (Not just this bike; all bikes.) Most of you will ride lower than the max adjustable height, and closer in that the max adjustable length. Once adjusted, this means your housing is now too long. If you don’t want housing everywhere you cut it. If you must cut the housing then you must decable the bike. Unless you have electronic wires to hid instead! See how that works?
When I made bikes, there was no electronic shifting. So, here was the Dan Empfield rule: If you push a cable, or cable housing, in the front of the bike, you kept pushing until it came out the rear. No fishing for the cable. No flashlights, elbow shaped spokes, magnets necessary. If you're a bike maker, and you want to follow the Dan Empfield rule, you run a liner inside your frame, push something into one end of the frame and it finds its own way out the other end. Or, you put electronic shifting on your bike.

Our Reader Forum just about lost its cookies over the exposed front brake cable on this bike. Oh, the horror! I have another tri bike in my workshop that has a front hydraulic disc brake and its routing is much cleaner! The cable disappears down the steerer, traveling the entire length of the fork, exiting right where the brake caliber is. Sounds great! Until you need to get at the steerer (to take out pedestals or add them in or whatever you want to do). Cervelo learned a lesson with the old P5-6: To raise and lower the aerobars you needed to decable the bike, because the cables ran through the headset spacers (the only way to raise and lower the armrests on the old 3T Aduro aerobar).
I know you folks. You who are Aeroweenies would have liked the brake cable run through the steerer. You have no trouble undoing the hydraulic line, pulling it out the fork, doing your fork business, rerouting and attaching the cable, bleeding the line, presto, done. But the rest of you? Not gonna do it! Therefore your bike will remain not your own. You will own it. But you will not have personalized it. So, honestly, that exposed brake line is fine right where it is.
Seat Post and Saddle
Cervelo almost screwed the pooch here. It spec’d a Prologo Dimension Tri T4.0 saddle, and that’s a fine saddle. But it’s not a split nosed saddle and on a saddle like this you’re riding atop the saddle rather than in front of it (hooking your ischial tuberosities on the twin noses). That means you have to push this type of saddle further forward, and on this saddle – with a truncated nose, following the theme of the Specialized Power Saddle – you have to put the saddle even further forward.

The Cervelo seat post hardware is fine. Great. Works great. But it’s very close to a bad match with this saddle. Great saddle! Don’t get me wrong! Great seatpost. It just may well not be great when matched together. This combo just barely worked for me (look at how far forward I needed to push everything), and I don’t ride ultra steep.
Remainders
I don’t like bottles behind the saddle. Most people are fine with them. But if you’re like me and you don’t like bottles behind the saddle, you can take off the rear bottle mount. There’ll still be a protrusion where that mount attaches. There are no bosses on the frame or the seat post for any sort of storage or speed box.
There’s a boot that fits between the top tube storage and the steer column that tidies up the wires and cables, but in most bikes that have these it’s hard to get them flush with the steerer, or stem, or whatever is right in front of it. Same with this one.
But these are minor niggles.
The Vision wheels were fine. No complaints. They’re 55mm wheels, which is middlin’ deep. A good all ‘round depth. This Metron 55SL wheelset was tubeless ready and I think that’s a must these days because, in my opinion, the cycling world is likely to move to tubeless and it makes no sense to buy a high quality wheel that can’t be made to run tubeless. That said, the Conti Grand Prix SL that come on the bike are not tubeless, and other than Giant and a very few other companies a bike is not going to come from the factory rigged for tubeless.

What is the significance of the image above? The hub uses Shimano’s Centerlock standard, not the 6-bolt spider standard. You want Centerlock, especially if you take off your rotors when you travel. You need a spline tool. Ten bucks. And a crescent wrench, aka an adjustable spanner for our UK readers. Or a 1” open-end wrench. That same spline tool takes off your cassette lock ring. Add a chain whip or chain pliers and you now have the tools for both tasks.
If you want to talk more about this bike, making it yours, buying it right and the like, there are two discussions on our Reader Forum: The current one on this new P-Series bike; and our evergreen thread, curated by professional bike fitter Eric Reid, on how to buy the right size Cervelo and have it configured correctly based on your personal fit coordinates.