

Road Bike Fit
"How should you fit aboard your road race bicycle?" is a question asked for a century and more. Some answers have been more useful or thorough than others.
Bike fit systems have sprung up, and often the goal of the system is to empower those only able to hurdle a low bar. Construct a fit system for those with spare knowledge and no tools, if you want. Many have, and there's no sin in that.
Some of us aim higher, and cater to a higher denominator of fitter.
Still, there is a cacophony of bike fit voices. Even if the goal is excellence, what can I bring that is incremental, instead of duplicative?
The road bike protocol I'm introducing below was built for two reasons. Well, two-and-a-half. Primarily, it's to utilize a set of bike geometry metrics coming into wide acceptance: stack and reach. Many or most bike designers now consider these the absolute measures of a bike cockpit's height and length. But until now only systems for triathlon match fit coordinates to production frame geometries via the use of stack and reach. The system below extends this to road.
Second, many or most of the leading bike fitters have gravitated to the use of fit bikes the elements of which adjust horizontally and vertically, rather than along a head and seat bias. These bikes, and fit systems specific to triathlon, such as the F.I.S.T. system we teach, have grown up together over the past decade. There is a convergence joining these bikes to protocols tri bike fitters use. Road bike fit protocols have not kept pace. One fitter, in one fit studio, using one fit bike, should be armed with fit protocols for road, tri and off-road. He needs a road protocol that's as current as the fit simulator he's using for tri bike fitting.
Those are two of my two-and-a-half reasons. The half-reason is this. Most existing road fit protocols don't appreciate—or refuse to acknowledge the existence of—anything other than a mannequin-like, monolithic way to position oneself aboard the bike. There are three places on the handlebars on which we place our hands; we use the entire fore/aft of what's sittable on a saddle; and we ride both in and out of the saddle. No bike fit session should be finished until all road bike positions—at least five in number—are optimized.
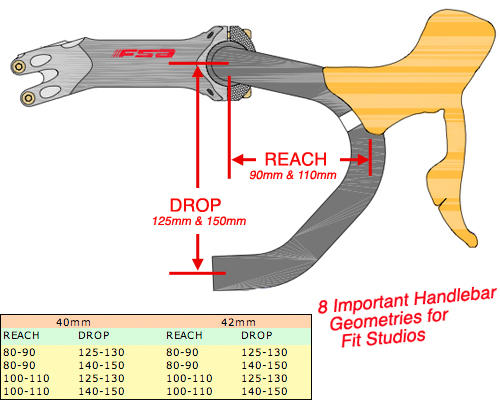
Akin to that is a current truism about road handlebars: They do not vary as wildly in geometry as do tri bars, but they are much more variable in reach and in drop than ever before. Consequently, a rider is unlikely to be content in all the available positions aboard a road bike unless the fitter—and his fit protocol—are equipped to alter handlebar reach, drop and width until all rider positions are optimized.
Otherwise, there is little I'm introducing worth stopping the presses. Most of what you'll read from me about road bike fit will probably seem pretty orthodox and straightforward. Maybe even boring—I apologize in advance.
THE PROTOCOL
Let us get right to the heart of it. The road fit protocol I advocate follows the steps below. Further along, I explain the thinking behind the protocol.
1. Fit Bike Set-Up:
A. Place front end on the fit bike appropriate for the subject.
B. Set the saddle to the approximate ending saddle height, contoured saddles should slightly nose up from the trough, flat saddles should be level.
C. Set the saddle at 10 percent of saddle height, plus 1cm relaxed. For example, a saddle height of 75cm, measured BB thru saddle top (midway between fore/aft), yields a starting saddle setback of 7.5cm (10% of 75cm), minus 1cm = 8.5cm. So, "relaxed" in this case means a setback of 10 percent + 1cm. If you think this is almost certainly too shallow, you're right. The idea is to optimize the rider across a variety of seat angles, shallow to steep. This first trial is likely to be shallower than the eventual rider choice.
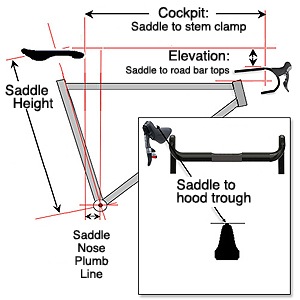
D. Cockpit—saddle nose to center of handlebar clamp—should be set at 75 percent of saddle height. Again, not a driver. Not an indicator. A rough estimate as a starting point.
E. Handlebar elevation—measured in a Y axis, saddle top (omitting any back lip-up of the saddle) to top of handlebar, just as it exits the stem—should be, like saddle setback, 10 percent of saddle height plus 1cm relaxed. "Relaxed" in this case means 10 percent minus 1cm. So, using 75cm of saddle height, 10 percent of 75cm = 7.5cm – 1cm = 6.5cm of handlebar elevation. If you think this is not enough handlebar drop, you'll be right in most cases. As with in tri, the idea is: 1) to match the rearward starting seat angle to a correspondingly higher front end; and 2) to start with the handlebars slightly higher than ideal and lower the handlebars to the rider's satisfaction.
F. Move saddle down 2cm, so that the rider starts with a saddle height obviously too low, in preparation for raising the saddle to its ideal height.
2. Saddle height: Have rider assume neutral position (sitting mid-saddle, hands on hoods), with a slight bend in the elbow. Same protocol as used in F.I.S.T. Tri Bike Fit protocol. Raise the saddle incrementally until subject and fitter concur on the height, with subject pedaling. Included knee angle should be 135° to 144°, angle fulcrum center of knee, arms thru greater trochanter and maleolus. Yes, this knee angle is a slight bit more acute than the included knee angle typical of tri bike positions.
3. Saddle tilt: Correct for saddle tilt by checking for comfort in all three seated positions: seated aft, hand on tops; seated mid, hands on hoods; seated on nose, hands on drops.
4. Cockpit distance: In neutral position, adjust the front of the fit bike fore/aft so that cockpit distance is agreeable to the subject.
5. Handlebar elevation: In neutral position, lower, then if necessary raise, the front of the fit bike to suit the subject's handlebar height.
6. Have the subject move to rearward, hands on tops, and toward the nose, hands on drops, to test all three seated positions. Forward position should be ridden under some significant effort, at a relatively high cadence.
7. Ask the subject if spatial relationships between saddle and bars are correct in each of the three positions. If not, substitute a handlebar and stem to normalize. For example, if seated, hands on tops is cramped when neutral position is comfortable, a longer stem coupled with a shorter reach bar normalizes and retains the neutral position cockpit while lengthening saddle nose to hood trough.
8. Position coordinates, stack and reach are noted. Coordinates archived are saddle height, saddle setback, saddle nose to center of handlebar clamp, saddle nose to center of hood trough, top of saddle to top of handlebar as it leaves the stem.
9. Saddle is moved forward 1cm, cockpit is moved forward the same amount, repeat steps 5 thru 8. Then repeat again, and a fourth time if necessary, asking subject if he likes the steeper position better.
10. Eventual position is pitted against known norms:
A) Saddle setback 9 percent of saddle height.
B) Handlebar elevation 11 percent of saddle height.
C) Saddle-to-hood trough = (.72)(overall height) – (.78)(saddle height)
NOTE: If fit studio, and/or fit bike, is equipped with a way to simulate an ascent, two of the five easily identifiable rider positions—seated, hands on tops, and standing, hands on hoods—are then testable during the protocol.
As opposed to tri bike positioning, steeper will not universally be better. It would not be uncommon for the shallowest trial to be better, and the second or third trial are probably equally likely to be desired.
If you measure the seat angle of these positions, measuring BB thru rail center, don't be put off by overly shallow angles. The oft-used motif of set-back seat posts on road bikes guarantees that seat angles that measure, say, 71.5° may be the position represented by a bike built with a 73° seat angle, with the seat post clamp in the center of the rails. The designer of the bike clearly intended the fat of the bell curve of this bike's rider to be sitting at this seat angle.
Shorter riders may not have the luxury of starting with a seat angle that shallow, for reasons of shoe overlap. Accordingly, the protocol is adjusted slightly for riders 5'6" or shorter. Instead of a starting saddle set back of 10% of seat height + 1cm relaxed, omit the 1cm relaxed. Just start with 10% of saddle height.

Start the discussion at forum.slowtwitch.com