Reasonable bike fit expectations
I rewrite the same basic article every year, updated to reflect the latest thinking in bike fit. This is its 5th consecutive year. I don't rewarm old text because I'm lazy and can't think of other things to write. Here is how a post on our reader forum began today: "I just had a fit done last week and have attached the numbers. I was hoping someone could help educate me on bike fit numbers."
This kind of drives me crazy, because nobody should walk away from a fit session without a very clear understanding of what just happened, and a written list in granular detail of all your options.
The fault is not yours, if you don't understand the output of a fit session, and what your options are as a consumer. Your complaint is almost always justified.
Here is the mistake many of you will make: You will read this and you still won't go into your fit session armed with, and requiring, certain deliverables from the fitter.
Let’s talk about what you should be getting out of a bike fit session. Note: What constituted a thorough and professional set of deliverables 5 years ago no longer suffices now (a lot of fitters haven't gotten that memo).
Fit Session Deliverables
1. Identification of the contact point products (saddle, aerobars) on which you're most comfortable. In other words, yes, a fit session should include you leaving that session knowing that there's a comfortable saddle in the universe for you, and knowing its name, because you rode it (among a number of others, if need be) during the session.
2. Your fit coordinates (explained below) and another set of metrics used to decipher complete bike solutions (also explained below).
3. The bikes that flow from your fit coordinates, i.e., the absolute precise prescriptions of exactly what bikes, in what size, with what front-end configuration, will match your fit coordinates. And, yes, of all the bikes that will match your coordinates, including a bike you ask about (unless that manufacturer doesn't provide basic geometric data on its bikes), whether or not sold by the fitter (unless your fit was given you at no charge).
4. Precisely, in granular detail, how you retrofit your existing bike to match your new fit coordinates, including how to do so should you choose to incorporate your newly discovered (during the fit session) favorite saddle, aerobars, etc.
5. Any other data that is actionable. You own the data. It's your data.
6. A video of what you look like aboard the fit bike.
7. The fit executed aboard a conforming fit bike! Happy to discuss that on our reader forum; the point here is that no, "it's the fitter not the tools" is not an appropriate response. Rather, "it's the fitter and the tools."
8. Where you are relative to norms, and if you differ from those norms, why.
Fit Coordinates
Fit coordinates are the first and most important "output" of a fit session and at a minimum it's just 4 or 5 numbers that you need. (Body angles are not fit coordinates; and while a diagnostic for the fitter they really aren't helpful to you, the consumer). I don’t believe this is just my idea of the output, or the F.I.S.T. protocol’s output (F.I.S.T. is my own fit protocol), I think by now it’s recognized by Retul, Guru Experience and others as a consensus set of deliverables. The problem is that not enough of Retul’s trained fitters, Guru Experience trained fitters, or fitters I have trained in our own fit workshops, are providing these deliverables. What output am I talking about?
Fit coordinates describe where your saddle, aerobars, armrests, etc., are in space, usually relative to the bottom bracket but sometimes relative to each other. They describe how you fit aboard any bike.
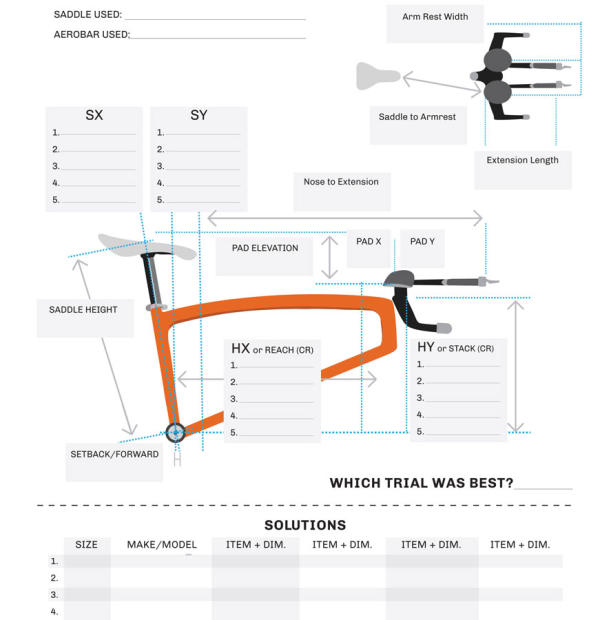
Saddle Height – obvious and simple. I measure from the bottom bracket straight up to the top of the saddle, halfway between the tip and the tail. Certain saddles I alter this convention, and an ISM Adamo is a case in point. There are only several centimeters of rideable “flat” on the saddle, near the nose, and I measure to the center of this section of rideable flat.
Saddle Fore/Aft – the nose of the saddle relative to the bottom bracket. This is strictly an X measurement, meaning if you consider your high school geometry, a Cartesian graph can be used to plot a point along the Y axis (height) or along the X axis (length). We’re just talking about where the nose of the saddle sits, in length, in front of or behind the BB. We also call this a “plumb line” measure, because if we drop a plumb bob from the nose of the saddle and we measure horizontally from the BB to that line, that’s our measure.
Cockpit – depends on whether it’s road or tri. Road, saddle nose forward to what I call the “hood trough,” which is that depression in the hood right before that final upturn (look at the image above). I measure this in a straight line and I call this an “angular” measure rather than an “X/Y” measure. I’m simply measuring directly from the saddle nose to the center of the clamp where the handlebar passes through the stem; and again from the nose directly over to one of the hoods, to the trough. Make sure, obviously, that the wheel is pointing straight forward when you do this. Now, on a tri bike, it’s different. What I want to know is: saddle nose to the back of the armrest (first place that line can touch the armrest); and nose forward to the shifter pivot, which should be directly in line with the index knuckle (where my index finger attaches to my hand). Again, these are angular measures.
Handlebar elevation – Now we’re back to X/Y measures. This is a Y measure. For road, it’s the elevation of the top of the saddle down to the handlebar, the top of the bar, right at that 31.8mm section as it’s ready to pass through the stem. I measure this by placing a level on the saddle, right about the saddle’s midpoint, and hold the level over the front of the bike, just barely to the side of the stem. Then, with the level horizontal, I measure from the bottom of the level to the top of the handlebar. Tri bikes, same sort of thing, just I angle the level over a little more and hold it over the armrest, and measure down to the top of the armrest. This is armrest elevation.
Now, one more thing: You must, as a fitter, note which equipment was used to generate these fit coordinates. Any horizontal measure (saddle fore/aft, cockpit distance), whether road or tri, is saddle dependent. Are you a road rider? Did you switch from a Specialized Toupé to a Specialized Power saddle? The nose of the Power saddle probably sits 20mm further behind the BB, without you moving your hips back at all. This also affects any measure from the saddle nose forward to the handlebars. So, fit coordinates are always specific to the equipment used. Vertical metrics are less affected, that is, your handlebar elevation probably didn't change when you changed from one Specialized saddle to the other, but still, your fitter should always note the equipment under you when fit coordinates are delivered. Also, in all cases it’s necessary to know what crank length was used, and the better fitters will have adjustable cranks on their fit bikes that allow the session to be conducted using the appropriate length.
That’s it. These are fit coordinates. “Wait!” you complain. “What about saddle tilt, aerobar angle, the distance between the armrests!” Sure. Fine. Yes. But these are minor coordinates and don’t port into any system or calculator helping you determine what your complete bike solutions are.
Happy to talk about all of these other metrics, along with a discussion about where your pursuit bars should be on your tri bike, and where the drops and tops should be on your road bike. Just, let's make sure you fitter first gives you your basic fit coordinates. Without these coordinates you aren’t the master of your own bike.
For some years we’ve given you the ability to place your fit coordinates right on your forum user profile. At the bottom of the profile. Here’s mine. As of this writing we need to update this so that you can plunk in HX/HY and Pad X/Y (explained below).
Complete Bike Solutions
Turning fit coordinates into complete bike solutions used to be extra credit for your fitter. Now it's a standard deliverable. Hang with me here as I explain how we do this.
The first part of a fit session is me (the fitter) determining for you (the subject) how you fit aboard a bike, and memorializing it with a bunch of measures that tell you how you fit aboard a bike (any bike). Saddle height. Aerobar elevation. Stuff like that.
There is another set of measures that port into calculators that deliver to you a list of bikes that match your fit coordinates. Let's talk about these metrics.
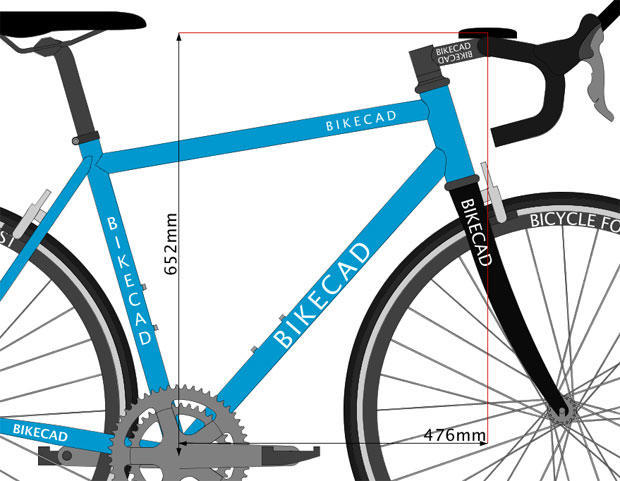
Road Fit: HX/HY – In my opinion, the most important metrics are these, which stand for Handlebar X and Handlebar Y, and are the rise and run from the BB to the handlebar bore (where the handlebar passes through the stem). You can calculate a LOT if you have these numbers but, remember, these metrics must be accompanied by a description of what equipment was used when generating these metrics. Your HX/HY describes where the handlebar clamp on your road bike should be in space given certain assumptions. It describes your position assuming the handlebar used during the fit. Why?
Because there is a thing called handlebar "reach" (everything's called reach these days!). The hooks on one bar might swoop further in front of the bike than on another bar. You want to know what HX is assuming a handlebar with a 70mm reach. Or, an 80mm reach. Or a 90mm reach. Whatever it is that was on the fit bike when the fit was executed.
Also, your fitter should note which road controls (shift/brake levers) were used during the fit. If the ergonomics of new, modern SRAM are different than new, modern Shimano, this might change slightly the fit coordinates of a bike outfitted with Shimano if you were fit while holding onto a pair of SRAM hoods.
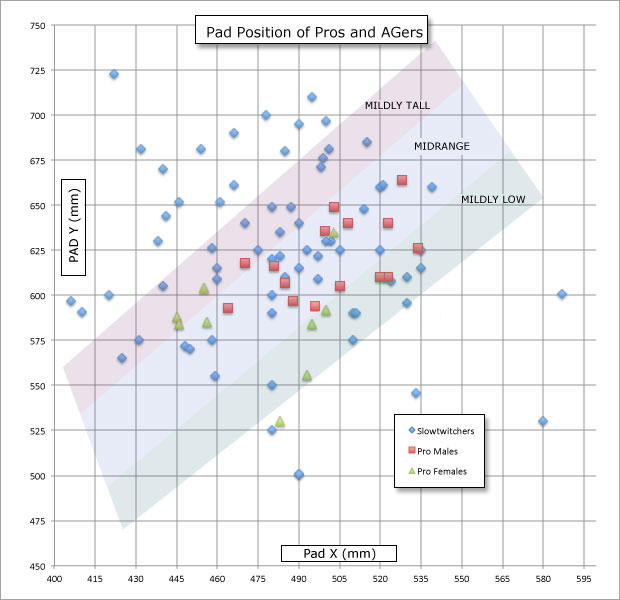
Tri Fit: Pad X/Y – Otherwise known as Pad Stack & Reach, and this is the rise and run from the bottom bracket to the armrests. Because almost all important tri bike companies making superbikes (bikes with integrated front ends) provide some sort of Pad X/Y solver, if your fitter doesn't give you this you can't port these numbers into the solver. I deliver to a consumer both Pad X/Y to the back of the pad, and to pad-center, because depending on the bike company its solver will use pad-rear or pad-center (the diagram below shows what Pad X/Y to the center of the pad refers to).
Fit coordinates are essential for you, because you can’t set up any bike unless you know your fit coordinates. But HX/HY (for road) and Pad X/Y (for tri) — everything underneath the heading of “Complete Bike Solutions” — this allows your fitter to prescribe the list of complete bikes that will fit up under your fit coordinates. If one doesn't have the metrics listed above, it is not possible to "prescribe" with any precision what bikes will work for you. I can't do it, and nobody else can either.
However, if I do have the numbers above, I can tell what list of bikes will match your fit coordinates, or what the geometry needs to be of the custom bike getting built for you.
Tri Bike Solvers or Prescribers
If you tell me your X (horizontal) distance from the bottom bracket forward to the center of the armrest if your ideal position; and the vertical component as well; I can tell you exactly what Trek Speed Concept you'll fit aboard, with granular precision.
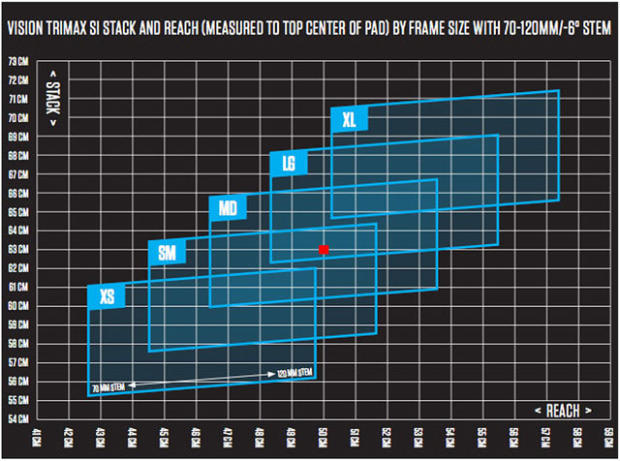
The "prescription" might be: Size L, low/far stem, 25mm pedestal, pads pushed forward 15mm from "neutral". If you give me that same set of metrics, except to the back of the armrests, I'll tell you which Quintana Roo PR6 you'll ride with the same precision; or which Giant Trinity Advanced Pro, or the Cervelo P5X. These three bikes use X and Y to the back of the pad. Above you'll see on a black background the solver for the Orbea Ordu OMP. You'll see a small red square there that identified my Pad X/Y position. As you see I can actually fit on 3 sizes of this bike, and then it becomes a handling and weight displacement decision. Where I am inside a size's parallelogram tells you how many pedestals I'll need under the armrest and whether I'm in the middle, or forward, or rearward of the bike's neutral position.
If my "dot" is way toward the front of the parallelogram, that bike is probably not long enough for me, if I want a really nice-fitting bike. If, after a tri bike fit session, you aren't getting a discussion from your fitter kind of like what you've read in this paragraph, that's a problem.
The second new thing I think you need is a video. In fact, more than one. First you need to see the videos of the "artist's work". Today, I don't know that I'd even sit for a free bike fit session (let alone one that cost $250) unless I saw examples of the fitter's work. Above is the video of a Slowtwitcher who sat for a fit session, got the fit, and then posted the video of the fit on our forum asking whether our forum readers thought this was a proper fit. After much comment and hand wringing, this Slowtwitcher traveled down to the Los Angeles area and was repositioned by our head F.I.S.T. instructor Ian Murray. Below is the result.
If you think the above video is evidence of a fit you admire, go see that fitter. If you like the video below, go see that fitter and give him your money.
We have a field on our database of fitters. It's called Portfolio, and if you click our Search button the very first searchable option is every fitter who has a portfolio. Not enough fitters have taken advantage of this field. They've now had more than a year of my nagging. I'm going to keep nagging them and you should too. The portfolio can be as easy as throwing up videos of fits on a Youtube channel and the portfolio link on our database listing refers to that channel. Mind, as of this writing this is new. It's going to take awhile for fitters to get this done.
Finally, I think you should have a video of your fit. I've just seen too many times when the subject wishes he'd had his fit memorialized in video.
A fit session isn't a discrete occurrence that happens, like a tonsillectomy, and it's immediately in the past, not to be referenced. It's more like a physiological test that generates a set of numbers that you use for training and racing. It's a tool that carries forward. And it's a tool that's yours, that you use.



Start the discussion at forum.slowtwitch.com