Gravel Bikes and Tire Radius
Gravel bikes are a big deal among Slowtwitchers. In fact more of you will be buying a gravel bike for your next bike than will be buying a tri or any other kind of bike. “Which gravel bike should I buy?” is a common question on our Reader Forum. I’ve broached this subject before, but someone on our staff recommended I write about this more explicitly. So, here goes.
I speak and write the same advice whenever asked about gravel, tri, electric or any other kind of bike. Every bike of every sort has to – first – perform all the duties of a bike. The bike has to stop when you depress its brakes. Bikes need to handle as bikes traditionally do. They should adjust to fit, and be reasonably easy to work on. Advanced functions, like aerodynamics, won’t offset the failure of a bike to perform basic functions.
In my opinion, this lack of attention to basic bike functionality can be found across bike categories these days, from road to tri, but gravel in particular is like triathlon was 20 years ago, when geometries were all over the map, and not a lot of thought appears to be given to basic bike handling among those who’re designing the bikes. There are plenty of examples of this, including the wildly variant ways gravel bikes fit, but with no explanation or description.
For example, 3T Exploro geometry in size Large has a stack and reach of 575mm and 390mm respectively. A Specialized Diverge in about the same length (reach) has a frame stack of 610mm. That’s a huge difference. These bikes will fit very differently. They’re both popular; their customers love them; but I can’t find anywhere any explanation that describes the fit of these bikes. The new Diverge’s geometry is described by Specialized as “progressive.” What does that mean? I have no quarrel with the geometry of that bike per se, it’s simply the lack of precision in terminology, and I don’t mean to pick on Specialized. We knew what bike geometries were, and what the terminology meant, 40 years ago. Not so today.
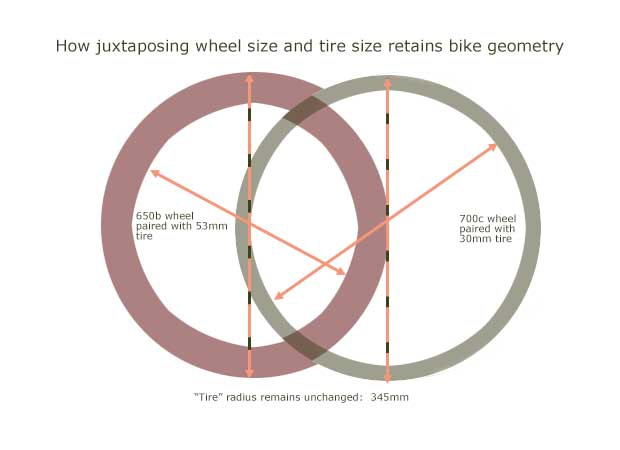
Okay, that’s one example. Today’s example refers to “tire radius” and I’m borrowing this term from Gerard Vroomen, who’s got an ownership foot in both 3T and in OPEN Cycles. By this term he and I mean the distance from the wheel axle to the ground, or the axle and the outward terminus of the inflated tire. These are basically the same thing, except the distance to the ground will be ever so slightly less once you weight the bike and compress the tire a bit. But you get the point, yes? Gerard also refers to this metric as RAM (Radius As Measured). Above is a drawing of 2 wheels that enjoy the same RAM, or tire radius, though with vastly different kinds of tires on them. We'll get to concrete examples in a minute.
Why is this metric important? It affects the bike in 3 ways. The first is steering geometry. The traditional tire radius for road bikes was around 336mm, but that has steadily grown as tires have gotten bigger. I remember when I used to time trial on 18mm tires. That grew to 20mm, to 23mm, to 25mm, and now 25mm is pretty much the narrowest tire we ride. Some of us are riding 28mm, even in triathlons, and today’s newest tri bikes are typically built to handle 28mm tires. A lot of today’s tire makers are making their road tires up to 30mm (Schwalbe's Pro One) and even 32mm (CADEX). The distance from the wheel axle to the edge of the tire’s contact patch is now, on these larger 28mm and 30mm tires, in the neighborhood of 345mm. This is especially true on today's rims that have larger inner bead diameters, which play a part in the ever-larger tire radii in our road and tri bikes.
This changes the way the bike rides because tire radius, along with the bike’s head angle and the amount of fork offset determines “trail”. Trail is the distance the front tire’s contact patch “trails” the projection of the steering axis. A lot of trail makes the bike very stable at speed, and less trail makes it more steerable. This isn’t a good or bad thing. It’s like surfing with a longboard or a shortboard. Each has its virtue. Just, if you’re a bike designer and you have a sense for how you want your bike to ride, and this means trail is a design input. If you change the trail by a lot (say, more than 3mm or 4mm) this changes the way the bike rides.
This hasn’t been a big deal, really, because the change in trail is too fine between a 25mm and 28mm tire for you to notice. What you may well notice is a difference in the way the bike handles when you change from a 28mm to a 43mm tire. Now you’re moving from a 345mm tire radius to something approaching 360mm. Here’s the practical application of this in gravel bikes: first, you have to design the bike for the tire radius you intend to have used in the bike; and second, if you as a user intend for a bike to be dual use – as both a road and a gravel bike with simply a wheel change – then your bike is going to handle very differently unless you strategically account for tire radius.
The second way changing tire radius changes the bike is in bottom bracket height. Bike designers generally talk in terms of BB drop, and that is the vertical distance between the BB spindle and the wheelbase line (it’s in the image below). In former days, the BB drop and the BB height (distance from the BB to the ground) were pretty much just each side of the coin: the greater the BB drop, the lower the BB height. Not so anymore. Because gravel bikes can handle an extreme range of tire sizes, the BB drop is unchanged, but the BB height can change quite a bit, and this affects handling as well. However, to be honest, this is the least impactful element of changing tire sizes.
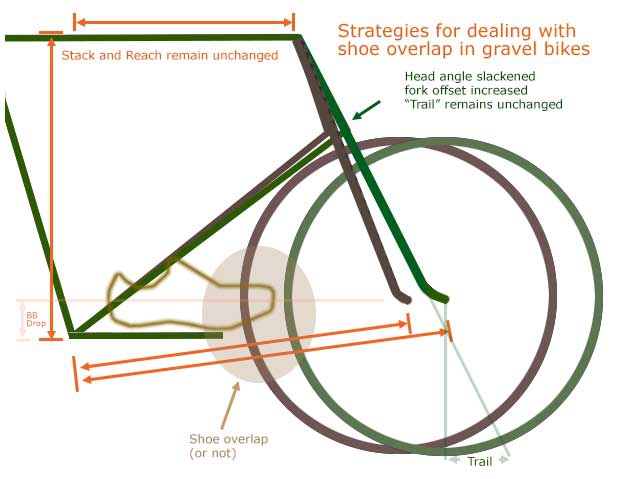
A much bigger issue is shoe overlap. As you see in the image above – which is not to scale and somewhat exaggerated for effect – a bike that may have no shoe overlap with 30mm tires may have it with 40mm tires. So, the gravel bike you get either will or won’t have shoe overlap depending on what tire radius the designer had in mind. Fun fact: as the image above shows, you can push the front wheel further in front of you without changing the trail by both slackening the head angle and increasing fork offset. For very different reasons this technique is used in gravel bikes (for shoe overlap), tri bikes (for weight displacement) and women's bikes (for bike fit reasons).
Back to how a bike designer deals with shoe overlap. First, do that thing I just mentioned: increase the bike's front center via a slacker head angle and extra fork offset. Or, juxtapose wheel size and tire size to preserve that tire radius you have in mind. For example, what I have found is that the odd, outlier tire radius is the 700c wheel with the 40mm and above tire. Basically, you’re making a 29er when you make this bike. And that’s fine. My favorite MTB is a hardtail 29er with a massive tire radius. But the bike is designed for that.
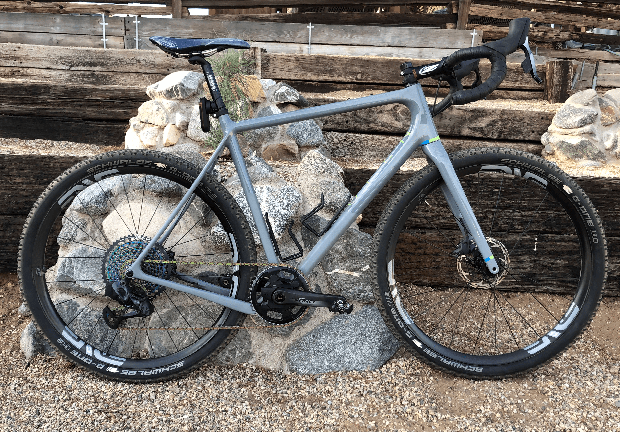
My dual use gravel bike has a set of 700c wheels with 30mm tires mounted – that’s the Clark Kent edition – and then it steps into a phone booth and emerges with 650b wheels with 53mm tires. That latter is the gravel edition. Because it’s got disc brakes I can swap these wheels in and out. The bike doesn’t look funny with a different wheel size; it looks normal with these 2 wheel sizes, because the bike was made with 345mm tires as a design input (my OPEN WI.DE with 650b wheels is below).
This allows the bike maker to make design decisions that optimize performance. 3T’s Racemax uses a road fork crown height (370mm) rather than the larger (395mm) height a lot of other gravel bike makers use, because 3T assumes you’re not going to make a penny-farthing out of its bike by slapping that huge tire on a 700c wheel. In fact, here you can find a list of wheel radii as measured with sample tires mounted.
Here is what this practically means. If you adopt the same strategy as do I, the unusable size is the 38mm to 43mm tire. Among my preferred gravel bikes this tire width is the “odd man out.” If I ride it on a 700c wheel, the tire radius is too large; on a 650b wheel, it’s too small. I’m either on a 700c wheel with a 28mm to 32mm tire; or I’m on a 650b wheel with a 50mm to 56mm tire. In this case my tire radius (WAM) will always be around 345mm, or will vary plus or minus by no more than about 3mm.
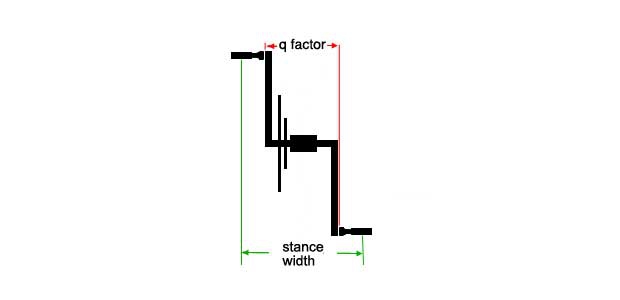
If you adopt this strategy, you have to be careful about the bike you buy, because gravel bikes are built on a road platform. By this I mean that your stance width (how far your feet are away from the bike’s centerline as you’re pedaling) are the same as on a road bike, rather than the much larger stance width you have on your MTB. (I’ll bet you didn’t know that, did you? The Q factor of your road bike is about 145mm or 150mm; on our MTB it’s in the 172mm to 1755mm range.) How do you fit a fat tire on a road frame platform, without the tire pushing the chainstays out to the point they interfere with the crank’s chain rings? Well, for one, you swap the 700c wheel out for a 650b wheel. Second, you either drop or raise the chain stays to make room for the crank. This is how the best new gravel bikes are made today.
You don’t need to worry too much about all of that. Just make sure that your bike can handle the tire width (53mm, 55mm, 57mm, whatever you intend to use) when mounted on a 650b wheel. Just ask. Ask the seller of that bike. If you just want to ride a 43mm tire on a 700c bike, that’s fine too. Just, in my opinion, you should first make sure the bike is designed with this in mind – both in steering geometry and in shoe overlap – and you must know that the bike is going to handle pretty differently if and when you choose to use it as a road bike.


Start the discussion at forum.slowtwitch.com