Grab your fast food, soda, and favorite dessert, because it’s time to…
Get. Fat.
If you thought triathlon was all about being skinny, lean, light, or anything of the sort, you’re wrong. Well, at least in the winter… when it comes to your tires. You need all the girth you can get.
They didn’t exist ten years ago, and how they seem to be all the rage. What am I talking about? The specialty-mountain-bikes simply known as “Fat bikes”. What defines a fat bike? While I don’t believe any official rules exist, there are a few generally accepted minimums:
1. Tires with a minimum cross section of 3.7”
2. 100mm bottom bracket shell width
3. Rim width of 60mm or more (Note – that’s WIDTH, not depth. Turn your deep section aero rim on its side.)
Aside from those relatively loose rules, there are quite a few variations out there. It’s a rather simple concept. More tire means more control in loose conditions. Super wide tires “float” over snow and sand. If you’ve ever ridden one of these bikes, you know what I mean. They might seem painfully slow on smooth pavement, but they’re the fastest bikes you’ll ever ride on deep sand and snow. As a bonus, they’re great conversation starters and generators of smiles with people you’ve never met.
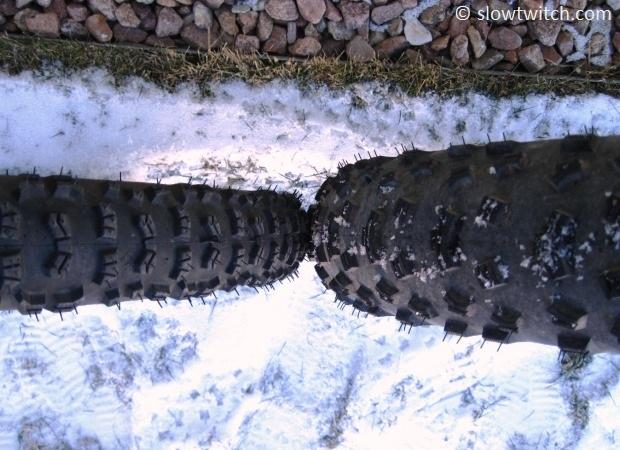
To give you an idea of how fat we’re talking here, take a look at the comparison photo below. On the left is a 26×2.4” mountain bike tire. A 2.4” is on the large size for standard cross country mountain bikes (akin to a 25 or 27mm tire on a road bike). On the right, you see the 26×3.8” front tire from my fat bike.
Positively rotund, no? Even though fat bikes use 26 inch wheels, the overall diameter of the tire is almost identical to a standard 29” mountain bike tire.
Fat Bike History
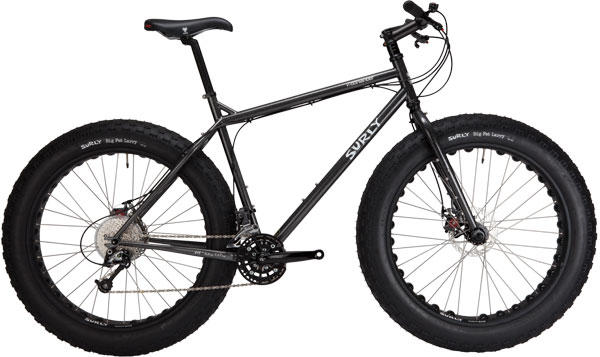
Fat bikes officially debuted en mass in 2005, with a groundbreaking bicycle from Minnesota-based Surly – the Pugsley. There was one tire in the world for this bike (also made by Surly), the Endomorph 26×3.7”.
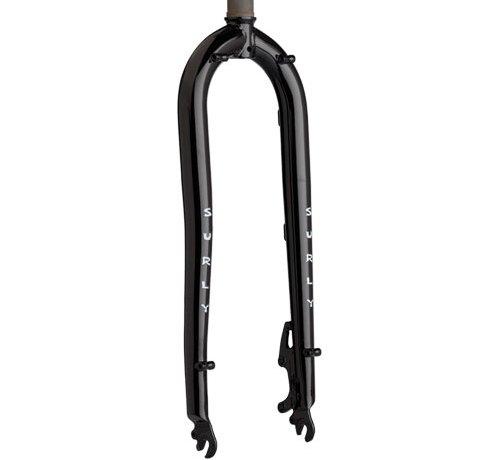
This steel-framed beast had all of the right stuff – 100mm BB, huge tire clearance, and 60mm Large Marge rims. The frame was also offset to one side by 17.5mm. That’s right – the whole thing is bent (look at the right fork leg – on your left in this view):
What gives? A bent frame and fork? The issue stems from the tire width. If they used a normal mountain bike 135mm-spaced rear hub, the chain would rub on the gigantic rear tire. They had to find a way to push everything out to the right, to move the chainline away and allow clearance of the huge fatties. Solution? Offset the frame and fork. The Puglsey accepts 135mm spaced hubs both in the rear AND front. That’s right – you can use two rear hubs. The idea behind this is that it allows you to use two complete rear wheels so you have a backup driving wheel in case something bad happens out in the wilderness. Plus, it would be an interesting challenge to fit a 3.8” tire through a standard 100mm spaced front fork. Problem solved.
If the whole frame is offset, won’t the bike be unbalanced? Would you steer in circles or tip over? Surly had a solution for this as well – make a rim with offset spoke holes. This allows you to lace the wheels so the rims are still in-line with the center of the bike, while also retaining reasonable spoke angles. You’re offsetting the rims in the opposite direction of the offset frame.
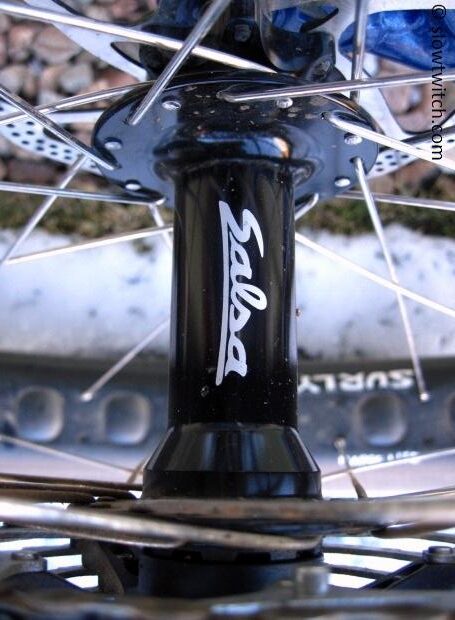
In more recent times, some bikes have popped up with a different take on this issue, from brands like Salsa Cycles and Alaska-based Fatback. They still use the 135mm front hub (which are now offered sans freehub – so it’s just an extra wide front hub). The rear, however, uses a massive 170mm spaced hub, seen here on my personal Salsa Mukluk:
The frame is symmetrical, like a normal bike – only wider. The 170mm rear hub achieves the same chainline as a 17.5mm offset 135mm hub.
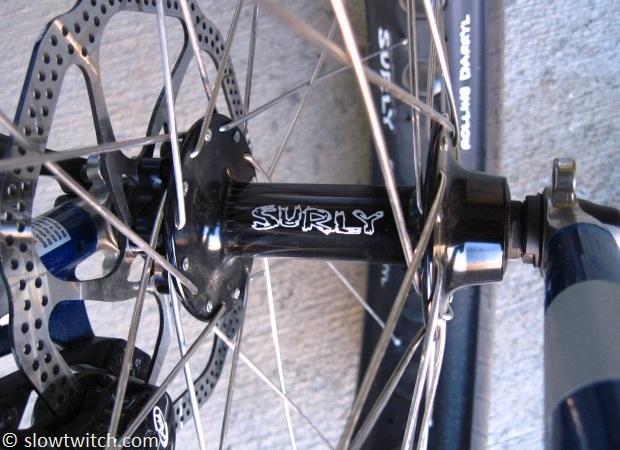
My front hub is the cost-friendly Surly with threaded steel axle. Because it lacks a freehub, it is lighter than using a rear 135mm hub on the front of the bike:
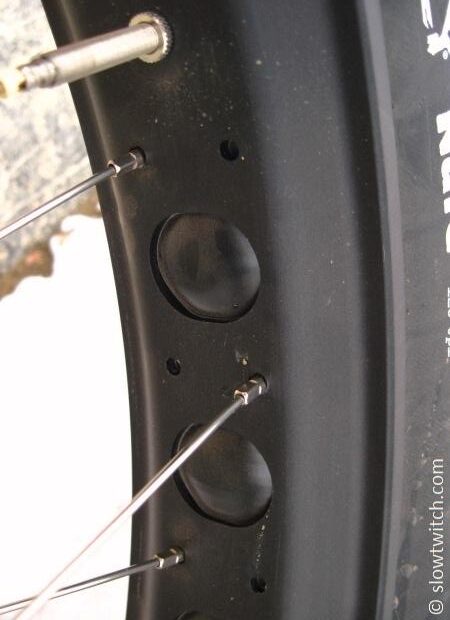
Surly now offers rims with double spoke drilling (64 spoke holes for a 32 spoke wheel). The purpose behind this is that it allows you to lace the wheels symmetrically, for bikes like my Mukluk – OR offset, for bikes like the Pugsley.
If you want to lace offset, all of the spokes go to one side of the rim. For a symmetrical wheel like mine (above), you simply alternate spoke holes.
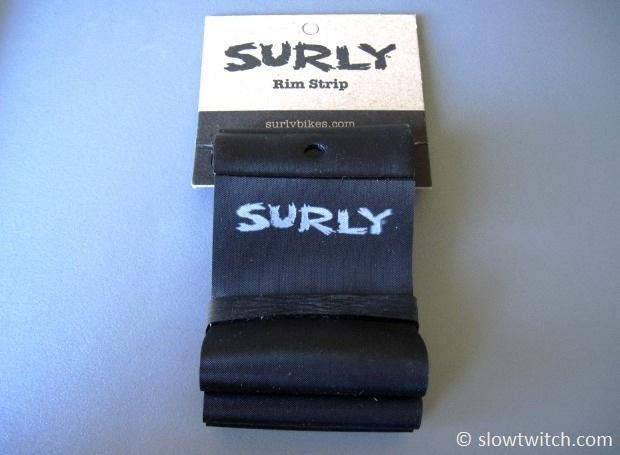
You also may notice that there are some other large holes in the rim. Most fat bike rims today are single-wall, meaning that there is only one layer of material in the rim (most aluminum road rims, for example, are double wall). With such a wide rim, double walls would mean very heavy weight. Surly’s double wall Large Marge DH rim, for example, weighs in at an astounding 1150 grams. That’s heavier than most carbon road frames today. The single wall, cutout Marge Lite, in contrast, weighs a ‘feathery’ 690 grams. With the cutout single wall rims, the one strange side effect is that you can see the rim tape through the rim. It actually bulges out due to the pressure in the tube. For added fun, they offer the tape in a variety of wild colors, for those who want to express themselves visually.
Maybe I’m boring, but I opted for black tape. At least Henry Ford would approve.
Surly offers rims in multiple widths these days:
Large Marge and Marge Lite: 60mm
Rolling Darryl: 82mm
Clownshoe: 100mm
Fatback offers rims in 70 and 90mm widths, splitting the difference. Other rims include the 80mm Vicious Graceful Fat Sheba and the US Chopper 100mm. Fatter rims spread the tire casing to make it wider, improving tire ‘float’, but also reduce the overall diameter slightly.
What about tire choices? While we started with only one (the Surly Endomorph), there are now a surprising amount of options. Surly offers the Endomorph, Larry, Black Floyd, Knard, and Nate in the 3.7-3.8” width. We now see more options sprouting from Vee Rubber and Origin 8. Surly’s sister brand, 45NRTH, debuted the very popular Husker Du 26×4.0 in early 2012. For 2013, they pulled out all of the stops and started offering the first studded fat bike tire, the Dillinger:
Way back in the beginning, nobody could have imagined all of these tire choices. I’ve ridden fat tires, and I’ve ridden studded tires, but never tires that are fat and studded. They cost a pretty penny at $225 each, but for such a low-sales-volume (and likely high cost-of-materials) item, I can’t say that’s an outrageous asking price.
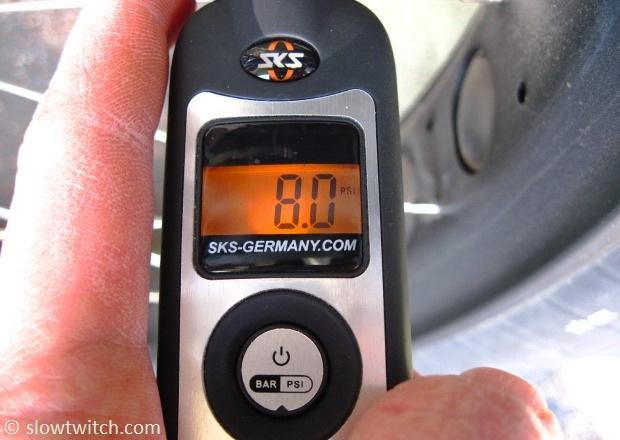
What is an appropriate pressure for these huge tires? On the road, it might seem odd to use less than 100psi. For cyclocross, the top professionals dip below 30psi on occasion. For standard mountain bikes with tubeless tires, it’s not uncommon to get in the low 20’s. On a fat bike… well, let’s just say that single digits aren’t out of the question:
When I first got in to fat biking, I started around 10psi. That seemed about right. I’d heard about some of the snow-riding crazies using as low as 4-5psi in deep powder, but that just seemed TOO low at first glance. Over time, I slowly reduced pressure… just waiting for the tire to bottom out on the rim. Thus far, nobody offers a tubeless-ready fat tire, so you must use a (large) inner tube – which is subject to pinch flatting.
I went to 9, then 8.5, then 8psi. Still no pinch flats. Finally, at 7psi I managed to feel both tires bottom out – mind you, on a very rocky trail. I now consider 8 to be my minimum for anything rocky, but have no problem with less for snow-only riding. The other risk with running pressure that is TOO low is that you can actually cause the tires and rims to spin independently of each other (low pressure means less tire bead force on the rim).
The New Breed – Super Fat
There is a new sub-segment of fat bikes that is emerging before our eyes as we move in to 2013. I don’t know if there is even an official name for it, so I’m going with “Super Fat Bike” (‘Morbidly Obese Bike’ didn’t quite have the same ring). This began in 2012 as Surly released a new bike, called the Moonlander. Rather than use a 17.5mm offset frame and 3.8” tire, it uses a 28mm offset frame and a massive 26x4.8” tire, mounted to the Clownshoe 100mm rim.
There is another important change that the Moonlander brought – the offset double crank. They call it the Mr. Whirly Offset Double. You see, even with the extra offset frame, you still could not use the granny ring of a triple and the big cog out back without rubbing the right side of the rear tire. Surly solved this problem by ditching the big ring all together. With their special design, the small ring moves to the middle position, and the middle ring moves to the outside position. Voila – more chain/tire clearance.
For the first year, there was a single tire available for this bike – the Big Fat Larry. For 2013, Surly expanded the line to include two knobbier tires – the Bud and Lou. If you’re about to glaze over from all of the tire choices, I’d like to offer a short summary of what’s out there. This is entirely in my own words, and not necessarily what the manufacturers say. All are listed in approximate order from the fastest rolling to most aggressive.
3.7 to 4.0” width
Surly Black Floyd: Slick streetfighter. Surly Endomorph: The original. Chevron tread pattern, low profile, fast roller. Surly Larry: The first semi-knobby fat tire. Good all-rounder, but can wash out in deep snow. Surly Knard: Tightly-spaced knobs, akin to a Kenda Small Block 8. Fast “XC” tire. 45NRTH Husker Du: Taller, moderately spaced knobs, akin to a Maxxis Ardent. Good all-rounder, with better cornering traction than the Larry. Surly Nate: Huge, widely spaced knobs. It’s a slow roller in a straight line, but has fantastic grip and mud shedding ability. My personal favorite. 45NRTH Dillinger: The first studded fat tire. 45NRTH Escalator: Dillinger minus the studs – do-it-yourself.
4.8” width
Surly Big Fat Larry: Like the ‘skinny’ Larry, only bigger. Float on sand dunes and even land on the moon. Surly Bud: New high-grip front tire, meant to be paired with Lou. Surly Lou: Like the Nate, only larger and with taller knobs (meant for paddling forward in mud and slush). Meant to be paired with Bud.
Personally, I’ve used the Larry 3.8, the Nate 3.8, and the Husker Du. I have no experience with the Origin8 and Vee Rubber tires.
Triathlete’s Fat Build
I think about a lot of strange things for bikes. One thing I’m almost positive nobody else has had cross their mind is the ideal fat bike build for a triathlete. What might that look like? How could our needs differ from those of, say, a true mountain biker? This thought process went through my brain, and ultimately dictated the outcome of my personal fat bike. Let’s take a look.
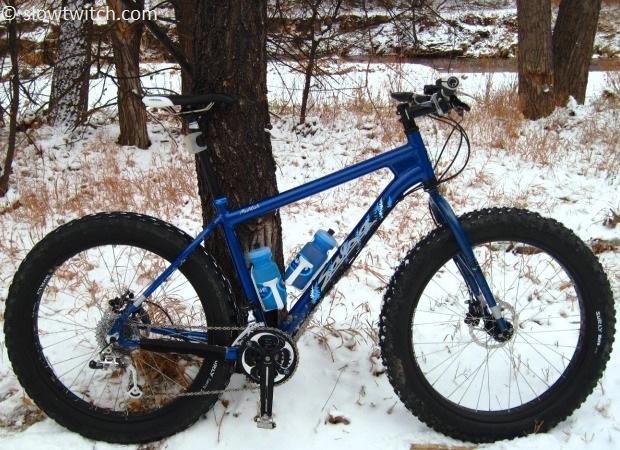
To start, I had to pick a frame. This was a relatively easy choice. I like the Surly bikes for their value, but wanted to stay away from steel if possible (given that I’d be riding this bike in slushy snow). This lead me to the symmetrical aluminum frames from Salsa and Fatback. My local shop carries Salsa, so that decided it. I ordered a blue Mukluk frameset, and it arrived in just a few days.
Why not go for full fat-ness with the Moonlander? As I’ve written before, I’m a fan of wide gear ranges. I don’t like having to change my equipment setup to ride different places. For my mountain bikes, that means I’m usually riding a triple crankset. If I went with the Moonlander, I’d lose my big ring. Now, you may argue that speeds are generally slower on fat bikes – which I agree with. However, having owned the fat bike for a year now, I can confidently say that I use the big ring often enough that I’m glad it’s there. I wanted gears more than I wanted extra tire width.
This desire for a wide gear range also dictated my rim width. You can fit a 100mm rim in the rear of a Mukluk. The problem is that this spreads the tire so much that you must use an offset double crank or space out the cassette. I decided that I’d use the 82mm wide Rolling Darryl rim up front, and the 60mm wide Marge Lite in the rear. This seemed like the best balance of weight, float, and clearance.
I have about 8-10mm of clearance between the chain and tire while in the small ring and largest cog:
For tires, I generally use the knobby Surly Nate on the front, and the Larry 3.8 in the rear, run backwards for extra climbing traction. After hemming and hawing for days on tires, this seemed like the best choice. It is not uncommon for mountain bikes to feature a larger and/or more aggressive tire on the front of the bike, where cornering traction is most critical. On the rear, you can usually get away with a little bit less ‘bite’, in favor of improved rolling resistance. I’ve also used the 45NRTH Husker Du, and found it to be a nice middle ground between Nate and Larry. When I wear out my existing tires, my next trial is going to be a Bud 4.8” on the front, and a Nate 3.8” on the rear.
My Mukluk frame has plenty of clearance out back for 3.8” tires.
Aside from the issue of gearing and drivetrain clearance, the bike is fairly standard. Saddle choice is always individual, and I went with my favorite ISM Breakaway:
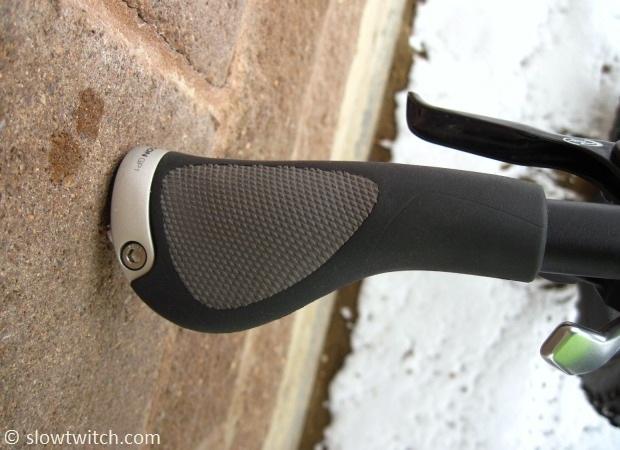
My hands have an equally plush experience with my favorite Ergon GP-1 grips:
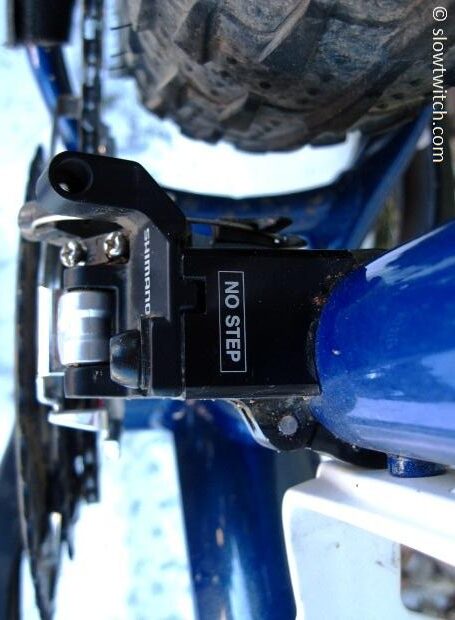
Most of the new fat bikes use a direct mount front derailleur, bolted to a custom clamp adapter from QBP house brand, Problem Solvers. A traditional clamp-style derailleur simply would not allow the cage to move out far enough to the right. I’ll give them ten points for the joke, too:
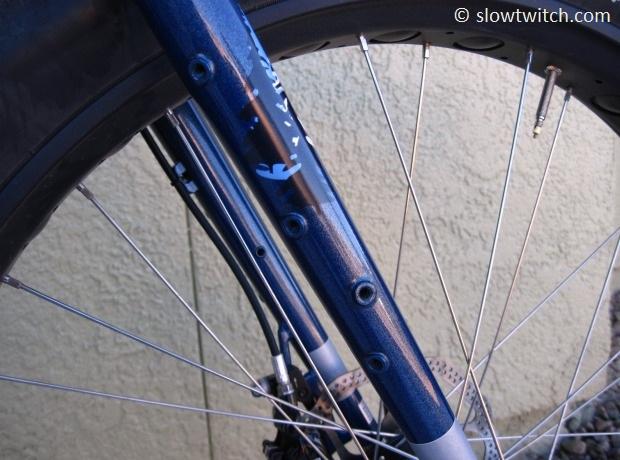
Salsa offers a generous number of mounting points for racks, fenders, bottles, and packs. As you can see below, the fork has the ability to accept bottle cages, in case you want to fill up the main frame triangle with a bag.
Price, Weight, and Compromises
How much does a fat bike cost?
It can vary, but prices generally start in the ballpark of $1,500. The top of the price range is just like triathlon bikes – the sky is the limit. Building a frame up from scratch is generally more expensive than a ‘standard’ mountain bike due to the odd and/or proprietary parts – 100mm BB, special cranks, special hubs, wide rims, and expensive tires.
How much does a fat bike weigh?
This is one area in which you can’t get around the laws of nature. These bikes are big. Big weighs more. Most average fat bikes weigh between about 30 and 45 pounds, assuming it’s not loaded down with extra touring gear. For 2013, Salsa introduced a ‘lite’ version of the Mukluk, called the Beargrease. It has a lightweight aluminum fork, more expensive parts, and weighs 28.5 lbs in stock trim.
Are there other costs or considerations?
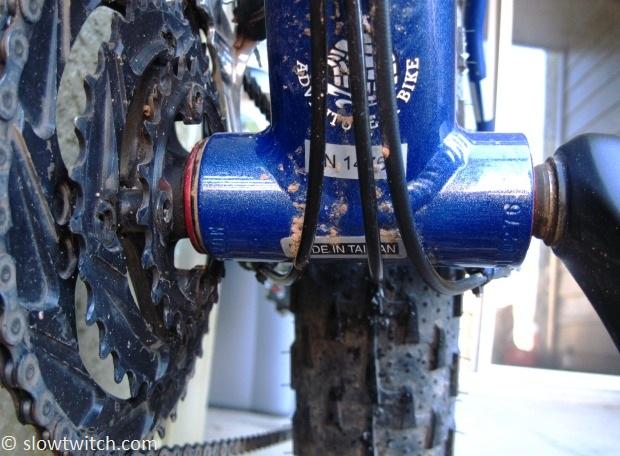
There is one topic that comes up from time to time with fat bikes – Q factor, or Stance Width. In simple terms, this means how far your feet are apart from each other while pedaling. Some people like wide, some people like narrow. With fat bikes, it’s wide, due to the 100mm bottom bracket shell. Compare that to a standard 68mm road shell, and you’ve got a Q factor that’s at least 32mm wider. Personally, I don’t mind it in the least. If you think this might present a problem for you, it’s a good idea to test ride a fat bike before buying.
Here’s a photo of that 100mm shell. Note the full length cable housings (which resist contamination and ice better than split housings and externally-run cables):
How do they ride? Are they really that much better than standard mountain bikes in snow? In a word – yes. The benefit is real. My old winter bike was a single speed 29er with the biggest tires I could fit. Riding it in deep snow was an experience, to say the least. Even with ‘only’ 60 and 82mm rims and 3.8” tires on this bike, its performance is head and shoulders above my old 29er. While you can’t ride over absolutely everything (i.e. three feet of soft powder), you can definitely do a lot more pedaling – and a lot less walking.
We hope you’ve enjoyed this look at the newest (and most fun) segment of the bicycle world. Fat bikes are certainly not for everyone, but can be a great addition to the stable of bikes for someone that thinks they have everything. If you live in a snowy area – or positively hate riding the trainer indoors – a fat bike may be just the thing your training is asking for.
Pictured Mukluk full specifications:
Salsa Mukluk aluminum frame Salsa Enabler steel fork SRAM X9 9-speed trigger shifters SRAM XO 9-speed long cage rear derailleur Shimano XT direct mount front derailleur with Problem Solvers adapter Shimano XT 11-34 9-speed cassette Shimano 9-speed HG chain FSA Alpha ISIS drive 170mm crankset FSA 100mm DH ISIS bottom bracket – stuffed with extra grease WickWerks 44/33/22 chainrings Truvativ bar, stem, and seatpost Avid Elixir XO brakes with 160mm 6-bolt HS rotors ISM Breakaway saddle Ergon GP1 grips Front rim: Surly Rolling Darryl Rear rim: Surly Marge Lite Front hub: Surly 135mm fat front with XTR skewer Rear hub: Salsa 170mm Mukluk 3 with Salsa skewer Spokes: DT Competition with 14mm brass nipples Front tire: Surly Nate 26×3.8 Rear tire: Surly Larry 26×3.8, backwards Surly fat tubes FSA The Pig DH headset – stuffed with extra grease Sampson E-Z Grip bottle cages Shimano XT pedals Lizard Skins chainstay guard Bellini mini handlebar bell
To provide the best experiences, we and our partners use technologies like cookies to store and/or access device information. Consenting to these technologies will allow us and our partners to process personal data such as browsing behavior or unique IDs on this site and show (non-) personalized ads. Not consenting or withdrawing consent, may adversely affect certain features and functions.
Click below to consent to the above or make granular choices. Your choices will be applied to this site only. You can change your settings at any time, including withdrawing your consent, by using the toggles on the Cookie Policy, or by clicking on the manage consent button at the bottom of the screen.
Functional
Always active
The technical storage or access is strictly necessary for the legitimate purpose of enabling the use of a specific service explicitly requested by the subscriber or user, or for the sole purpose of carrying out the transmission of a communication over an electronic communications network.
Preferences
The technical storage or access is necessary for the legitimate purpose of storing preferences that are not requested by the subscriber or user.
Statistics
The technical storage or access that is used exclusively for statistical purposes.The technical storage or access that is used exclusively for anonymous statistical purposes. Without a subpoena, voluntary compliance on the part of your Internet Service Provider, or additional records from a third party, information stored or retrieved for this purpose alone cannot usually be used to identify you.
Marketing
The technical storage or access is required to create user profiles to send advertising, or to track the user on a website or across several websites for similar marketing purposes.
To provide the best experiences, we use technologies like cookies to store and/or access device information. Consenting to these technologies will allow us to process data such as browsing behavior or unique IDs on this site. Not consenting or withdrawing consent, may adversely affect certain features and functions.
Functional
Always active
The technical storage or access is strictly necessary for the legitimate purpose of enabling the use of a specific service explicitly requested by the subscriber or user, or for the sole purpose of carrying out the transmission of a communication over an electronic communications network.
Preferences
The technical storage or access is necessary for the legitimate purpose of storing preferences that are not requested by the subscriber or user.
Statistics
The technical storage or access that is used exclusively for statistical purposes.The technical storage or access that is used exclusively for anonymous statistical purposes. Without a subpoena, voluntary compliance on the part of your Internet Service Provider, or additional records from a third party, information stored or retrieved for this purpose alone cannot usually be used to identify you.
Marketing
The technical storage or access is required to create user profiles to send advertising, or to track the user on a website or across several websites for similar marketing purposes.


Start the discussion at forum.slowtwitch.com