Valve Extender How-To

I don’t get it. Some people just hate valve extenders. No - despise them. I used to work for a high-end carbon wheel manufacturer, and part of my job was attending race expos as a company representative. We did everything from handing out catalogs, to answering questions, to telling people where the nearest port-o-john was located (past the bikes, down the row, and hang a Louie). It was a glamorous rock-star lifestyle.
I was working at one of these events some years back in California. It was a sleepy Saturday afternoon, and expo traffic was rather light. Then - from afar - a woman approached. She had a wheel in each hand, and a scowl on her face. As she neared, I attempted my cheeriest rendition of, “Hi, how are you?” Her response? “I really can’t stand your wheels at all. I just hate these wheels!”
We were off to a great start. I immediately went in to auto-customer-service-mode. “I’m so sorry, what can I do to help?” She went on, “I just can’t ever pump these things up! My training wheels work just fine. But these things…! They’re supposed to be so great, and they sure were expensive, but I can’t even pump them up!”
Oh. Boy.
Before she had approached, I was mentally preparing myself for the worst. I thought maybe she broke one of the rims on a pothole. Maybe she had broken both of them. Maybe the deep-section rims were too difficult to handle in crosswinds. Something – anything. But… the valve extenders? That was the huge problem?
Taken aback, I asked to take a look at her wheels to see what was going on. To my surprise, she wasn’t even using the valve extenders that came provided with the wheels (along with a text-and-photo instruction sheet on how to install them). So… she was furious with me about a product that we didn’t even make. Strike one.
They were clincher wheels, so I removed the tires and tubes to see what was going on. This revealed what I expected… the valve extenders were installed improperly. She had simply opened the presta valves and threaded the extenders on. She had done one worse too – the valves had been opened and left loose, so one of them had threaded itself shut from the vibration of riding down the road. All the cards were stacked against her – strike two and three.
I attempted to make a quick explanation of what had happened, but judging by the near-visible smoke coming from her ears, I decided it was a better choice to just re-install the extenders properly, put the tires and tubes back on the wheels, and send her on her way. Customer service agents everywhere will tell you that their worst enemy is often an uneducated consumer. Or in this industry, an athlete bursting with pre-race nerves. Unlucky for me – she was both.
Believe it or not, but her problem was not an uncommon one. Thankfully, most people were more polite when the same problem did arise - but I was still surprised by the sheer frequency of such a simple problem. If nothing else, it proved to me that 90% of people never read instruction manuals. What is the number one cause of valve extender problems? Since the issue is so common – there must be someone or something to blame. The valve extenders are defective. The inner tubes are defective. Elvis really didn’t die, and he sneaks around to bike shops to sabotage their inventory in the middle of the night.
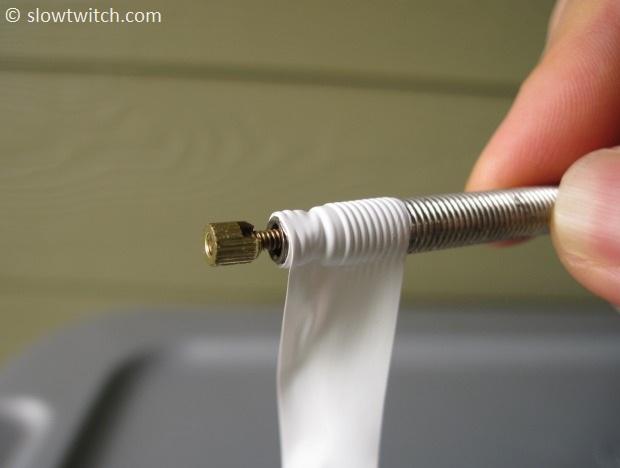
Or maybe it’s something really simple, like a lack of Teflon tape. Yes, the simple white tape that you can buy for 99 cents at the hardware store. Genius! You see, a threaded metal-on-metal contact will not be air tight on its own. Teflon tape is simply a means to fill up the extra space between the male and female threads, and create an air-tight seal. You wouldn’t install a single metal water pipe in your house without it, so why is it so frequently overlooked on bicycles?

So – before you read any further or try to install your next valve extender – go buy a few rolls of this stuff. It’s cheap and it works really, really well.
Valve Extender Types – And How To Install Them
There are two main types of valve extenders. First is the basic “tube” extender, pictured here (standard Zipp extender on top, and a Shimano Dura Ace C50 extender on bottom).

This is the type of extender that my expo friend had. It’s the old standard, and generally works fine. My two personal favorites of everything on the market are the Zipp and Shimano designs. They both feature large diameter ends with a textured surface – both essential for getting a good “bite” on most pumps. The narrow or non-textured types tend to cause the pump to slip off at pressures over 100psi (7 bar).
There are a couple keys to using this type of extender. First, you must open the valve really hard. The idea is to open it all the way, and then use a pair of needle nose pliers to force it open an additional half turn or so. This intentionally damages the threads, so the valve stays open permanently. If you don’t do this, you have a very good chance that the valve will rattle itself shut as you ride (which prevents you from putting any air in the tire next time you try to pump up).
I like to use two pairs of needle nose pliers for this task. One to hold the valve core in place, and the other to force the valve open:

The second key with this type of extender is dependent on whether or not valve has a removable core. If it does – now is the time to make sure it is tight. You can use one of your needle nose pliers to snug it down. Don’t kill it; just be sure it isn’t loose.

Now it’s time for the Teflon tape. In a few words – don’t be bashful. Lay it on thick. I see some folks do a measly two or three wraps. I’m talking more like ten. This, of course, depends on the thickness of tape you use – but most of the white tapes are thin and need to be caked on.

I know that I have enough tape when I start to thread the extender on and feel some resistance. If it threads on too easy, I add more tape.

I can usually get the extender on sufficiently tight just by hand. You can also grab the valve with your pliers to gain extra leverage. Zipp’s extenders are actually broached in the end for a 3mm allen key to aid in installation – just don’t get too crazy and overtighten it (you can crack the extender).

That’s it. Now just install your tire and/or tube as you normally would and pump away. If you sealed everything up well, you should get an accurate reading on the pump.
The last thing to note with this type of extender is that it is intended to be permanent. I’ve seen people remove them after pumping up their tires in order to “save weight”. Sorry Slim, but you just ruined the seal of the Teflon tape and have to start all over again. If you’re riding tubulars, that means regluing the whole thing. Leave those extenders on! Yes, really!
Some folks also question the fact that you are leaving the presta valve open. Won’t air leak out? Short of having a valve that is defective – no, you will not lose air. You see, presta valves are designed to hold themselves shut because of the pressure inside the inner tube. Air only gets released when you manually depress the plunger. I don’t know anyone who is talented enough to do that while riding… so I think you’re safe.
But – if this whole open-presta idea still looks suspicious – you’re in luck. There is a second category of valve extenders that are exactly what you’re looking for. The only caveat is that your valve must have a removable valve core. If it doesn’t, you must use the extender type described above.
This newer type of extender is still shaped like a mini tube or pipe. There are several options on the market, including but not limited to: Vittoria, Zipp, Tufo, Lightweight, and Stan’s. In the photo below, the new Zipp extender is on the left, and a Stan’s extender is on the right.

My personal favorite of this type is the Stan’s extender. It is the only one I’m aware of that is externally-threaded, which aids in keeping your pump head latched on at high pressures (some of the non-threaded ones require that you hold the pump on with your hand).
The key feature with this type of extender is the fact that it retains full function of your valve. The first step for installation is to remove the valve core. You can use needle nose pliers (as shown above), or the slick tool from Stan’s NoTubes, pictured here:

Out comes the core:

Now – before you go threading that extender in – I highly recommend using Teflon tape. You’ll notice that most of these extenders feature some sort of rubber O-ring, which is intended to aid in sealing:

To be blunt – don’t trust it. Just use the tape. Note, however, that due to the very fine threads, you do not want or need to use as many wraps as in the first example. Typically two or three wraps are sufficient.

Now, thread the extender in to the valve. Some extenders, such as the Zipp product, include their own mini wrenches to help snug down the extender (but you can also use pliers):

The last step is simply to thread the valve core in to the end of the extender. If you really want to get crazy with it, put a couple wraps of Teflon tape around the core’s threads (just be sure that your tape does not interfere with the function of the valve – you may have to trim the width to avoid this).

Snug the core down however you please – with pliers, the Stan’s tool, or the closed end of a Zipp valve wrench (pictured here):

In some cases with deep section rims, you may need more than one extender. Simply stack them up to reach your desired length. This was necessary for the Lightweight Fernweg wheels I reviewed previously:

Each part of the stack has Teflon tape, and it works beautifully.
See? That’s not so hard, is it? The only things required are a bit of your time, some inexpensive tape, and a pair of pliers (or two to make it easy). I consider it a small investment with huge benefits – namely, a reduction in race morning stress, and improved accuracy in setting tire pressure. You may even impress your friends with your new-found mechanical prowess.


