Let’s talk about truing wheels. Is it science or art? Or… black magic?
Truing a wheel can seem daunting for those who have never done it. I’ve been there. I remember buying my first set of “nice” wheels and immediately bringing them to my local mechanic just to have him check the spoke tension. I had no clue how to even approach the topic. Are the wheels okay? Did I get my money’s worth?
Alas, wheel truing is rather simple when you break it down. The key – as with most things – is practice. It really does make perfect.
This guide is not necessarily all-encompassing. There are just too many different types of proprietary spokes, spoke nipples, rims, wheel designs, and tools to cover everything. I will attempt to cover the basics that apply to ALL wheels, and note important exceptions when necessary.
The photos in this article were taken while I was building up a new pair of wheels. However – it is NOT a guide to building wheels. For that, I recommend you purchase The Art of Wheelbuilding by Gerd Schraner. It’s a classic, and still very relevant today. Our article intends to cover what you should do for simply wheel truing (i.e. you spin your wheel at home, notice it’s wobbly side-to-side, and want to fix it).
Getting Started
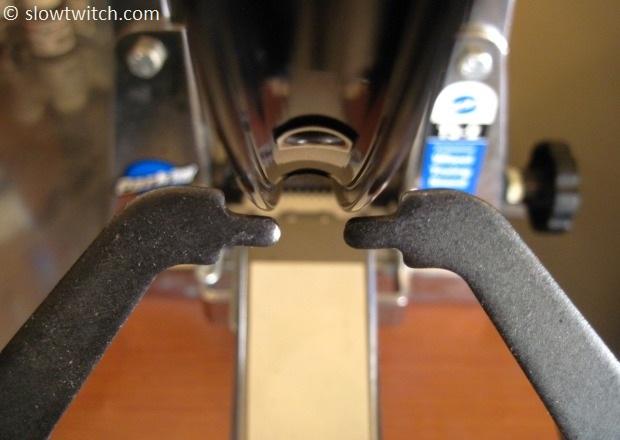
The most important tool for truing wheels is a truing stand. I have ‘the standard’ – the Park TS-2. It has a pair of calipers that you can widen and narrow around your rim. The purpose of this is to provide a static reference point; when you spin the wheel and notice the rim moving left and right between the calipers, you know the rim is not straight.

Alternatively, in a pinch you can use a bike’s brake pads as a reference point (instead of a truing stand). I’ve done this while on-the-road without access to my tool kit. It can get you by, but does not offer the same level of precision that a real truing stand does.
You will also need a spoke wrench. Be prepared, because there are at least a couple dozen different types out there. Here are a few of mine:
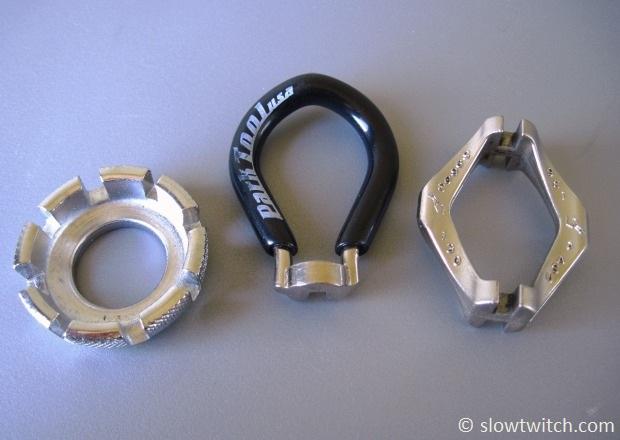
In the center is my trusty Park black wrench. It is made to fit standard spoke nipples (for 2.0mm spokes). Park offers a few different color wrenches for different size spoke nipples. On the left and right, you see some of my ‘multi spoke wrenches’. These don’t offer as secure a fit as my nice Park wrench, but they come in handy when working on lots of different wheels. For some reason, cheap OEM wheels tend to have really odd size spoke nipples. When working on aluminum nipples, I have a 4-sided DT Swiss wrench; it offers superior engagement for the relatively fragile aluminum material. I build all of my training wheels with brass nipples (for their strength and corrosion resistance), so today we’ll use the black Park wrench.
So your wheel is in the truing stand. Must you always remove the tire beforehand? If you can access the spoke nipples from the inside diameter of the wheel, you do not need to remove the tire (provided the tire fits in the truing stand – some large mountain bike tires do not fit). If your wheel has internal nipples or those that are otherwise accessed from the outside of the rim, you must remove the tire and rim tape. If you have a tubular tire, yes, that means it must come off (which is the number one reason mechanics hate tubular wheels with internal nipples).
What now? Just pull the rim left or right as needed? Is it that simple?
For the most part, yes – it is that simple. If the rim is pulling to the left, tighten the spokes going to the right side of the wheel. If it’s pulling to the right, tighten the left spokes. BUT – before you go turning wrenches, there are some important details to discuss.
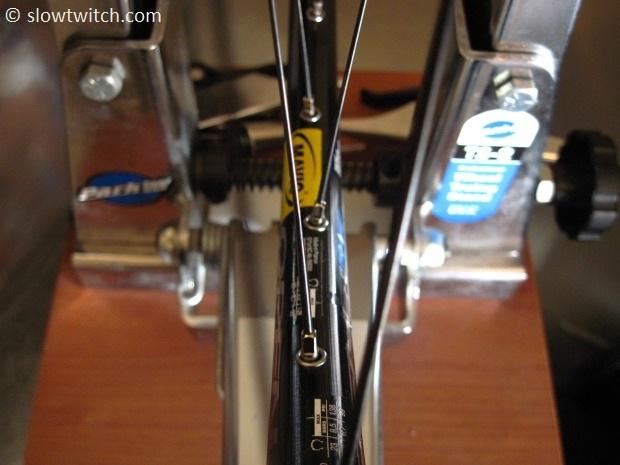
First, always use a lubricant before you start adjusting spokes. This goes double for old wheels. Where do you apply it?

In the above photo, I drew two arrows. The blue arrow shows the place you absolutely-positively must apply lubricant (between the nipple and the rim). I do this regardless of rim material (carbon, aluminum, etc). What type of lube? Most wet chain lubes do the job just fine (but don’t use a wax-based lube). I’m cheap, so I bought a small needle dropper tool and just refill it with leftover auto engine oil from oil changes. Apply one small drop-per-nipple that you’re going to adjust.
Whether or not you apply lubricant at the location of the red arrow (between the spoke and nipple) is a little bit more open to debate. Some manufacturers use various thread locking compounds after wheel assembly. Some do not. What I usually do is try to adjust a spoke nipple without lube; if it is easy to turn, I roll with it. If it’s difficult to turn, I add lube. If the manufacturer did something stupid like use a high strength Loctite on the spoke threads, I drench everything in lube; at that point, I’m just hoping to avoid breaking alloy nipples and getting myself in to a lot more work than I bargained for.
So we’re ready to start pulling the rim left and right? You may have honed in on that ‘high spot’ in the rim, and are ready to pull it back in line. Before you do, you may want to consider a few things:
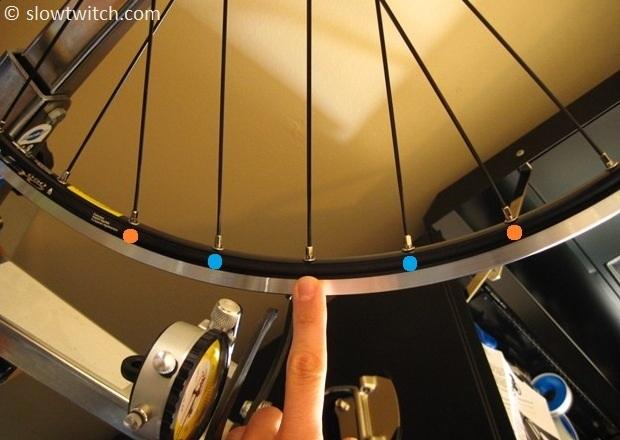
Let’s say that the rim is pulling to the right, exactly where my finger is (so the rim is being pulled away from my finger). X marks the spot – and THAT is the spot. We should tighten that specific spoke, right? That will pull the rim back to where it ought to be?
Yes, it tightening that one spoke will absolutely bring the rim back in the proper direction, but that does not mean it is the best decision. Another option might be to loosen the two neighboring spokes (with blue dots). Or – what if we actually want to tighten the spokes with orange dots? Or a combination of everything?!
The best way to find out the answer is to use a tension meter. There are several different types out there; I have the simple blue model from Park.

As you can see, the tension meter is a tool that pushes the spoke to the side. The looser the spoke is, the easier it is to displace. There is a scale on the end of the tool that gives you a reading:

What do the numbers mean? In order to figure that out, you must use the handy chart that Park includes.

This chart is double-sided and shows dimensions for various round or bladed spokes. You must pick the column that most closely matches your spokes. In my case, I’m using DT Aerolite bladed spokes, so I use the 2.1x1.1mm column.
Looking down on the chart, the left column (in bold) shows the arbitrary units that show up on the tension meter itself. If you go over to your appropriate column, you see another number. That is the actual tension, in kilograms force (Kgf). If you prefer to talk in Newtons, one Kgf equals ten Newtons.

Most manufacturers have a suggested spoke tension for their wheels. They’ll usually tell you the tension for the front wheel, as well as the right and left sides of the rear wheel. If you cannot find this information, a good ballpark is about 120 Kgf for the drive side. With most wheel designs, the non-drive side could be anywhere from 30-70% of that. Front wheels are usually slightly less than the rear drive side; call it about 115 Kgf.
For my wheel today, I’m looking at the fourth column from the left on the chart above. The closest number to 120 Kgf is ‘122’. This is 15 units on the Park tension meter, so that is my target for the drive side of the wheel. If I was using a 2.0mm round spoke, the same 120 Kgf would net a meter reading of 25 (due to the much thicker spoke).
The point of the tension meter is this: Even if you know nothing about what tension your wheel is supposed to be at, the tension meter will at least give you an objective comparison between the spokes that are actually on your wheel. If you’re measuring the drive side and two neighboring spokes read ‘10’ and ‘20’ – you know that there’s a big problem. The spoke tension is very uneven. When adjusting your rim left or right, it is always best to evaluate an area of spokes to see what the best decision is. In my experience, adjusting a single spoke by a large amount is the correct decision about 10% of the time. In the other 90% of cases, you’re usually adjusting more than one spoke a smaller amount. The end goal is both a straight wheel AND a wheel with even tension.
When it comes to actually turning wrenches, there are a couple things to keep in mind. If you’re using bladed spokes, it is in your best interest to buy a bladed spoke tool, such as mine from DT Swiss:

This keeps the blade part straight – not only is that more aerodynamic, but it also leads to better wheel longevity. As you turn the nipple, the spoke will want to turn with it. If you have round spokes, you cannot see this happening. In that case, I keep two fingers on the spoke itself to feel whether it is turning. I’ll also over-tighten each nipple by about 1/8th turn, and then turn it back 1/8th to undo any wind-up.
The other widely-accepted method of reducing spoke wind-up is to “de-stress” the spokes. That’s a nice way of saying “smash the heck out of the spokes”.

I usually use two hands and grab spokes in groups of four. All you do is smash them towards the center of the wheel. If you’re working with round spokes that have wound-up, you may hear some creaking and crinkling while you do this step (that’s the spokes finding their way back straight). I do this step many times during the truing or building process – it never hurts to do it more, but can definitely hurt if you never do it. If you do not un-wind the spokes like this, it will happen the first time you ride the wheel – and likely put it out of true.
It is also worth noting which direction you should turn those spoke nipples. Most spokes have standard right hand threads (righty-tighty). Note, however, that you must approach this in your head knowing that it's righty-tighty from THIS direction:

If you’re using a hex driver to true your wheel from the outside, the tightening direction makes perfect sense. If, however, you’re working from the inside of the wheel (like I am today), it will appear to be backwards – simply because you’re effectively working upside down. I do have a pair of Shimano 29er mountain bike wheels that are actually opposite – they have left-hand threads. When in doubt, do a test on one spoke and note which direction it pulls the rim.
When the wheel is getting close to straight, I pull out the heavy artillery – the Morningstar R.O.C2-TECH dial gauges.

These gauges attach to any standard TS-2 stand. They provide you with an objective measurement of how true the wheel is. I’ve known Paul Morningstar through the industry for several years, and I’ll admit – even I was a skeptic of the dials. Paul said to just ‘trust me’, and see for myself. The beauty of the dials is that – not only do they tell you where the high spots in the rim are, they tell you the high spot of the high spot. You can hone in on EXACTLY where you want to go. A bonus that I wasn’t expecting is that they help in low light conditions. If you’re working in anywhere but a perfectly-lit work space, it can be difficult to see the distance between your rim and the calipers. The R.O.C2 gauges give you a bright and clear display of exactly what you need to know. Trust me – they’re awesome.
Radial Truing
While we’ve only dealt with lateral (side-to-side) truing up to this point, you should also consider the radial true of your wheels. Put simply, your wheels might not be as round as you think. If you want to look at radial true, you MUST remove the tire from your wheel.
The Park TS-2 stand has an easy method for looking at the radial true of your wheel – bring the calipers together, and adjust them like this:
When you spin the wheel, you’ll see the rim move up and down. On the ‘low spots’, you want to tighten spokes to bring the rim up. On ‘high spots’, you can loosen spokes to let the rim down. On aluminum wheels, I usually adjust spokes in pairs of four – two right and two left. I loosen or tighten them all the same amount to avoid messing up the lateral trueness of the wheel.
This is also the point where carbon and aluminum wheels differ. Carbon rims are much stiffer than aluminum. Put simply, the amount that you can radially manipulate a carbon rim is MUCH less than aluminum. As such, when adjusting radial trueness, you need to adjust many more spokes. Think of it as shifting the entire rim up or down – rather than bending a part of that rim to be more straight. Instead of adjusting 4 spokes, I might adjust 8 or 10. This also brings up the point that carbon wheels rely much more on roundness of the rim itself for a straight wheel; an imperfect rim cannot be manipulated very much (unlike aluminum).
Morningstar Tools also makes a radial-truing version of their R.O.C2-TECH dials, seen here:

It works in a similar way to the lateral dial, and makes precise and objective adjustment much easier.
Wheel Dish
In addition to lateral and radial true, you may also want to check the dish of your wheel. What is dish? This term refers to how centered the rim is relative to the hub. If the rim is offset to the left or right, you’d say that the wheel is “out of dish”.
To check dish, you will need a dishing gauge. The idea is to lay the flat part over your rim, and adjust a piece in the center to meet your hub. Before you go doing so, make note of this:

My Park dishing gauge has an adjustable block on either end. If you are checking your wheel’s dish with a tire still on it, adjust these blocks so that they contact ONLY the rim (not the tire). You do not want an imperfect tire to influence your dish measurement. If you removed your tire from the wheel, you can remove these blocks entirely.
Lay the dishing gauge on one side of the wheel. You want to adjust the center piece so it just barely clears the lock nut. Note – the lock nut is NOT the end of the axle. You want the dishing gauge on the surface that actually touches inside face of your frame or fork (NOT the axle end – which rests inside of your frame/fork dropouts).

Next, put the dishing gauge on the other side of the wheel. If the dish is perfect, you will have exactly the same amount of space between the gauge and the lock nut. My wheel below is clearly NOT in dish (this was very early in the wheel building process):

As you can guess, the rim needs to come to the right. To achieve this, I’ll tighten all of the right side spokes. Or – if they were already at maximum tension, I might loosen the left side spokes.
Wrap Up
The process of truing wheels just takes time and experience. Even if I made a perfect guide on how to do it, you will still screw it up. I’ve certainly screwed up a lot. It is best to start practicing on cheap wheels; you’ll eventually figure it out. The most important thing is to consider ALL adjustments at the same time. If you adjust lateral trueness, it will also affect radial trueness and dish – there’s no way around it. Because that is the case, always evaluate a large area of spokes (on both sides of the wheel) before making a decision on what to adjust. More often than not, your best course of action is to adjust three or four spokes by a quarter or eighth turn, rather than one or two spokes by a half turn.
Miscellaneous Notes and Considerations:
1. Truing ‘race’ wheels. As noted above, carbon rims behave differently than aluminum rims, especially when it comes to radial truing. The other thing to consider is that most ‘race’ wheels usually have fewer spokes than training wheels. Fewer spokes means that your adjustment points are fewer and further between. Translation: It’s harder to make them as true as training wheels. That’s life. You must be more precise with your adjustments and live with the fact that a 16 spoke wheel might never be as true as one with 36 spokes.
2. When replacing a broken spoke, you should always reduce the spoke tension of the entire wheel. If you simply replace the one spoke and bring it back up to tension, your chance for problems later on goes up. I reduce the entire wheel’s tension by about 50%, replace the spoke, and bring everything back up to tension together. If you’re using alloy nipples – yes, the chance for breaking one goes up compared to brass.
3. Retaining compounds. Should you use one on the spoke threads? I’ve tried everything under the sun – linseed oil, Spoke Prep, regular oil, Loctite, etc. When building new wheels, I’ve taken to using a tiny amount of oil on the end of the spoke threads before beginning assembly, and then using a little bit of low strength Loctite when the build is complete.

Wheelsmith Spoke Prep seems to work well, but is more time consuming to apply. The best medicine to avoid spoke loosening over time is to use a sufficiently high tension in the first place.
If I am truing a wheel (not building from scratch), I normally do NOT use a retaining compound. Often times the manufacturer used one of their own during building, and I don’t know whether it will mix well with mine. The exception to this is the case of a particularly problematic wheel. If spokes keep loosening over and over, I Loctite them (but it’s rare).
All images © Greg Kopecky / slowtwitch.com
![]()