
While the concept of a placing a water bottle between your aerobars isn’t new, the execution is evolving. The original aerobar bottles hang vertically between the extensions and feature a straw sticking out the top. They usually have an opening on top for filling on-the-fly at aid stations, and some sort of anti-splash mechanism (a sponge, for example).
The next big step in aerobar-mounted hydration was simple: zip-tie a standard water bottle cage on top of the extensions. This is an easy solution that works well for many people. There is an extra bonus in that this setup tends to be the most aerodynamic. The key limitation, however, is that large size bottles (i.e. 24 ounces or more) don’t always fit, depending on the length and style of your aerobar extensions. You must completely remove the bottle to drink from it, which requires a fair amount of space.
There is a new type of system hitting the market that is an attempt at the best of both worlds from the two systems above. Profile-Design makes one, called the Aero HC System:

As you can see, the Aero HC features a horizontal bottle, placed similarly to a standard water bottle. However, like the older vertical bottles, it also features a straw and refill port – so it never needs to be removed from the cage while riding. The capacity is equal to a large size standard water bottle, at 24 ounces.
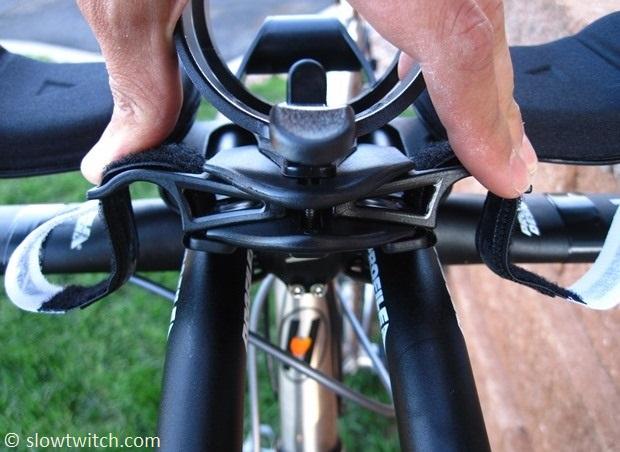
This photo shows the system with the bottle removed:

There are two adjustable Velcro straps that wrap around your aerobar extensions. You may also notice that Profile cleverly integrated a computer mount, located behind the bottle’s resting position. Computer and accessory placement can be difficult on triathlon bikes due to limited real-estate. For example, if your frame has an integrated stem, there is a good chance that a GPS display will not fit. You also can’t put it between your aerobars if you have a bottle there – making this auxiliary computer mount a must.
The whole system adjusts with two 3mm hex bolts. You can slide the cage and computer mount fore and aft, completely independent of each other.

Loosening those two bolts also allows for width adjustment of the extension straps. According to Profile-Design, the minimum extension width is 80mm (center-to- center), and the maximum is 120mm.
Note: the bottle cage design is not just a normal run-of-the-mill cage. It has a metal tab that protrudes, resulting in a very secure fit with the bottle.

Profile says that the bottle plastic bottle is BPA-free. The entire ‘nose cone’ unscrews for cleaning:

There is a simple flip-top cap that allows for on-the-fly filling:

Overall, I think the Aero HC System is a very nice addition to the Profile-Design product line. The design is simple, it holds the bottle well, and is a nice middle ground between the sometimes-clunky vertical bottles, and the minimal horizontal-zip-tie-cages. The computer mount is a definite value-add.
The only real deal-breaker for some people will be the capacity. Whether or not this is an issue for a person depends on many factors – race distance, ambient temperature, number of bottles on their bike, aid station setup, sweat rate, and so on. For comparison, Profile’s Aero Drink carries 32 ounces, and their larger Aquacell holds 35 ounces. That isn’t a huge delta from the Aero HC’s 24, but it is worth considering if you’re a heavy sweater and ride a bike with limited fluid carrying capacity.
T3+ and T3+ Carbon Fit Notes
While we’re on the topic of Profile-Design, I want to go over a few fit notes for their T3+ and T3+ Carbon clip-on bars. We recently wrote about these bars, linked at the bottom of this page. The things I have to discuss are directly related to the Aero HC above (in fact, I only discovered most of it by accident).
Profile’s main clip-on aerobar line works like this. The T1+, T2+, T3+, and T4+ all have the same clamp hardware, but different extension shapes (and those extensions are made of aluminum). The T1+, T2+, T3+, and T4+ Carbon also share the same clamp hardware – but it is different from the standard hardware. The ‘plus Carbon’ bars feature carbon fiber extensions.
Due to the carbon extensions and somewhat more complicated design, the carbon bars cost more than the standard bars. The catch, however, is that the two categories of bars fit differently – and don’t all work with the same hydration systems.
Let’s talk details.
Installation Notes
I was in need of some clip-ons for one of my tri bikes. Based on my fit coordinates, stem, and my bike’s head tube length, I narrowed my selection down to the Zipp Vuka Alumina Clip, and the Profile bars mentioned above. I recently used the Zipps on my Serotta 650c Project bike, so I decided to give the Profile product a whirl.
Based on the recommendation of our publisher, Dan Empfield, I wanted to try the T3+. However, because I’m a big reliability weenie, I wanted to use aluminum extensions. I thought the standard T3+ would work just fine. Profile sent a pair of bars, and I got to working.
The T3+ has some funky-looking extensions, which they call their ‘Carbon fiber ergonomic multi-position drop bend extensions’. Some call them ‘wrist relief’ extensions, a term coined by John Cobb. Here’s a comparison of these extensions (right) with a standard extension (left):

I’ve never used any sort of wrist relief extension, and thought they were worth a try. In the past, I’ve tried-but-hated ‘s-bend’ extensions, and stuck with the old-school design.
After trying Profile’s ergo extensions, I have a new favorite. I wouldn’t call them ‘wrist relief’ so much as ‘heel-of-your-hand relief’. Here’s an attempted illustration of that (don’t worry, I’m not going to launch my hand modeling career any time soon):

All they’re doing is dipping the extension out of your way – and then bringing it back up to your hand. There is zero interference between the extension and your hand (or watch strap). It’s a simple, but important improvement upon the old extension style.
The real success, however, is that Profile positively knocked it out of the park when it comes to extension length. This seems to elude many bar makers – how long do we make the upturned part of the extension? How tall should it be relative to the arm pad? Should we leave it long and rely on the user to cut it down? Should we make it short so it looks cool? Profile – in my opinion – got it right on target. The shifter lays perfectly in your hand, and no cutting is required. Of course, the only downside is that the extensions would be too short without shifters plugged in (e.g. for use on a road bike with drop handlebars and no bar-end shifters).
Profile also sent their full riser kit to me, which allows for easy stacking of the entire aerobar. Both the pads and extensions travel vertically together. I award bonus points for Profile continuing to use real size hardware with 5mm hex heads. Some other bar makers have really wimped out on bolts in an attempt to save weight, but making them prone to stripping out. For people who travel, are busy, or might not use a torque wrench all the time (so - all of us), I think the robust design is a smart one.

NOTE: while not a functional issue, you should know the bolts go top-down on the standard T-series bars, and bottom-up on the ‘plus’ bars.
After a lot of measuring, cutting, and bolting things together, I arrived with a finished setup:

You will notice that the arm pad carriers are not the stock hardware that comes with the T3 bars. I opted to upgrade to the Carbon series’ F35 pads, on Dan’s recommendation. This photo shows the F35 (left) compared with the stock F19 pads (right).

With everything installed, I realized there was a problem, Houston. The aerobars were placed as narrow as possible (right next to the stem clamp area) – but the arm pads were way too wide. My normal pad width is 17cm center-to-center – not what I’d consider to be excessively wide OR narrow. The T3+ bars have no width adjustment for the pads, outside of moving the entire clip-on.
Editor's Note: In fact - these bars do have a width adjustment feature, which Profile pointed out to me later. There is an extra-long bolt that can be used, which doubles as an armrest holder and also clamps down on the extension.
I think the easiest way for Profile to improve the design would be to add a third row of holes to the arm pad carrier. Make it a grid of sorts. What about the pads’ angular adjustment, however? The current carriers feature one set of holes that are round, and another that are slotted – to allow for angle adjustment. I think the solution is to make ALL of the holes round, but slightly oversize to allow for this adjustment. Zipp did it on the first generation Vuka Clip, and it worked well.
Without my imaginary pad carriers, however, I opted to rebuild the bike with T3+ Carbon hardware.
Here are the key differences between the two sets of clamp hardware:
First, you’ll notice that the Carbon hardware has a nice width adjustment feature for the pads – note the three holes on the wing below:

You’ll also see that the system uses a unique compression plug to secure the extension, rather than a pinch bolt.

In addition to the width adjustment, this design does two things differently than the standard T3 hardware
1. The pad holders sit on a fixed wing; it cannot angle down over time.
2. The extensions come straight out over the clamp, rather than being offset - bringing everything closer to the stem (including the arm pads).
This photo illustrates everything – we have the T3+ Carbon on the left and T3+ on the right:

Here is a top-down view:

The pads on the T3+ Carbon aren’t any narrower relative to the extension; it’s just that the extensions happen to sit closer together, bringing the pads along with them. What I ended up with is essentially a complete T3+ Carbon system, but with T3 alloy extensions. If you wanted to buy everything aftermarket, here’s what you’d need:
J4 Brackets
Aerobar Bracket Riser Kit
T3 alloy extensions
F-35 Armrest kit
Or if you want the carbon extensions, just get a complete T3+ Carbon bar and avoid all of my fuss.
With this bar setup placed as narrow as possible, my pads measured 18cm C-T-C. That’s still 1cm wider than normal for me, but I wasn’t about to rebuild my bike for a third time. I’ve ridden it around enough to know that it feels fine to me with an 18cm gap.
The interesting side effect, however, is that the Aero HC System no longer fit. The minimum width between the extensions is 80mm center-to-center, or about 70mm from edge-to-edge. With my T3+ setup in this configuration, the edge-to-edge width between the extensions is 38mm – not even close to working:
The solution in this case is to use Profile’s other BTA (between-the-aerobar) mounting system, the HC Mount:

This simple device allows you to use any bottle cage, and lays on top of the aero extensions. It includes zip-ties for attachment. I have to think that most people who use the Carbon-series bars will have to use the HC mount.
Our publisher wrote that he thinks the T3+ is the best clip-on bar currently available at any price. Personally, I’d add a qualifier: For those people who require a pad width of 18cm (center-to-center) or greater. That's the narrowest that either the T3+ or T3+ Carbon can go. If you need pads that sit narrower than that, this bar will not work for you.
If you do require pads that are closer together, I think the Zipp Vuka Alumina Clip is your choice. That bar is fit-opposite to the Profile bar in terms of pad width. The Zipp extensions run relatively wide, with narrow pads… and the Profile extensions run relatively narrow, with wide pads.
Interestingly enough, my pad width of 17cm seems to elude both of these bars. On my 650c Project Bike, I had to bring the Zipp clamp hardware out very wide to bring the pads out – and then angle the extensions towards each other. However, the resulting pad width sits at 16.5cm – just shy of what I wanted. There is a little bit more width adjustment available on the base bar, but I’m going to be stubborn and say that I just don’t like my extensions that wide.
As a big aerobar geek, I’m excited to see where this evolution is going. Some of the product on the market today is really, really good. Compared to five or ten years ago, we’re spoiled. I do not think, however, that the evolution is done. Many bar makers have figured out proper stacking of the clamps and extensions, such as Profile, Zipp, and Bontrager. I think the two areas left for improvement and refinement are:
1. The width relationship between the arm pads, clamp hardware, and extensions
2. The height relationship between the top of the arm pad and the end of the extension (made more difficult due to different shifter designs – and whether or not the consumer uses a plug-in shifter at all)
![]()

