Break out the degreaser and gloves, ‘cause it’s time to get dirty. Or rather, make your cassette not dirty.
We realize that this may be considered to be ‘very easy’ by some of you. Why waste the time doing a How-To on cleaning cassettes? Everyone and their mother’s brother knows how to do that. Well, Mr. Macho Mechanic, not everyone knows how to do it. We can’t all be as smart, suave, and fresh-smelling as you, so back off, okay?
In fact, this is one area in which a lot of people could use a reminder on. Even for those who may have installed or removed a cassette in their day, a second lesson never hurts (and maybe this will spur them to put their knowledge to use and actually clean a cassette or two).
Does a clean cassette actual make you faster than a dirty one? Nope. Does it actually shift better? Arguably. If there is actual debris between the cogs – leaves, dirt, twigs, etc – then yes, a clean cassette will shift better. If it’s just surface grime, however, it generally doesn’t make much of a difference. There would have to be a LOT of grime to noticeably slow down shift performance.

This leaves us with a question: Why do it? Why waste your time cleaning a cassette? That is one mechanical question to which I have no answer other than – because it’s what you do. In a similar sense, why would you ever wipe down your frame with a cleaning solvent? Is a shiny frame faster than a dusty one? Of course not. But – and this is where my argument comes in – clean frames and cassettes are signs that someone takes care of their equipment. These people look over their bike from time to time, clean it when it’s dirty, and generally make sure it’s going to function properly. That prevents DNF-ing a race, and THAT is faster.
I’ve worked at a lot of races as a mechanic, and I can tell you with certainty that clean cassettes are rare enough to be considered an endangered species. BUT – every time I’ve encountered one, the bike was in relatively good shape. No major repairs necessary or last-minute emergencies. In contrast to their dirty-cassette brethren in transition, the clean-cassette bikes average much better function overall.
Cleaning your cassette (or just about anything on the bike) provides you with an opportunity to find other things that may be going wrong. It forces you to turn your attention to the mechanical workings of the bike. Similarly, if you change the oil on your car, you’ll likely take that time to check all of the other fluid levels. You may as well; you’re already under the hood.
How often should you clean your cassette? As often as you want. An easy default is to simply do it every time you put a new chain on. Say you ride a fair amount and change your chain twice per year (for a total of three chains). That’s two great opportunities to spend an extra five minutes cleaning that cassette. Plus, the combo of new chain and shiny cassette will make you feel warm and fuzzy inside. Maybe that’s just me. Or, if you change cassettes for a specific race course profile, clean your cassette then. I generally make the habit of never putting a dirty cassette on to a wheel. If I’m changing cassettes for any reason, I take the extra few minutes to do it right.
Tools
Well, all you really need is a cog brush, some soapy water, and a hose. Spread those suds around, brush away, and…
WAIT! DON’T DO IT!
Put the brush…down. The last thing you want to do is break out one of these:

The lowly cog brush. Or, as I like to call it – a grease spreader. These things are sold by the thousand in bike shops around the world, and don’t get it. The idea is this: Wash your bike, use the brush to spread soap suds on the cassette, scrub away, rinse, and voila - clean cassette.
Great in theory, not in practice. Why? There are two reasons. First, this method has a tendency to remove about 25% of the grime, and spread the other 75% around (making the cassette look dirtier than when you started). Second, and perhaps more importantly, due to the design of modern cartridge bearing hubs, you are likely reducing your bearing life considerably with this wash-and-rinse routine. I’ve yet to find a cartridge bearing freehub (the part your cassette is mounted to) that lasts as long as one with loose ball bearings.
I avoid spraying water on rear hubs like the plague. “They just don’t last like they used to.” In this case, Grandpa is right. The exception are hubs from Shimano and Campagnolo, which still use loose ball, angular contact bearings (and withstand washing much better). If I end up getting some water on the rear hub while washing a bike, I don’t freak out – I just try to avoid any high pressure or prolonged spraying. When your bearings do die, you typically must replace the entire freehub mechanism, which can be $100 or more.
Now that we know what not to do, let’s cover the proper way to clean a cassette. First, here are the required tools:

You’ll need:
1. A splined cog tool. There are two types: a) the Campagnolo-specific tool, and b) the tool for every other brand. Let’s call it ‘SRampano’ (SRAM, Sampson, Shimano…). The one pictured above is SRampano, and even features a nice little ‘stick’ that goes in to the axle for a secure fit.
2. A chain whip. Mine here is from Park Tool, and works with all cassettes 10-speed and below.
3. An adjustable wrench
4. Nitrile gloves and clear shop glasses (optional, but I always use them)
You’ll also need some sort of cleaning solvent. My cassette-cleaning arsenal is pictured here:

My go-to for general cleaning is Simple Green. I mix it 1:1 water-to-Simple Green. This tackles most cassette jobs. You can use any general household degreaser. The other two products – automotive brake parts cleaner and Boeshield T9 – are for heavier cleaning, which we’ll discuss later.
Procedure
The wheel we’re working with today is a Zipp 650c 404 clincher built with Powertap SL+ hub. The cassette is an 11-26 SRAM PG-1070.
To begin, we need to get the cassette off of the wheel. This requires all three tools mentioned before. The real key is getting the wheel in to the right position – in front of you, cogs facing out, with the wheel leaning against your legs:

The chain whip goes in your right hand. Pick a cog somewhere in the middle, and wrap the whip’s chain around it.
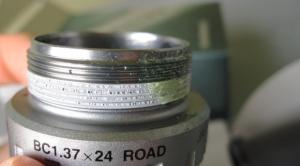
Next, insert the cassette tool in to the lockring.

Now it’s time to use that adjustable wrench to unthread the lockring. The splined tool fits in to your cassette lockring, and the wrench turns it.
This image (below) shows how the whole arrangement works – and explains why you need a chain whip. When the cassette turns in the direction of the red arrows, the pawls inside the hub engage. This stops the cassette from spinning, and allows you to pedal the bike forward. When the cassette turns in the direction of the green arrows, it is allowed to spin freely – this is what allows you to coast.

Notice how the ‘coasting’ direction is counterclockwise – the direction you turn the lockring to unthread it. If there was no chain whip, you could never complete this task; the cassette would spin forever and the lockring wouldn’t come out. The chain whip is what makes everything possible; holding the cassette in place.
Once the lockring is off, simply pull the cassette off.

I should note that most cassettes have spacers between the cogs, and some have a spacer behind the biggest cog. The ones that go between the cogs are usually about 2mm thick, and keep the individual cogs separated from each other at consistent intervals, so your chain shifts properly. The photo below shows two cogs, and the spacer that goes between:
![]()
You want to keep track of these spacers. Most cassettes have spacers that are all the same thickness; you can mix them up and it doesn’t matter. However, some cassettes have different width alloy carriers and have a specific order for the spacers (for example, 9-speed Campagnolo cassettes, or some SRAM 10-speed mountain cassettes, such as the 1070 model in larger sizes).
If your cassette does have different widths or amounts of spacers between cogs, keep track of the order you take everything off. The high-tech method of doing this requires a special device: a plastic zip-tie.

A zip-tie will keep everything in order, and still allow you to clean the cassette.
For cassettes that also have a spacer behind the largest cog – this is a big, hairy topic in-and-of itself that we will cover separately. For now, know this: If your cassette has a small spacer behind the biggest cog and your wheel is working properly – keep it that way. Don’t lose the spacer, and re-use it when re-installing your cassette.
Once your cassette is off, place it on a shop rag. Spray it down with your degreaser, then flip the cogs over and spray them again. Then use another shop rag to wipe off each individual cog. Repeat as-necessary.

The larger cogs are typically held together in clusters of two or three, all on a single aluminum carrier.

This saves weight, but complicates the cleaning process. Fear not, my friends, as there is an easy solution. Take a clean section of rag, and place it over your forearm. Spray the rag with your solvent.

Next, take that section of rag and clamp it into a vice, like this:

Now, take your cluster of cogs, and ‘floss’ between them with the rag. If you don’t have a vice, you can do the job with a friend holding the rag.
Extra dirty cassettes
If your cassette is so dirty that multiple shots of degreaser don’t do the trick, that’s where the heavy cleaning agents become necessary (typically this issue only comes in to play with the large cogs that are held together on a carrier). Automotive brake parts cleaner is very effective; it’s just nasty stuff that you don’t want to get all over your hands. If you use it, definitely wear gloves and eye protection.
In the case of an extra-dirty cassette, I’ll spray it down with brake cleaner and re-floss the cogs. Then as a final step, I’ll use T9 and do it again. T9 is a spray lubricant and solvent mixture that I use for several areas on bikes. It’s similar in function to WD-40. It does well as a solvent, and leaves a bit of a slick coating afterwards. If this process doesn’t get your cogs clean, nothing will.
Reassembly
To put everything back together, simply reverse the process. If your cassette had a spacer behind the big cog, put it on first. Then, install the rest of the cogs in order. All standard Shimano-style freehubs have one spline that is wider than the others. This lines up with a single wide spline on your cassette (so there is only one way that they can go on).

After all of the cogs and spacers are back on, it’s time to thread that lockring back in. Take care not to cross-thread it. A+ students might also put a dab of grease on the lockring threads before installing it.

Now, tighten the lockring down with your wrench. For beginning mechanics, it’s a good idea to use a torque wrench. Most lockrings go to 40 Newton Meters. Once you’ve installed enough of them, however, you get a feel for how tight they should be.
Note – since we’re tightening the lockring in the clockwise direction, you do not need the chain whip anymore (the freehub pawls will keep it from turning).

Congratulations – that’s one clean cassette! Pat yourself on the back, have a frosty beverage, and feel good about upstaging your buddies in the clean-bike competition.
Special cases
“But… but… my cassette doesn’t come apart! It’s a single-piece super-light cassette, ‘cause I’m fast and stuff!”
I’m glad you mentioned that. Say you have a SRAM Red cassette (pictured on the right), or even a racy aluminum Sampson cassette (pictured on the left):

These cassettes do not come apart. What to do? With these cassettes, I don’t even bother with the Simple Green. No, I go to the full-on heavy duty brake parts cleaner. I lay the cassette on an already-dirty rag, and hose it down. Then, I use the ‘floss method’. Repeat until it’s clean, or you’re tired of trying. The unfortunate reality is that you can never get these things quite as clean as a normal cassette. That’s life.
“But… BUT! I have a new 2012 Red cassette, or an XX mountain bike cassette, and they have extra holes drilled out in them… now what do I do?”
So, you’ve got one of these:

Short of breaking out the Q-tips and detailing the cassette for an hour, your options are slim. The best method is to use a LOT of brake parts cleaner, and a very high pressure spray to rinse. You can even take the cassette with you when you go to wash your car. Put it in a plastic tub of solvent to soak, and then go to town with the hand-held pressure sprayer. It works pretty well. If you do choose to go the high-pressure route on a steel cassette (such as Red or XX), it is always a good idea to give the cassette a light coating of spray lube afterwards (like T9). This will help prevent the steel from rusting.
We hope that this in-depth lesson on cassette cleaning has been helpful. Now that we’re square in the off-season (in the northern hemisphere), it’s a great time to give your bike(s) some much-needed TLC. Have your friends over for a wine, cheese, and bike cleaning party. Teach your children how to take care of their coaster-brake kids’ bikes. If nothing else - go the extra mile and bring your bike to the local shop for service in a condition that’s a notch above ‘Port-o-John’. It’s the little things that count.
All images © Greg Kopecky / slowtwitch.com
![]()