1 of 20 photos
But that’s just me - and there are certainly many others who do not share my sentiments. Thankfully, with the product at hand, the process was mostly smooth, and my hand-throwing-outbursts were limited. What’s the product? The crème-de-la-crème electronic trainer from Saris CycleOps – the PowerBeam Pro:

2 of 20 photos
We’re going to approach this review from a certain perspective (mine). To paint a picture for you, I’ve been riding the same CycleOps Fluid2 trainer for a decade. Give me a workout on a post-it note, some headphones with jammin’ music, and I’m set. No need for extra entertainment or fuss. I’d much rather ride outdoors, and make every effort to do so. This means – if I’m on the trainer, it’s because I’m time-limited… so it’s short and sweet.
I understand that this is not the case for everyone. Some people really enjoy indoor riding. Some folks have to, due to geographic, time, or other constraints. If you’re an existing trainer fiend, and know everything about every product on the market, this review might not offer what you’re looking for. If you’re looking to get in to the electronic trainer market, and don’t really know what they’re all about, sign yourself up. Consider this your newbie-and-technically-challenged guide to the PowerBeam Pro.
The Basics
Where exactly does this trainer fit in to the overall picture? Some of the key competitors include the Wahoo KICKR, Tacx Bushido, and the obvious elephant in the room – the RacerMate CompuTrainer. Personally, I’ve ridden CompuTrainer about ten times, the KICKR for about five minutes at Interbike, and never used the Tacx.
All of these trainers are trying to achieve the same basic goal: Reduce indoor training boredom, and increase workout effectiveness. These are very broad goals, and each system has their own take on solutions. The common denominator that all these systems share is some sort of interactive visual interface, via a computer screen, and usually a small secondary device (Computrainer’s Handlebar Control Module, CycleOps’ Joule GPS, or your iPhone for the Wahoo KICKR).
Prices for any of these systems are in the range of $1,000 to $1,600, depending on brand and the options you pick.
Powerbeam Details
There are two different PowerBeam packages that are available:
PowerBeam Pro w/ VirtualTraining Software - $1,299
PowerBeam Pro w/ VirtualTraining and Joule GPS - $1,599
What does this mean? The Powerbeam Pro is the trainer itself. VirtualTraining is their software that allows you to do all of the video rides (not to be confused with their PowerAgent file analysis software – we’ll touch on that later). The Joule GPS is the CycleOps top end cycling-computer-and-GPS-in-one (similar in concept to, say, a Garmin 500).
Both packages include the hardware you see here:

3 of 20 photos
The cord plugs your trainer in to a standard US 120-volt outlet. You also get a cadence sensor, heavy duty steel skewer, and the requisite bag of zip-ties.
The other very cool accessory you get is the CycleOps USB stick. This transmits information wirelessly between the PowerBeam and your computer. Thank your lucky stars, because there is no mess of wires to deal with.
The other very cool accessory you get is the CycleOps USB stick. This transmits information wirelessly between the PowerBeam and your computer. Thank your lucky stars, because there is no mess of wires to deal with.

4 of 20 photos
If you do opt for the Joule GPS unit, here’s what you get:

5 of 20 photos
That’s the Joule, USB cable, a stem mount, a handlebar mount (for 31.8mm road drop bars or mountain bike bars), and more zip ties.
Whether or not you have the Joule GPS affects the number of features you have available to you. If you already have a Joule (that came with a Powertap hub, for example) you do not need to purchase a second one with the PowerBeam.
Getting Started
Out of this entire review, the only part that I struggled with was getting the system up and running. The trainer itself is very easy to set up. There is a single cord that plugs the resistance unit in to your wall outlet – that’s it.

6 of 20 photos
For the rest of it, there is a specific order of operations that you must follow. CycleOps does have a few handy videos on their website to aid in setup. For the technologically challenged (such as myself), I’ve written down a very basic step-by-step guide of how to get the stem running. This is assuming you do not have anything installed and have zero experience with the system. Also note that this assumes you did purchase the Joule GPS.
Order of Events
1. Unpackage trainer, plug it in, install the steel rear skewer, install the cadence sensor to your bike, and install the bike into the trainer
2. Download, install, and register Virtual Training software (you must have product key from the package)
3. Update VirtualTraining to the latest version
4. Download courses, or create your own with the Google Maps application within VirtualTraining
5. Plug in USB stick, make sure bike is within range (a few meters)
6. Link Virtual Training software to PowerBeam trainer, cadence sensor, and HR strap
7. Perform 2-minute rolldown power calibration
8. Ride course
To use Joule GPS-specific options
9. Charge Joule GPS, then power it on
10. Link Joule GPS to PowerBeam, so they recognize each other (RU Sensor option in the menu). Also link cadence sensor and HR strap, if applicable.
11. Download and install PowerAgent software
12. Plug in Joule GPS to computer, to link it to PowerAgent, and configure the GPS unit with information like your age, tire diameter, and so on.
13. Update GPS firmware to latest version
14. Create workouts in PowerAgent (i.e. interval workouts) and upload them to Joule GPS
15. Perform 2-minute rolldown power calibration in GPS menu
16. Ride with created workouts, or in manual resistance mode
If this looks like a lot of steps, it is. This isn’t something that you can simply take out of the package and use right away (but neither are the competitors’ products). The good news, however, is that you only have to do most of these steps once. After you have it set up, it’s smooth sailing. Just be prepared to spend an afternoon with it the first time around. I think of it similar to a time-consuming piece of bike maintenance: The time invested is well worth it, but be sure you’ve blocked out sufficient time before you begin.
VirtualTraining Details
So let’s say you’ve got your PowerBeam trainer. You’re impatient, and can’t wait to slay some watts. What’s the best way to do said slaying? GPS rides, manual resistance mode, or something else? We’ll go through each option step-by-step to show you what they’re all about.
First, let’s look at the ride options in VirtualTraining (not the Joule GPS-specific options – we’ll do those later). The main screen has tabs on top which show your different options. The first tab is where you store all of your personal user data, and is largely self-explanatory. The second tab is called Local Routes, and shows the courses you have downloaded to your computer:

7 of 20 photos
On my screen above, there are three courses which I’ve downloaded. It shows you a course profile, a rating (i.e. “Very Easy”), the total elevation gain, etc. On the right, it tells you whether the course has an associated GPS file, video file, power data, and the average user rating.
To download courses, you click in the ‘Internet Routes’ tab. It looks like this:
To download courses, you click in the ‘Internet Routes’ tab. It looks like this:

8 of 20 photos
You can search for whatever you want, and there are quite a few rides out there.
It is important to note that the system does not include any pre-downloaded courses. You must download them before you can begin riding. In contrast, the CompuTrainer includes a few courses with the system when you buy it. The very important difference, however, is that ALL CycleOps VirtualTraining courses are free. Additional CompuTrainer course DVDs are $100.
“How does that work out? CycleOps makes all of the video rides for free?!” You may be wondering that. I certainly wondered that. Here’s the secret – it’s user-created content. Rather than spending big bucks to go out and make all of their own video rides, CycleOps lets the users do it. If you have a GPS unit, such as the Joule or a Garmin, you can make a ride. Simply ride your route outdoors while recording on the GPS, import it to VirtualTraining, upload it to the internet, and anyone in the world can do your ride. Many of the available rides are like that – simply a GPS file – without an associated video file. When you do these rides, the ‘video’ is a bird’s-eye view from Google Earth. When searching, it tells you whether the file has video or not.
If you do want to record a video ride, you need to have a bike-mounted camera, such as a Go Pro. You link the video file to the GPS file, to keep the two synched up (so when the video shows you riding up a big hill, the GPS file is dictating elevation gain to the trainer – so it feels like you’re riding up that hill). That’s all advanced stuff, however, which we’re not going to get into during this review.
So you downloaded some courses from around the world, and want to ride them. To do so, click on the ‘Start Training’ tab.

9 of 20 photos
There are my three courses I’ve downloaded. As you can see, the first two have video, but the third is GPS-only:

10 of 20 photos
You click on one of these, and then ‘Next’. This brings up the screen that confirms all of your accessories (step 6 from the order-of-operations above). Then you have to choose whether or not you want to do a roll-down power calibration.
The folks at CycleOps recommend doing the calibration every time you install or remove your bike from the trainer, or when there is a significant change in ambient temperature. The PowerBeam’s power measuring accuracy is affected by things like tire pressure, temperature, and how tight the rear tire is clamped down upon. Over time, I simply made a habit of doing the calibration every ride as part of my warmup. If you don’t do the calibration often enough, you simply drift farther from the 5% +/- accuracy rating.
The calibration process takes two minutes. The following screenshot is of the roll-down calibration being done in VirtualTraining:

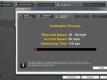
11 of 20 photos
You must pedal to “18 to 22 mph” for two minutes, and then stop pedaling to let the wheel coast to a stop. If you’re wondering what resistance that equates to (i.e. how many watts), I have no idea. It’s not a very hard level of resistance, however, so it’s generally fine for using as a warm-up.
Once the calibration is done, you’re ready to start the ride.
Riding Those Rides
Once you’ve started riding, you can choose to view your ride in a couple different ways. First, we’ll look at a video ride I did – Atlantska Cesta. This view shows the primary screen with the Google Earth top-down view, and the small secondary screen showing the video:

12 of 20 photos
The left side shows all of the relevant data you need – wattage, ride time, etc. The top-left is where you can play with options such as zoom for Google Earth.
There is also a button that lets you toggle between different main screen views. In the screen shot above, I’m in ‘Google’ mode. If you want to swap screens and have a larger video, click on ‘Video’:
There is also a button that lets you toggle between different main screen views. In the screen shot above, I’m in ‘Google’ mode. If you want to swap screens and have a larger video, click on ‘Video’:

13 of 20 photos
If I click on Video, it looks like this:

14 of 20 photos
You retain all of the information on the left, along with the course profile on the bottom of the screen.
As you’re riding along, you get all of the things you’d expect – moving cars, changing conditions, etc. It’s no $10,000 HD television, but the video quality is good, and general operation is smooth.
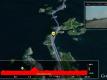
If you do a course that does not contain video at all, you simply look at a Google Earth view. This screen shot shows my non-video ride of the Escape from Alcatraz bike course:
As you’re riding along, you get all of the things you’d expect – moving cars, changing conditions, etc. It’s no $10,000 HD television, but the video quality is good, and general operation is smooth.
If you do a course that does not contain video at all, you simply look at a Google Earth view. This screen shot shows my non-video ride of the Escape from Alcatraz bike course:

15 of 20 photos
It isn’t quite as entertaining to ride without video, but it’s certainly much better than staring at the wall.
Your other option within VirtualTraining is to make your own route with Google Earth. On the main screen, this can be accessed by clicking on the tab on the top-right (Route Editor):
Your other option within VirtualTraining is to make your own route with Google Earth. On the main screen, this can be accessed by clicking on the tab on the top-right (Route Editor):

16 of 20 photos
This method allows you to ‘ride’ anywhere in the world. Rather than recording an actual ride with a GPS device and saving it, you make the ride by clicking your mouse. The resistance gets set using Google Earth data. If you click your way up to the top of a mountain, the elevation gain gets reflected in the workout. This is undoubtedly the quickest and easiest way to make a ride, but you have no ability to use video.
Joule GPS Workouts
As mentioned previously, adding the Joule GPS unit into the mix gives you a few extra options. First and foremost, you can use it to record outdoor rides, and then do those same rides indoors in VirtualTraining. Second, and perhaps more importantly, it allows you to use their software to create any workout you desire… and have the trainer dictate it to you like the most heartless coach on the planet.
Just to be perfectly clear, the workout creator for the Joule GPS is accessed in the PowerAgent software, not the VirtualTraining software. You probably know PowerAgent software if you’ve ever used a PowerTap rear hub. It’s where you go to analyze your files post-ride to see how you did with metrics like average wattage, heart rate, and so on.
With the latest version of PowerAgent, you simply click on ‘File’, then ‘New’, and finally ‘Workout’, to access this feature:

17 of 20 photos
This opens up a new area that lets you do whatever you wish to punish yourself.
You create workout segments and dictate the constraints like time and control type. Let’s look at the example workout below:
You create workout segments and dictate the constraints like time and control type. Let’s look at the example workout below:
18 of 20 photos
For the warmup, I have ten minutes at 100 – 150 watts, and then five minutes at 150 – 200 watts. As you’re doing these segments, the trainer forces you to stay within those power ranges.
After the warmup, we go in to some two minute intervals, with one minute of rest between each one. As you can see, rather than selecting Power Range, I selected Target Power. The term ‘Target Power’ is somewhat misleading. You don’t target it, so much as it targets YOU. This means that I must ride at whatever specific wattage I type in. If you write in an interval with a Target Power of 200 watts, the PowerBeam makes you ride at 200 watts. No if’s, and’s, or but’s.
To transfer these workouts to the Joule, just plug it in with the supplied USB cable and click ‘File’, and ‘Transfer Workouts’ in PowerAgent. You can move the workouts over in a matter of seconds:

19 of 20 photos
Personally, I feel this is the biggest advantage to the whole PowerBeam system. The trainer MAKES you ride your workout. Let’s say you currently have an old fluid or magnetic trainer, and use it with a power meter, such as Powertap, SRM, or Quarq. You plan to ride for two hours in a given power range while watching a movie. While riding, you get to a particularly sappy portion of The Notebook (or whatever you watch), and start to ease off the power as you sob tears of sadness or joy. Maybe you just let your cadence slip from 88 to 85, and your power drops down below your minimum target of 150 watts. With your old trainer, nothing is stopping you from slacking off.
If, however, you do the same ride with the PowerBeam, and set your power range with a minimum of 150 watts, you can’t go below that. If your cadence drops, the trainer compensates and bumps up the resistance. If you start to go over the top of the power range, it eases off the resistance. Nice, huh?
While I don’t think it’s necessarily good to use this feature for every single ride, it is nice to use from time to time. You can pre-load your Joule GPS with ten rides that your coach wrote for you. If you get home from work and have 45 minutes to pound out a workout, just select your 45-minute workout and go to town. If it was a particularly tough day at the office and you can’t concentrate on maintaining a specific power number, don’t worry – the PowerBeam will do it for you. Just pedal. The only other system that I’m aware of that can do something like this is the CompuTrainer when used with newest TrainerRoad software in Erg Mode.
Summary – Accuracy, Practicality, and Noise
After spending quite a bit of time with this trainer, I was impressed with it. One of my main concerns was ease-of-use, and I think the PowerBeam does well in this department. None of these electronic trainers are as easy to use as a mechanical trainer, but they have some worthwhile benefits for those who spend considerable time riding indoors.
Accuracy seems to be right at their stated +/- 5%. To test this, I did every ride on the PowerBeam with an SRM crankset and Garmin 500 head unit (which is rated at +/- 2%). The main difference with the PowerBeam was that the lag time seemed different with changes in power. Overall, if I had to say the PowerBeam erred in one direction, it quoted power slightly high. To correct for this, I simply made my workouts set for about 10 watts higher than I really wanted (so – tell the Workout Creator to be at 210 watts, for an actual 200). I don’t consider that to be a big problem, nor would I say the trainer is inaccurate. For someone who has never trained with a power meter, this will get you well within the ballpark that you’re looking for.
What about noise and ride feel? The PowerBeam is quiet, so don’t worry about noise. You can hear the internal motor making small changes to the resistance as you pedal along, but it is barely noticeable. The whole thing is certainly a lot quieter than most mechanical trainers I’ve dealt with. Part of the quiet operation is also due to the nice quality CycleOps Trainer Tire I used in conjunction with the trainer.
20 of 20 photos
The tires are a relative steal at $35 each.
I’d describe the ride feel as “good”, and the realism as “excellent”. What I mean by ‘realism’ is how accurately the courses seem to recreate the Google Earth and GPS data. How quick are the elevation changes made; how steep do the hills feel? This was all very good, and even seemed to take my gearing into account. For example, when I did the Escape from Alcatraz bike course, I had a 53/39 crankset, and 12-23 cassette (I normally ride with tight gearing on the trainer to hit target power numbers more accurately). If I was going to do that race, I would most certainly use a cassette larger than 12-23. When I did this ride on the PowerBeam, the resistance was correct – I was grinding up some of those hills at a too-low cadence. On the way down the hills, I would spin out in my 53/12 right about at the speed you’d expect to do so in the real world. The PowerBeam does work with 650c size tires, and I’d expect that you’d feel the correct change in effective gearing from this.
The software interaction was good, and quite a step above some of the early versions of CycleOps software from many years ago. VirtualTraining automatically saves all of your training data, which can be imported by PowerAgent for post-ride analysis. CycleOps also has their own quasi-version of Strava, with VirtualTraining.CycleOps.com. Here you can compare your ride data to other people, and track your own progress.
Is it a good value? Is it better than the competitors? What about potential problems?
Overall, I think the PowerBeam is a good value. While certainly not as well known as CompuTrainer, it has a lot to offer. The Workout Creator is a really great feature that forces you to do your ride properly, and is great for would-be slackers (you know who you are). In fact, the only real ‘downside’ to the software is the unlimited free rides. Rather than doing rides off of a DVD, you must store all of the ride data on your computer. The 2.46 mile Demo Route is 200 megabytes. The full video ride of Alpe d’Huez is nearly 2.5 gigabytes. You can quickly fill up a hard drive with this stuff, especially if you also have a lot of music or photos. I’ve known people that use competing electronic trainers and actually purchase a dedicated desktop computer to use with it (and sometimes have a dedicated ‘trainer bike’ too). While not mandatory for the PowerBeam Pro, it is a good idea, especially if you plan on downloading a lot of courses.
Whenever I did have questions or problems, I was pleasantly surprised to have great customer support from CycleOps. I’ve had good experiences with them in the past when I’ve owned PowerTap hubs, and that held true today. For a small company dealing with some complicated software, they pull it off gracefully. I look forward to more rides on the PowerBeam, and can confidently say that any technological hurdles I encountered (read: my own unease with new technology) were easily overcome.