
This is part two of our 2014 tire sealant test. If you missed part one, it is located HERE. It covered the reasoning behind our test, the testing methods, and the brief details of our sealant contestants.
Today we’ll reveal what you’ve all been waiting for – the results.
Caveats
Before we get to the meat of it, we must mention a few things.
First and foremost, this is just one test. It is well-controlled, but like all tests – it has its limitations. As we mentioned in part one of this article, we’re testing in a manner that most of these sealants are not specifically intended for – inner tubes. Of the seven sealants we tested, only three are billed as tube-specific (Vittoria Pit Stop, Specialized Airlock, and Flat Attack). Bontrager clearly calls out their TLR sealant as not intended for tubes; they make a special product just for that application called SealSafe. The rest (Caffelatex, Stan’s, and Orange Seal) say that while you may use their products in tubes, their primary intent is for tubeless tires. Why did I test using tubes? Because it is the configuration that 95%+ of triathletes use today.
Second, this is clearly not a perfect test because the wheel and tire are unloaded (e.g. not being ridden). When a wheel is loaded, there is substantial deformation of the tire and tube during each revolution as it contacts the ground. While I would have loved to include that in the protocol, it just wasn’t feasible for an initial test. Outdoor riding has been impossible due to an incredible winter and high amount of snow, and I didn’t want to delay this already-delayed article any further. My main priority was to establish a baseline test protocol. Heck, I didn’t even know if I was even in the ballpark with my expectations. Would any of the sealants work? Or were my punctures all too easy, causing all of the sealants to pass with flying colors? While I’ve definitely had my fair share of punctures on the road, I’ve never done anything like this test. With any luck, it will give us good baseline information with which we can design future tests.
Finally, I think another key limitation is the size of the sample. As much as I’d love to test 500 punctures to make my data more robust, I also need to make a living (and I’m not paid hourly). Inner tube and tire thickness influence how well a sealant does its job, and we all know that product variation is a part of life. Put simply, tires and tubes do not have perfectly uniform wall thickness. It’s entirely possible that a sealant that looks poor on-paper happened to be caused by a circumstantial puncture in a particularly thin part of the tube or tire. We can’t know for sure, and would need to replicate this test many times over in order to validate it.
Protocol Recap
Remember, here is the protocol:
-700x23mm Schwalbe Durano S on an Ultegra 6800 front wheel
-105psi standard
-Three puncture sizes: 1.2mm thumb tack, 1.7mm nail, and 2.2mm nail
-Latex and butyl tubes tested
-Punctures through the tread and sidewall
-2.2mm sidewall puncture was the ‘torture test’ – the nail went completely through both sides of the tire
-Wheel and tire cleaned between each sealant type to avoid cross contamination
-Standardized amount of 2 oz sealant per tube (50-60ml), except for Pit Stop (one canister per tube)
-Test stopped at first failure

TAKE NOTE: In our charts below, ‘Y’ means that Yes – the sealant did work. Time-to-seal for Y = less than two seconds. In other words, they sealed fast enough that it wasn’t practical for me to pull out the nail, spin the wheel, start my stop watch, and get an accurate time. Green boxes with a number listed denote that the sealant did work; we’re just telling you the number of seconds it took.
Stan’s NoTubes / Schwalbe Doc Blue
First up for our results is the well-established Stan’s NoTubes sealant. This is also repackaged and sold by Schwalbe under the name Doc Blue. Stan’s has been around for a long time, and is very common in the mountain bike scene. I’ve always wondered why they don’t market more towards the flat-phobic triathlon market.
The best part about Stan’s, in my opinion, is the super easy two-ounce bottles that you can buy; it’s the perfect amount for a road tube.
My experience with Stan’s on-the-road has been so-so. While racing the Desert Duathlon in Arizona, I suffered a puncture through the tread of my brand-new Zipp Tangente 700x23 tire. The inner tube was a standard-thickness butyl, pre-loaded with two ounces of Stan’s. I didn’t see anything on the road, and suddenly heard the tell-tale puncture sound coming from my front wheel. There was nothing stuck in the tread; just a small puncture. Without a spare kit, my day was done.
Was the puncture too large? Was I unlucky? I’ve heard many stories of mountain bikers finding giant nails in their tires after bike rides, which sealed thanks to Stan’s sealant.
Here are our test results:
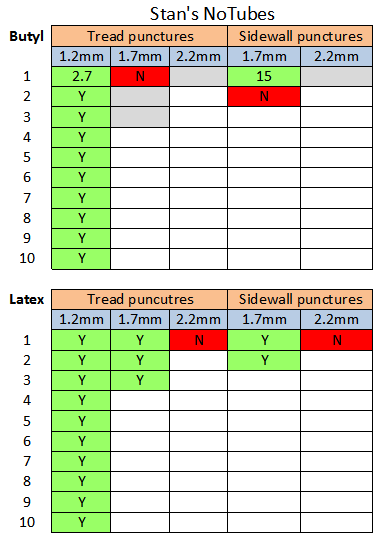
As you can see, it fared noticeably better in latex tubes than butyl. The 1.7mm latex punctures through the tread and sidewall sealed instantly. The smaller puncture in the butyl tube sealed quickly, but things turned for the worse as the puncture size grew.
Vittoria Pit Stop
Pit Stop took the world by storm when it hit the market. With sealant and a CO2 inflator combined into one device, it seemed like a fantastic solution. Now we see many similar devices from the likes of Effetto Mariposa and Hutchinson.

Personally, I haven’t done well with Pit Stop. At Oceanside 70.3 one year, I was racing with new Vittoria Open Corsa CX 23mm clincher tires and Michelin latex inner tubes. Those tubes didn’t have removable cores, making it impossible to use a thicker sealant like Stan’s. I opted to pre-inject both tubes with a canister of Pit Stop (one per tube). Unfortunately, similar to my experience at the Desert Duathlon, I suffered a puncture through my front tire. It was eerily similar; nothing stuck in the tread, and nothing visible on the road. Thankfully, it happened about a mile from the transition area; I added some CO2 to the slowly-leaking tire and rode carefully to T2.
It is worth noting that during this test, I found that each Pit Stop canister would give me about 45 psi when starting from a completely flat tire. You must carry an additional CO2 if you want to use this as an on-the-road fix.
Finally, I only had three canisters of Pit Stop, so I was unable to do a sidewall puncture test with latex inner tubes.

Similar to Stan’s, this tire did noticeably better with a latex tube. With butyl tubes, it failed on the very first 1.2mm puncture in both tests.
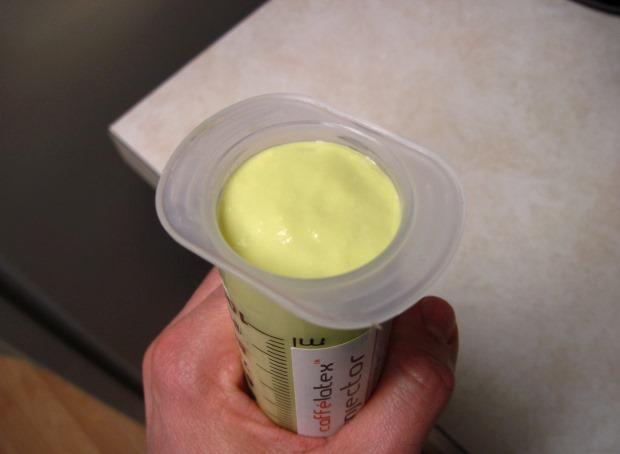
Effetto Mariposa Caffélatex
Of all the sealants listed today, this is the only one that I know has worked for me in the past (it is entirely possible that I’ve suffered other puncture with other sealants and not noticed it). While riding in Colorado, I successfully repaired punctures from small goathead thorns into a WTB mountain bike tire with standard butyl inner tube using the Espresso inflator cartridge. Espresso uses the same formula as the bulk Caffélatex, packaged in a CO2 inflator. I was ecstatic to finally have something work in a real-world situation.

One of the key selling points of Caffélatex is that it foams up when you shake it (or ride it), which is supposed to seal sidewall punctures and cuts better than other liquid sealants. The side effect, however, is that it can be somewhat difficult to measure the amount of sealant using an injector. How much liquid do you have?
I contacted the founder of Effetto Mariposa, Alberto De Gioannini, to find out more. According to him, you actually do not need to shake Caffélatex vigorously due to its composition and particulate size. All you must do is turn the bottle upside down a couple times; that’s it. In an effort to ensure a level playing field for this test, I measured to what appeared like 50ml of liquid, while the foam rose to about the 80ml mark on my sealant injector.
Let’s look at how it fared:

I was a little bit surprised to see that it didn’t do as well as Stan’s with butyl tubes, given my opposite on-the-road experience. Did tire construction influence how well the sealants worked? Was one of my punctures a fluke? Caffélatex did do better than Stan’s with latex tubes, successfully sealing the 2.2mm tread puncture.
Flat Attack
Flat Attack is one of two glycol-based sealants in our test. The beauty of this type of sealant is that it doesn’t dry out and effectively last the life of your inner tube. Glycol sealants are also tube-specific and do not work with tubeless applications, outside of the mountain UST standard. Given the ease-of-use, I have used Flat Attack in several wheel sets over the past two years. Fortunately or unfortunately, I never suffered a noticeable puncture on any of those wheels while riding, so I haven’t had a good chance to see whether or not it is effective.

It is worth noting that Flat Attack recommends that you use more sealant than most brands. For a road tire, they recommend 2-3 oz, compared to as little as 1 oz for some competitors. I split an 8 oz bottle evenly between my four tubes.
Let’s see how we did:

With the butyl punctures, sealing times varied quite a bit. I had to pump the tire up twice during that first butyl run; more than any other sealant. In a huge turnaround, it did very well with the latex tubes.
Specialized Airlock
This is the other glycol sealant in our test. Unlike Flat Attack’s visible goop-plus-fiber mixture, Airlock is entirely homogenous. Call it… snotty-mustard?
The Airlock packaging says that you’re supposed to use four ounces per tire… but doesn’t specify what size tire that assumes. A road tire? A big-boy 29-inch mountain bike tire? Other sealants vary the amount based on the volume of the tire, so we decided to stay consistent with our two-ounce-per-tire rule.
Let’s see the results:

Oddly enough, the butyl punctures were all sealing quickly, but #8 leaked down slowly. By this point in the test, it was no surprise that performance with the latex tube was significantly better than butyl.
Orange Seal
Orange Seal is a relative newcomer to the sealant game. Don’t let that fool you; it has gained a very good reputation in a short period of time. Multiple people have told me that I ‘just have to try it... it really works!’ I decided to see what this orange goop was all about, and they were kind enough to send a box of samples for this test.
Orange Seal provides an easy-to-use injector tube that comes with each bottle, seen here:

Similar to Stan’s, Caffélatex, Pit Stop, and Bontrager TLR, Orange Seal is latex-based. It is primarily intended for tubeless applications, but they say that you can also use it in inner tubes. Orange Seal representatives told us that it is ammonia-free, and works in a pressure range of 8 – 120psi.
Given all the hype, I was eager to see how it stacked up in our Pepsi Challenge.
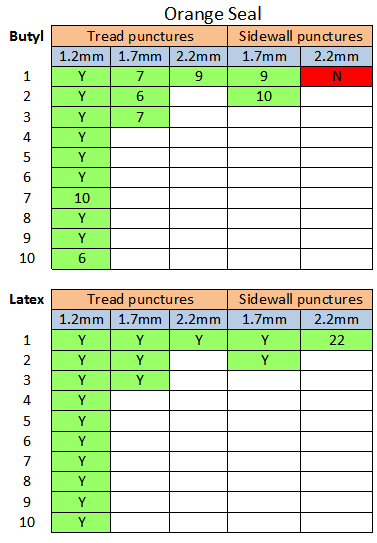
As we can see, Orange Seal is the best performer so far. It passed all-but-one of the butyl punctures, and is the only one to pass the 2.2mm latex-tube double sidewall puncture – very impressive. After 22 seconds, all visible and audible air leaks stopped. By that point the pressure had dropped a fair amount, but it was holding steady with a successful seal.
Bontrager TLR
We’re left with Bontrager’s TLR sealant. As mentioned previously, this sealant is advertised as being for tubeless applications; tube customers are instructed to buy their SealSafe product. On paper, I don’ t see why this shouldn’t be used for tubes. It has a synthetic latex base and is ammonia-free. They say that it does not degrade tire rubber, too. They only recommend 0.8 oz (25ml) for a road size tire, making our 2 ounces more than enough.
Similar to Stan’s, TLR is sold in bulk-size bottles, and also in super convenient two ounce ‘single serve’ bottles.

On to the results…

The Bontrager chart looks very similar to the Orange Seal data, with the exception of faster seal times in several trials. TLR's butyl tube performance was particularly wow-worthy. All of the smaller 1.2 punctures and the 1.7mm tread punctures sealed instantly with no perceptible air loss – similar to how most sealants performed with latex tubes. I don’t know what they’re putting in this sauce, but it works wonders.
Notes on all sealants
With any latex-based sealant, its performance is going to degrade as it evaporates over time. In very dry climates, this can mean injecting more sealant as often as every couple months. In humid climates, I’ve gone as long as a year in higher volume applications. Especially for training applications where weight is less important, I think it makes a lot of sense to over-apply at the beginning, so you have to maintain it less frequently down the road.
How much do sealants weigh? Just for kicks, I weighed a two ounce bottle of Stan’s. It came in at 72.5 grams full, 13.9 grams empty, for a liquid weight of 58.6 grams. Weight will vary by sealant type and volume, but figure in the ballpark of 100 grams per bike.
Finally, in my experience, all of the latex sealants will eventually clog up your presta valve cores. While I love sealant, it isn’t very smart (it can’t tell the difference between a hole in your tire and the hole in your valve - so it clogs both). Valve cores can be purchased as spares, and I always keep a few handy. With most sealants, I replace the cores every six months or so – very easy to do while you are topping off the sealant level.
Summary
What did we learn from all this? For one, I learned how to install tubes really well. My thumbs hurt...
I think it’s safe to say that we learned some cool stuff about latex vs butyl; the performance was undeniably different between the two. Latex tubes are definitely trickier to install, however. They are so soft that they don’t want to hold any shape. If you use them, you must double-triple check for pinch flats before inflating. For that reason, I would not suggest carring them as spares for on-the-road changes – even for a big race. Butyl tubes can be installed much quicker on average.
That said, if you do use latex tubes, does it really matter which sealant you pick? I really don’t know. Most of them performed very similarly in our test. To me, that’s a big area of opportunity for future test refinement. Also note that with the 2.2mm double sidewall puncture, some of the sealants successfully repaired the entry wound, but not the exit wound (latex tubes only). I didn’t catalog this for each sealant because I didn’t notice it until half of the testing was done. With Caffélatex and Airlock, the entry puncture seemed to be 100% sealed.

Does this test mean that sealants aren’t useful for butyl tubes? On top of that, how many of these punctures (with both tube materials) would stand up to a fifty mile bike ride after-the-fact? For now, we’re left with some question marks.
The best medicine, in my opinion, is to develop bigger and better lab tests, along with cataloging real-world results.
--
All charts © Greg Kopecky / slowtwitch.com

