
This is the second (and final) segment of our How-To on cassettes. If you missed it, part one is located HERE.
The first segment of this article was dedicated to the standard procedure of removal, cleaning, and re-installation of a cassette. The same basic steps are used for all modern multi-speed cassettes, whether they’re 9-speed, 10-speed, 11-speed, SRAM, Shimano, Campagnolo, or whatever. Unless you’ve got something really odd, it will work in the way we described.
This article is dedicated to the very complex topic of cassette spacers. Specifically, we’re talking about spacers that are located behind the cassette.
![]()
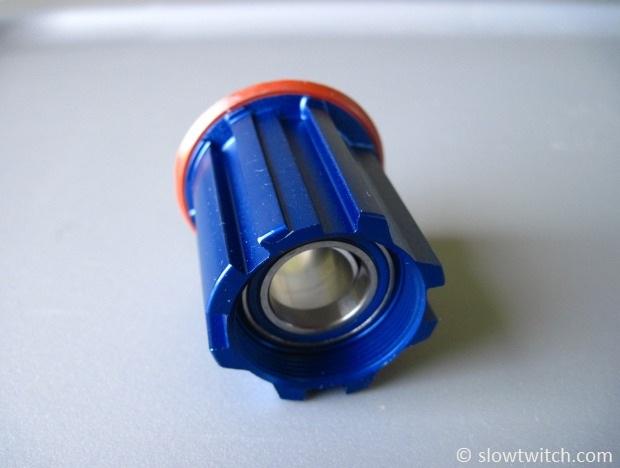
In the photo above, I have a Shimano 9/10 freehub with a SRAM 10 cassette – no spacer necessary. Should YOU use one? Why or why not? In order to discuss that, we must also delve in to the history of freehub standards, and explain how it all evolved.
Spacers and Freehub Standards
The first thing to understand is the fact that there are different freehub shapes out there in the market. A freehub is the part of your rear hub that the cassette mounts to. Other names include ‘cassette body’ and ‘freehub body’.
By far – the most common shape of freehub is known as ‘Shimano 9/10’. More than likely, this is what your wheel has. Before 10-speed existed, it was simply called a ‘Shimano 9’ freehub. They’re characterized by a set of short splines, with a single wide spline for properly locating the correct cog orientation. As an example, here is a Shimano 9/10 freehub from a CycleOps Powertap SL+ (made by Joytech):

In contrast, here is a Campagnolo-specific freehub, for a Zipp 182 rear hub. Notice the different shape (deeper) splines:
Great – cool. So where does the spacer talk come in? Spacers really entered the scene in a big way with the advent of 10-speed Shimano components. They decided to squish an extra gear in to that cassette, and fit it on to the same freehub. To do this, the cogs got narrower, along with the space between each cog. The strange thing was, however, that the total cassette width actually shrank to be 1mm skinnier than the 9-speed version. So – more cogs, AND less total width. In order to fit on to the same 9-speed freehub, they began supplying all 10-speed cassettes with a 1mm ’10-speed spacer’. They look like this:
![]()
Easy enough, right? Sure is. Well… until it got complicated. First, some back-story:
Begin backstory:
The 9-speed freehub was intended to be made out of two materials: steel or titanium. Steel is heavier and cheaper; titanium is lighter and more expensive. Both materials are sturdy enough to do the job. What happened, though, was that other manufacturers (besides Shimano) started making 9/10-speed freehubs out of an even lighter material – aluminum. Yes, it is really light – but it is also soft. What happens over time as a result? The cassette cogs actually dig in to the freehub splines. Your forward pedaling action smashes the cogs in to the freehub, and they start to dig little notches in to the aluminum.

The smallest two or three cogs are wider, and don’t notch nearly as bad. The biggest cogs are usually stuck together via a single alloy carrier, which is wide and does not dig in to the freehub. It’s the middle cogs that are the problem. They’re narrow – only the width of the cog engages to the freehub.
These notches present a problem when trying to remove your cassette; the middle cogs get jammed in to place, and you can’t pull them off. The easiest solution is this – take a shop rag, place it over the cassette, and try to force the stuck cogs counterclockwise – out of their notches. If that doesn’t work (i.e. your freehub is really bad), there is a two-person method. Person 1 holds the cassette with a rag. Person 2 carefully takes a flat head screwdriver, and places it against a tooth of the stuck cog. Then they gently tap the handle of the screwdriver with a hammer.

This screwdriver-and-hammer method has never failed me. If the freehub is badly damaged, the only solution is to replace it with a new one. Keep in mind that this is usually not considered to be a warranty item by most wheel manufacturers. The aluminum freehubs are doing exactly the job they’re supposed to – be a light racing product. As we know, the definition of a racing product is something that gives up longevity and durability for light weight and/or speed. If you keep killing alloy freehubs (and don’t like buying new ones), consider going with a titanium or steel model next time around. Or, train on a training-specific wheel/hub (with a steel freehub), and then race on a racing-specific wheel.
End backstory.
Shimano saw this aluminum freehub business going on, and decided to do something about it. They knew that they couldn’t make an aluminum freehub in the existing 9-speed shape – at least one that would last more than one season. So, they did what they always do… re-engineer the design. What they came up with was a new spline shape. Take the old 9-speed model, and make the splines substantially longer. Longer splines mean more contact between cassette-and-freehub… so no more digging and notching. While they were at it, they also made the freehub 1mm shorter, so the little spacer would no longer be necessary.
Behold – the Shimano 10-speed ONLY freehub (shown with a 1mm spacer to prove that it won’t fit on the deeper splines):

For comparison, here is an image of the older short-spline 9/10 freehub (left), and the newer deep-spline 10-only (right):

This new freehub was a fantastic solution to the problem. However, it created a new one - it was a new standard. The 9-speed freehub was around for years, and the industry was comfortable with it. It works with 9 and 10-speed cassettes, so it is versatile. A few manufacturers got on board and started selling the 10-only. But most were slow to react, and stuck with the 9/10. Besides, the older-style meant quicker freehub failure, and more sales of new freehubs… why change?
Alas, after a few short years, Shimano themselves dropped the 10-only freehub. They reverted back to the 9/10, and using titanium freehubs as their lightest option. Today, you still see a very small handful of wheel manufacturers selling the 10-only, such as Easton. If you only own Shimano 10 cassettes, they work great (i.e. you don’t own any 9 or 11-speed, and nothing from any other brand – SRAM, Sampson, etc). If, however, your drivetrains are diverse, you’re better off sticking with the 9/10.
Going to eleven, Mavic, and more
Many of you have heard that the new 2013 Dura Ace 9000 is going to 11-speed. You may have also heard that it requires yet another – newer – freehub. The splines are the same short style as the 9/10 freehub, but the total length of the freehub is longer by 1.85mm (to accommodate the additional cog). This means that if you have an old wheel with a 9/10 freehub, you cannot use it with an 11-speed cassette. You must buy a new wheel that is 11-speed. However, the 11-speed wheels are retro-fittable for 9 and 10-speed. They come with a 1.85mm spacer to take up the extra slack. If you have a 9-speed cassette, you only use the 1.85mm spacer. If you have a Shimano 10 cassette, you use the 1.85 PLUS the 1mm 10-speed spacer.
In a stroke of either luck or genius, Mavic wheels are already 11-speed compatible. Their wheels always included a 1.75mm Mavic spacer, because their freehub is extra long (by 1.75mm). This photo compares their spacer (right) with the Shimano 1mm spacer (left).
![]()
If you want to use 11-speed Shimano components with a Mavic wheel, simply use no spacers at all.
Charting it out
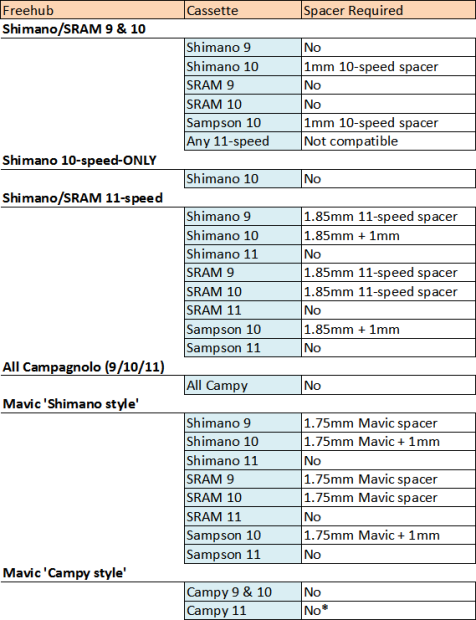
This is all really simple, right? I hear you – it’s not simple at all. In fact, I’m guessing that if you’ve read this far, your eyes are glazed over, and you might even be drooling a little. This is definitely an area of the bicycle that has become unnecessarily complicated. I personally understand how it works, but I’m a rare breed of nerd. For those of you for whom this type of stuff is not second nature, I put together a table that will hopefully clear things up.
The table covers most potential situations and setups of cassettes, but is by no means all-inclusive. I chose to include products and standards from Shimano, Campagnolo, SRAM, Mavic, and Sampson, as they are – in my view – the most common in the US, and also what I’m most familiar with. There are a handful of other cassettes out there – Miche, Wheels Manufacturing, and IRD – to name a few. If you happen to have one of these cassettes, my advice is to follow the manufacturer’s instructions, or call them with questions. Also, this entire topic will continue to evolve, as manufacturers jump on the 11-speed bandwagon… and inevitably move to 12-speed, or whatever comes next.
Update:
Some of our readers brought up the fact that their Mavic wheels required a special .55mm spacer to use with Campagnolo 11-speed. I inquired with Zack Vestal from Mavic for further detail; here is his response:
“The reason that some Campy 11 users need spacers is that the very first ½ production cycle [of wheels] in the early days was run before they realized the new cassettes - in some sizes - didn’t fully clear the hub flange. This was on a few wheels only. [For those wheels], a small ‘band-aid’ spacer was required. I think this may have even been limited to just a certain few R-Sys and Ksyrium wheels with taller, more blocky hub flanges. That’s why it’s just .55mm of spacer – just enough to push out the cassette a tiny bit.
In later versions, no spacer is required.”
--
All images © Greg Kopecky / slowtwitch.com
![]()

